Documents / Warranty Safety
Installation and User Guide for Fiamma Turbo-Vent Premium Rooflight
Comprehensive installation and operation guide for the Fiamma Turbo-Vent Premium rooflight. Includes wiring, mounting, Polar Control settings, and maintenance tips.
Table of contents
Manual images
Jump to the sectionQuick guide from the manual
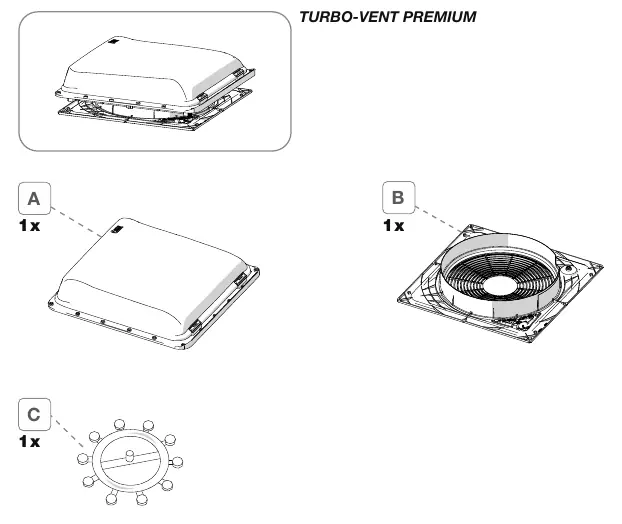
The Fiamma Turbo-Vent Premium is a rooflight designed for installation on vehicle roofs with a thickness between 30 mm and 85 mm. It requires a 12V DC power supply. Before installation, ensure the roof surface is flat and free from obstructions such as roof racks, cables, or internal reinforcements. The unit must be installed with the hinges facing the front of the vehicle.
Installation
Follow these steps to install the rooflight:
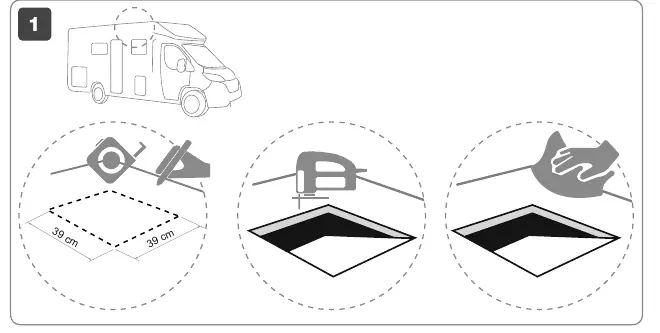
- Decide on the installation location and cut a square hole of 39 cm.
- Seal the lower part of the external frame with a minimum width of 30 mm using a recommended sealant (e.g., SIKALASTOMER-710, THEROSTAT II, or DEKALIN 1512).
- Place the external frame into the opening, ensuring the hinges face the front of the vehicle.
- Fasten the external frame using 20 self-tapping screws (Ø4.2x30mm).
- Apply silicone around the perimeter of the external frame, filling any gaps between the roof and the frame, and cover the screw heads.
- Connect the electrical cables to the motor.
- Fasten the internal frame using 8 self-tapping screws (Ø3.5x15mm).
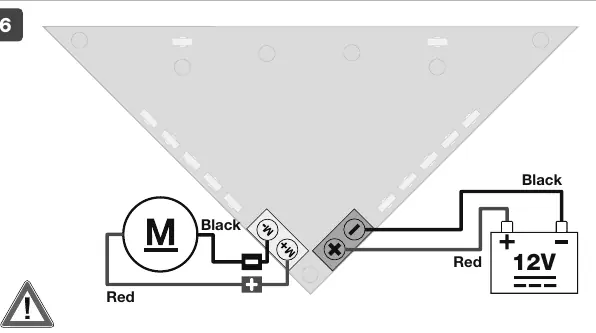
Electrical connection
The unit operates on 12V DC. Do not connect to 220V. Ensure the power supply is disconnected before performing any work. When connecting, pay strict attention to the polarity and position of the wiring as indicated in the diagram. Reconnect the power supply only after the installation is complete.
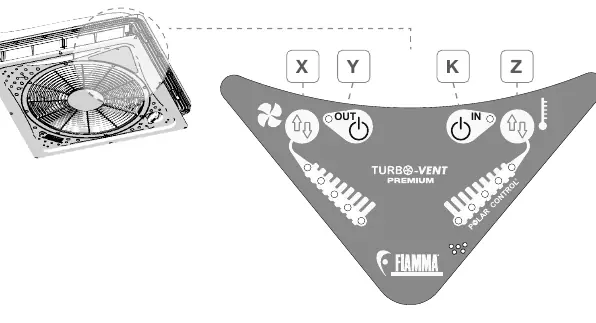
Operation
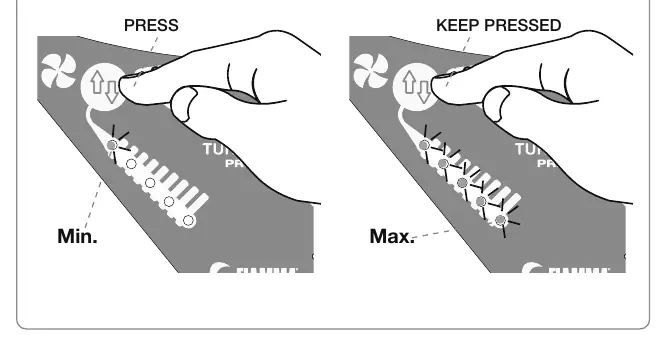
The Turbo-Vent Premium features a Polar Control function for automatic ventilation based on the set temperature difference (ΔT) and outdoor temperature. Use the control panel to adjust the desired ΔT. The fan will rotate until the target temperature is reached. Switching the Polar Control off and on resets the displayed room temperature. The control panel also allows for manual fan speed regulation.
Care and maintenance
Regularly check the tightness of all screws, especially after the first few kilometers and before/after long trips. If the opening/closing mechanism becomes stiff, lubricate it with a few drops of grease. Clean the unit using only neutral, non-aggressive detergents. For the Crystal cover, use an acrylic glass cleaner and a soft cloth to avoid scratches. Do not use alcohol-based cleaners, solvents, or abrasive products. The mosquito net can be cleaned with water and a neutral detergent.
Safety warnings
- Do not walk on the product cover.
- Ensure the rooflight is properly closed before driving.
- Do not open the rooflight while the vehicle is in motion.
- Do not open the rooflight during strong wind or rain.
- Remove snow or ice from the rooflight.
- Always comply with speed limits and traffic regulations.
Manufacturer information
Fiamma SpA
Practical help
Common problems
Opening/closing device is stiff or hard to operate
Lubricate the lid opening mechanism with a few drops of grease.
Fan does not operate
Check the 12V DC power supply and ensure the wiring polarity is correct.
Water leakage
Ensure the external frame is properly sealed with the recommended sealant and that all screw heads are covered with silicone.
Before use
- Verify roof thickness is between 30 mm and 85 mm.
- Ensure a 12V DC power source is available.
- Check for obstructions on the roof (cables, racks, reinforcements).
- Ensure the roof surface is flat.
- Remove protective plastic from the cover.
Specs in practice
- Nominal supply voltage
- 12V DC (Do not connect to 220V).
- Power consumption
- 36W at nominal voltage.
- Operating temperature
- -10°C to +70°C.
Images and diagrams
- The wiring diagram shows the correct connection of the motor to the 12V power source, emphasizing the importance of correct polarity.
- Installation diagrams illustrate the required 39cm square hole and the application of sealant.
- Control panel diagrams explain the functions of the Polar Control and fan speed regulation.
Model compatibility
- Compatible with roof thicknesses from 30 mm to 85 mm.
- Requires 12V DC power supply only.

Manual page author
David Miller
Documentation analyst
Organizes user manual content into clear summaries, with attention to model details, product context, and everyday usability.