Automotive / Navigation
Owner's Manual for Flamma FFO1 Dual Footswitch Stereo Looper Pedal
Quick guide for the Flamma FFO1 stereo looper pedal, covering setup, recording operations, data management via USB, and technical specifications.
Table of contents
Manual images
Jump to the sectionQuick guide from the manual
The Flamma FFO1 is a stereo looper pedal featuring 40 storage slots, 160 minutes of total recording time, and USB connectivity for data management. This document provides instructions on device operation, parameter settings, and computer data transfer.
Device Layout
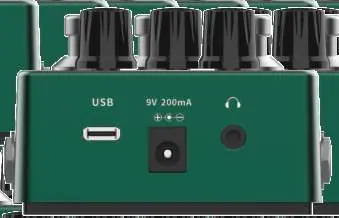
The pedal features two footswitches for control, two knobs for selection and volume, and an LED strip for status indication. Input and output jacks support stereo connections, and a USB-C port allows for computer data management.
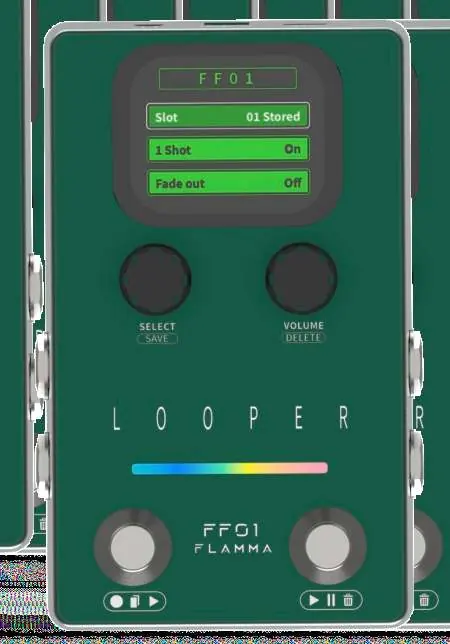
Looper Settings
Use the SELECT knob to navigate the menu on the screen. Available settings include:
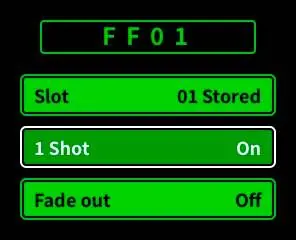
- Slot: Choose from 40 storage slots.
- 1 Shot: Enable/disable one-shot playback.
- Fade Out: Enable/disable or set fade-out time (1-5 seconds).
Looper Operations
- Record: Press the left footswitch in an empty track state.
- Dub & Play: Press the left footswitch during recording to overdub. Press the right footswitch to play without overdubbing.
- Undo/Redo: Press and hold the right footswitch for 1 second during playback.
- Stop: Press the right footswitch during playback.
- Delete: Press the right footswitch twice and hold for 1 second in playback mode, or hold for 1 second in stop mode.
Computer Data Management
Connect the FFO1 to a computer via USB. The device will appear as a removable disk. Open the WAVE folder to access subfolders W01-W40, which correspond to the 40 storage slots. You can drag and drop 44.1kHz/16Bit WAV stereo files into these folders. Ensure files are renamed to RECXX (e.g., REC01) to be recognized by the pedal.
Safety and Maintenance
- Use only a 9V 200mA power adapter with center negative polarity.
- Do not operate switches with excessive force.
- Keep the device away from water, humidity, and strong magnetic fields.
- Clean only with a dry cloth.
Practical help
Common problems
Unexpected noise during operation
Use an isolated power supply instead of sharing power with other devices.
Imported file not recognized
Ensure the file is a 44.1kHz/16Bit WAV stereo file and is renamed to the correct format (e.g., REC01).
Cannot use Undo/Redo function
This function is unavailable if no new layers have been overdubbed or after saving data.
Before use
- Verify the power adapter is 9V 200mA with center negative polarity.
- Ensure the device is placed away from sources of magnetic interference.
- Check that all audio cables are properly connected to the L/R input/output jacks.
- Disconnect power when the device is not in use for a long time.
Specs in practice
- Max. Record Time
- 4 minutes per storage slot.
- Input Impedance
- 2M ohm for instrument inputs.
Images and diagrams
- The layout diagram identifies the SELECT/SAVE knob (02), VOLUME/DELETE knob (03), and the two footswitches (05, 06).
- The rear panel diagram shows the USB-C port (11), 9V power jack (13), and 1/8 inch headphone output (12).
Model compatibility
- Supports Windows and macOS for data management via USB.
- Requires 44.1kHz/16Bit WAV stereo files for data import.

Manual page author
Michael Turner
Technical manual editor
Reviews PDF manuals for structure, safety notes, and practical product details so readers can find the right information quickly.