Lighting / Motion Sensor Lights
User Manual for FlinQ Solar Light Atalora 2-pack
Quick guide for the FlinQ Solar Light Atalora 2-pack (FQC8543). Includes installation instructions, operating modes, technical specifications, and safety precautions.
Quick answers from the manual
Quick answer
- The FlinQ Solar Light Atalora 2-pack is a solar-powered motion sensor light. It features two work modes (A and B) and can be installed via wall mount or hanging. It requires 8-10 hours of sunlight to fully charge. p. 2, 3
Key actions
- Switching Modes: Press the button 1st time (Mode A), 2nd time (Mode B), 3rd time (Off). p. 2
- Installation: Drill 6mm hole, insert plug, fix with screw. p. 3
First start
- Charge the lamp for 8-10 hours in strong sunshine before first use. p. 2
Problems and fixes
Light not working or short duration
Ensure it is installed in a location with sufficient sunlight.
p. 3Technical specifications
| Parameter | Value | Meaning | Pages |
|---|---|---|---|
| Brightness | 220LM | Light output | p. 2 |
| Battery | 18650, 3.7V, 1200mAh | Power storage | p. 2 |
Where to find it in the PDF
- Specifications p. 2
- Installation p. 3
Table of contents
Manual images
Click an image to enlargeQuick guide from the manual
This document provides instructions for the FlinQ Solar Light Atalora 2-pack (FQC8543). It covers the installation, operation, and maintenance of the solar-powered motion sensor light.
Specifications
- Brightness: 220LM
- Battery: 18650, 3.7V, 1200mAh, 4.44Wh
- PIR Sensor: 120° / 6 Meters
- Charging Time: 8-10 hours of strong sunshine
- Lighting Time: 40 hours
- Installation Height: 2-4M
- Housing Material: ABS+PC, anti-UV, antioxidant, V0 fireproof
Operating Modes
The light is controlled by a single button on the front:
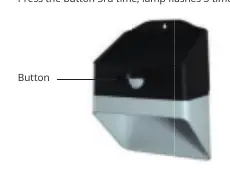
- 1st Press: Light turns on and enters Mode A.
- 2nd Press: Light flashes once and enters Mode B.
- 3rd Press: Light flashes 3 times and turns off.
Mode A: Automatically lights up at night, turns to full brightness when motion is detected (≤6m), and dims after 10 seconds of no motion.
Mode B: Automatically lights up at night, turns to full brightness when motion is detected (≤6m), and turns off after 10 seconds of no motion.
Installation
Both installation methods require drilling a hole with a diameter of 6mm and a depth of 50mm, then inserting the expansion plug.
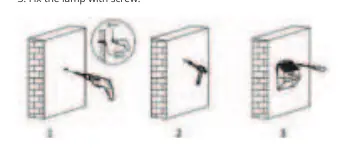
Wall Mount
- Drill the hole and insert the expansion plug.
- Fix the lamp to the wall using a screw.
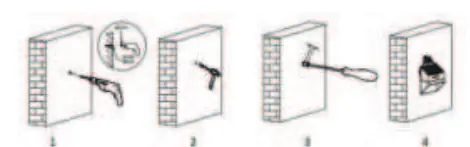
Hanging
- Drill the hole and insert the expansion plug.
- Fix the screw into the plug, leaving about 4mm protruding.
- Pull out the hook on the back of the lamp and hang it on the screw.
Cautions
- Install in a location with efficient sunlight.
- Lighting time depends on sunshine duration and the selected work mode.
- The built-in IC provides over-charge and over-discharge protection.
- The lamp charges even when turned off.
- Do not disassemble the lamp if you are not a professional.
- Dispose of the battery properly; do not throw it in household garbage.
Manufacturer information
FlinQ
Practical help
Common problems
Light does not turn on
Ensure the lamp is installed in a location with sufficient sunlight and has been charged for 8-10 hours.
Short lighting duration
Lighting time depends on the amount of sunshine received during the day and the selected work mode.
Before use
- Ensure the installation location receives efficient sunlight.
- Charge the lamp for 8-10 hours in strong sunshine before first use.
- Verify you have a drill with a 6mm bit for installation.
- Check that the mounting surface is suitable for the expansion plug.
Specs in practice
- Charging Time
- Requires 8-10 hours of strong sunlight to reach full charge.
- Installation Height
- Recommended height is between 2 and 4 meters.
Images and diagrams
- The button on the front of the lamp cycles through Mode A, Mode B, and Off.
- Installation diagrams show the drilling process (6mm hole, 50mm depth) and the two mounting options (Wall Mount vs. Hanging).
Model compatibility
- Designed for outdoor use.
- Solar-powered; requires direct sunlight for optimal performance.

Manual page author
Michael Turner
Technical manual editor
Reviews PDF manuals for structure, safety notes, and practical product details so readers can find the right information quickly.