Industrial / Cleaning Systems
User Manual for FOAMit FOG-IT-DS Electric Fog Unit
Quick guide for the FOAMit FOG-IT-DS electric fog unit. Learn how to install, set the timer, operate, and troubleshoot your industrial fogging system.
Table of contents
Quick Guide
The FOAMit FOG-IT-DS is an electric fog unit designed for industrial cleaning applications. This manual provides essential instructions for installation, timer configuration, and safe operation. Always ensure the unit is connected to a GFCI-protected 120VAC outlet and that all chemicals used are compatible with the unit's seals.
Safety Instructions
- Personal Protective Equipment: Always confirm PPE requirements with the Safety Data Sheet (SDS) of the chemical being used.
- Chemical Compatibility: Use only chemicals formulated for this application and compatible with unit materials and pump seals.
- Maintenance: Always depressurize the unit and disconnect from the power source before performing any maintenance.
- Grounding: Pump, valves, and containers must be properly grounded when handling flammable fluids.
- Flushing: Flush the unit with fresh water when switching between acidic and alkaline chemicals.
Timer Adjustment
The TR120DS-A is a repeat cycle timer. ON and OFF times can range from 1 second to 511 minutes.
- Select Interval: Move the top dip switch to the left for MIN (minutes) or to the right for SEC (seconds).
- Set Time: Use the next 9 dip switches to control the total active time. The switches represent increments of 1, 2, 4, 8, 16, 32, 64, 128, and 256. Combine the numbers of active switches (left position) to achieve the desired time.
- Indicator: The timer light is red when the output is off and green when the output is on.
Installation
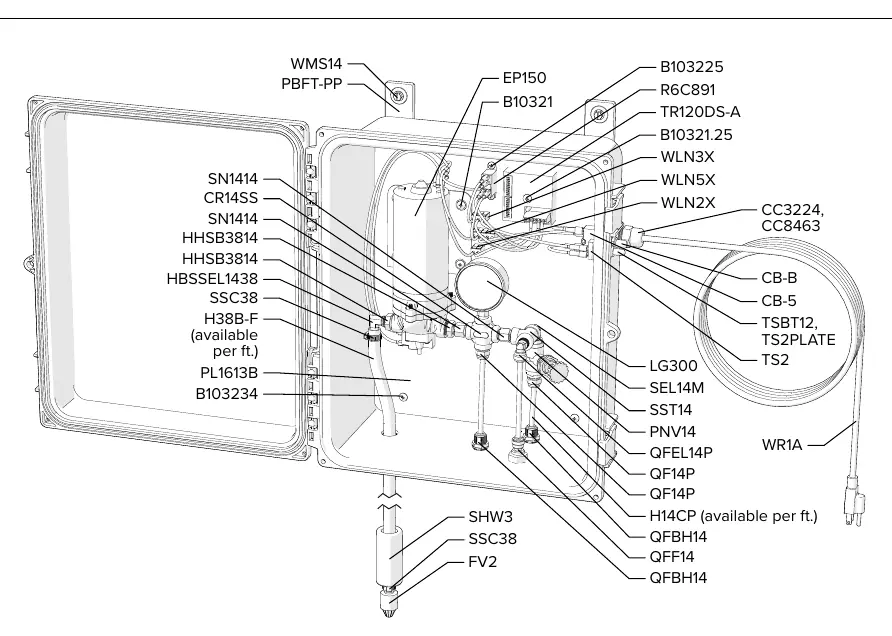
- Mount the control box to a vertical wall at a height of 6 feet or less.
- Ensure the chemical suction line reaches the bottom of the chemical container.
- Install quick connect elbows to the outlet fittings on the bottom of the control box.
- Run 1/4 inch tubing from the control box outlet to the fog nozzles.
- Install pressure relief tubing and ensure it dispenses back into the chemical container.
- Plug the unit into a GFCI-protected 120VAC power outlet.
Operation
- Prepare the area to be fogged.
- Verify timer settings.
- Turn the power switch to the ON position.
- Open the priming valve until solution flows through the line, then close it.
- Adjust the pressure relief valve until the liquid gauge reads below 150 psi. If the pump makes a hammering sound, open the pressure relief valve further.
Troubleshooting
- Pump not drawing chemical: Check suction line and strainer for debris. Repeat priming steps.
- Pump hammering: Adjust pressure relief valve until the pump equalizes (around 75 to 100 PSI).
- No product dispensed: Disassemble the nozzle and inspect for debris or build-up.
- Unit not turning on: Confirm power supply and verify timer settings.
Technical Data
- Electrical: 120 VAC at 60 Hz, 2 amps (GFCI protected).
- Liquid Temperature: 40-100°F (4.4-37°C).
- Output Distance: 3-5 ft. (0.9-1.5 m).
- Flow Rate: 7.8 oz/min (0.23 l/min) per nozzle.
- Capacity: One control box supports up to thirty nozzle assemblies.
Practical help
Common problems
Pump is hammering loudly
Adjust the pressure relief valve until the pump equalizes, typically around 75 to 100 PSI.
Pump is not drawing chemical
Check the chemical suction line and strainer for debris or damage. Repeat the priming procedure.
Product is not being dispensed through a fog nozzle
Disassemble the nozzle and inspect for any debris or build-up.
Unit is not turning on
Confirm that power is supplied to the unit and verify that the timer settings are correct.
Before use
- Inspect the unit for any damage or broken parts.
- Ensure all electrical power cords are positioned to avoid damage or tripping hazards.
- Verify chemical compatibility with the unit's seals via the SDS.
- Check that the chemical suction line and strainer are clean.
- Ensure the unit is connected to a GFCI-protected 120VAC outlet.
Specs in practice
- Liquid temperature range
- 40-100°F (4.4-37°C); do not exceed these limits.
- Electrical requirements
- 120 VAC at 60 Hz, 2 amps; requires a GFCI protected outlet.
- Output distance
- 3-5 ft. (0.9-1.5 m) from the nozzle.
- Nozzle capacity
- One control box can support up to thirty nozzle assemblies.
Images and diagrams
- The timer adjustment diagram shows the DIP switch configuration for setting ON and OFF times.
- The internal diagram illustrates the layout of the control box, including the pump, timer, and various valve connections.
Model compatibility
- Requires pre-mixed chemical solution.
- Designed for use with 1/4 inch outside diameter tubing between the control box and nozzles.

Manual page author
Emily Carter
User documentation editor
Prepares concise manual descriptions and highlights the most useful setup, operation, and maintenance information for readers.