Furniture / Beds & Mattresses
Assembly Manual for Francesco 180cm Headboard
Complete assembly and installation guide for the Francesco 180cm headboard. Includes step-by-step wall mounting instructions, hardware list, and care tips.
Quick answers from the manual
Quick answer
- The Francesco 180cm headboard must be mounted to the wall using the provided brackets and wall plugs to prevent tipping. p. 6, 7, 8
Key actions
- Mount the headboard to the wall using the provided brackets. p. 6, 7, 8
Problems and fixes
Missing parts
Contact the store with the assembly instructions.
p. 2Maintenance and reset
- Regularly check that all fasteners are tight and retighten if necessary. p. 9
Technical specifications
| Parameter | Value | Meaning | Pages |
|---|---|---|---|
| Dimensions | 1845 x 1250 x 95mm | Overall size of the headboard | p. 5 |
Where to find it in the PDF
- Assembly Instructions p. 2, 3, 4
- Parts List p. 5
- Installation Steps p. 6, 7, 8
- Care and Maintenance p. 9, 10
Table of contents
Manual images
Click an image to enlargeQuick guide from the manual
The Francesco 180cm headboard is designed for wall mounting. It is essential to install the wall fixings to prevent the furniture from tipping over. Ensure you have the correct wall plugs for your specific wall type, as they may not be included for all wall materials. Always tighten screws periodically after initial use.
Assembly preparation
Before starting the assembly, ensure you have a clear, organized space. It is recommended to use a carpet or blanket to protect the furniture and your floor from scratches. Identify all parts and count the hardware to ensure nothing is missing. Have the necessary tools, such as a hammer and screwdriver, ready.
Parts list
The hardware kit includes:
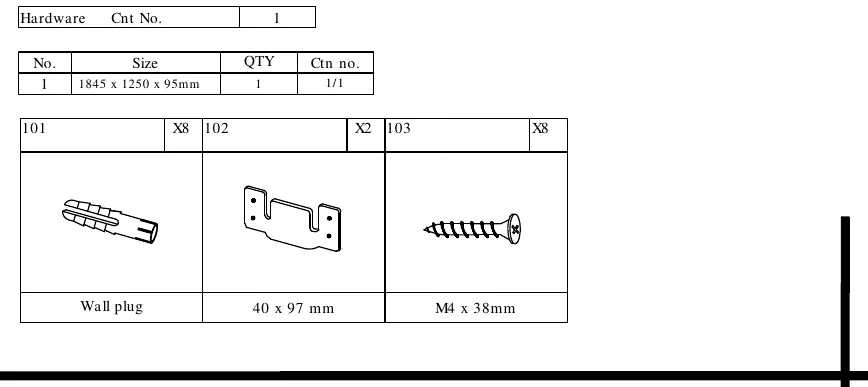
- Wall plugs (Item 101)
- Brackets (Item 102)
- Screws M4 x 38mm (Item 103)
Installation steps
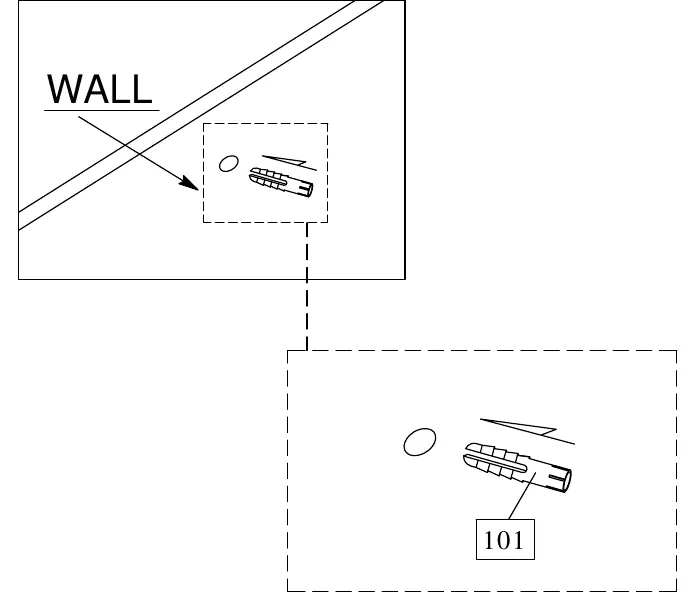
- Prepare the wall: Drill holes in the wall according to the spacing required for the headboard brackets.
- Insert plugs: Insert the PVC wall plugs (101) into the drilled holes.
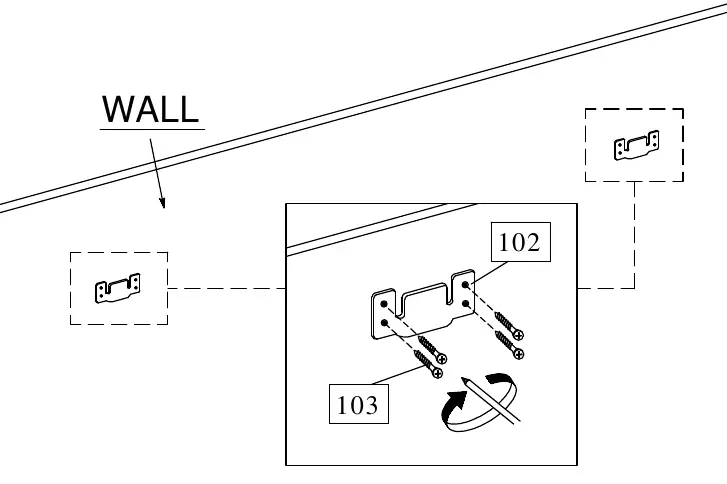
- Attach brackets: Secure the brackets (102) to the wall using the provided screws (103).
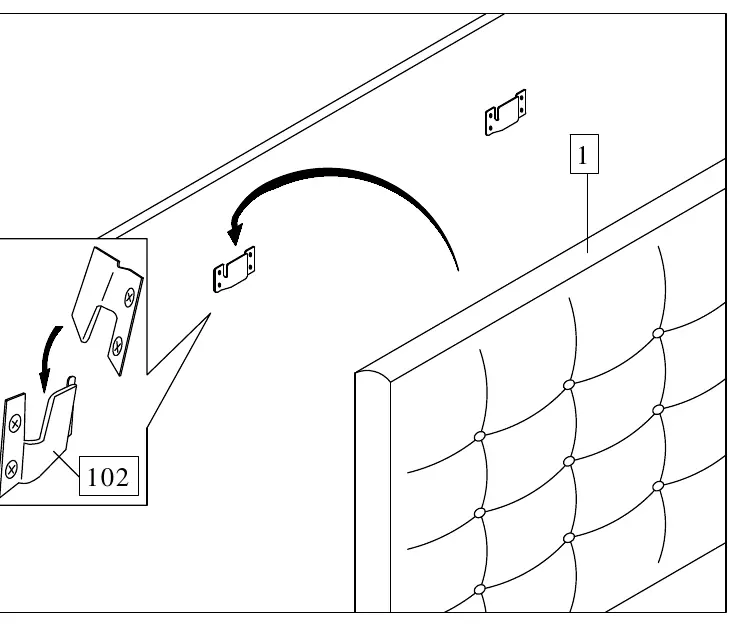
- Mount the headboard: Align the headboard with the wall-mounted brackets and hang it securely.
Care and maintenance
To keep your headboard in good condition:
- Dust regularly with a dry cloth.
- For stubborn stains, use a damp cloth with a mild detergent.
- Avoid using furniture polishes or sprays unless necessary.
- Regularly check that all fasteners are tight and retighten if necessary.
- Keep the product away from open fires or high heat sources like radiators.
Practical help
Common problems
Headboard feels unstable
Check that all wall fixings are secure and tighten the screws.
Missing parts
Keep the assembly instructions and contact the store where the item was purchased.
Before use
- Identify all parts and hardware
- Gather necessary tools (hammer, screwdriver)
- Clear a space for assembly
- Use a blanket or carpet to protect the floor
- Verify wall type for appropriate wall plugs
Images and diagrams
- Step 1: Drilling holes in the wall
- Step 2: Installing wall plugs
- Step 3: Attaching brackets to the wall
- Step 4: Mounting the headboard
Model compatibility
- Wall plugs may not be suitable for all wall types; special anchors may be required.

Manual page author
David Miller
Documentation analyst
Organizes user manual content into clear summaries, with attention to model details, product context, and everyday usability.