Tools / Welding Equipment
Quick Start Guide for Fronius iWave 190i and iWave 230i Welding System
Quick start guide for the Fronius iWave 190i and 230i gas-cooled welding systems. Includes assembly, gas cylinder installation, connection procedures, and power setup.
Table of contents
Manual images
Click an image to enlargeQuick Start Information
This guide provides essential steps for setting up the Fronius iWave 190i and 230i gas-cooled welding systems. Before operating the device, it is mandatory to read and understand all provided and online documentation. This document serves as a quick reference for physical assembly and connection.
Assembly
Use a TX25 tool for the assembly process. Ensure the power source is securely mounted to the cart and all screws are tightened according to the diagrams provided in the manual. Verify that the unit is stable before proceeding.
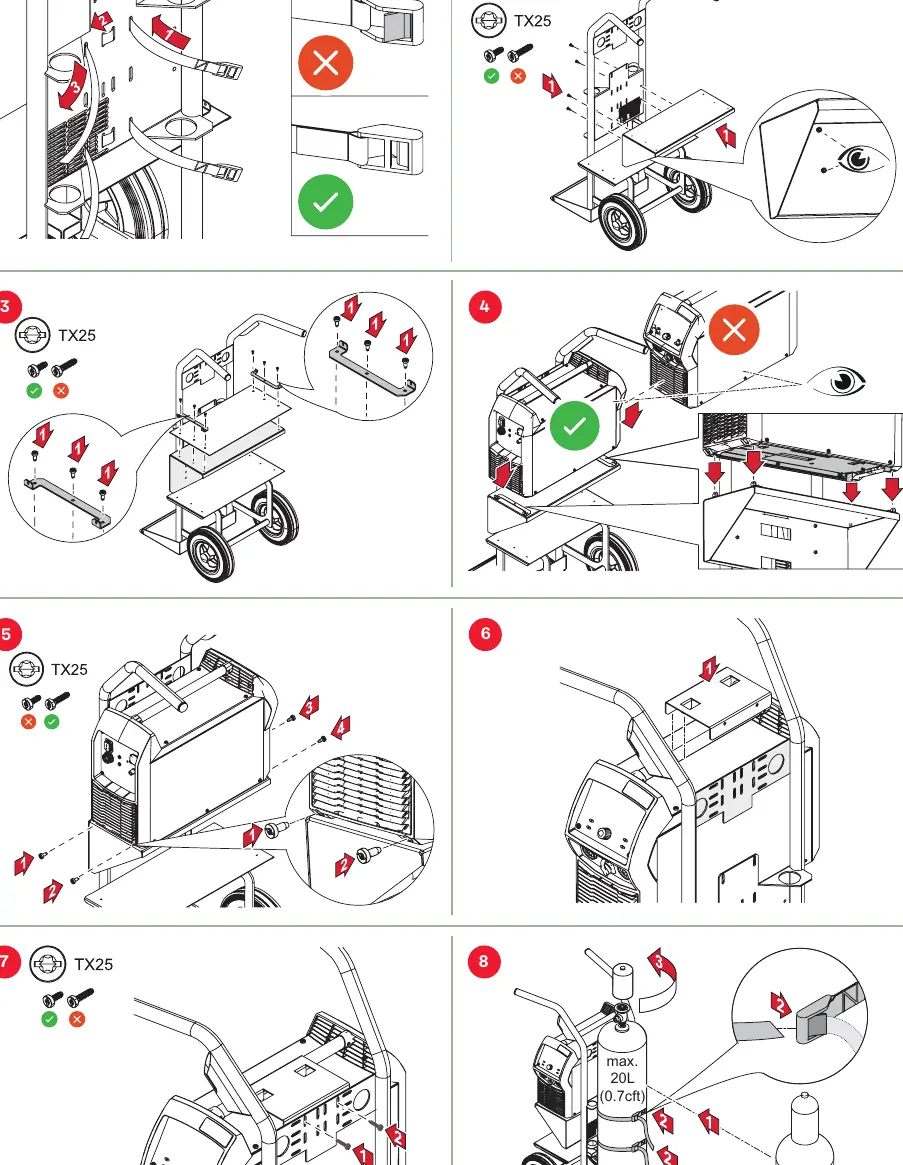
Gas Cylinder Installation

- Maximum cylinder size: 20L (0.7cft).
- Secure the gas cylinder firmly to the cart using the provided straps.
- Maximum gas pressure: 5 bar (72 psi).
- Ensure the regulator is correctly attached and secured.
Connections
Connect the welding torch and grounding cable to the appropriate ports on the front of the unit. Ensure all connections are fully inserted and locked in place. Check that the gas hose is properly connected to the regulator and the welding machine.
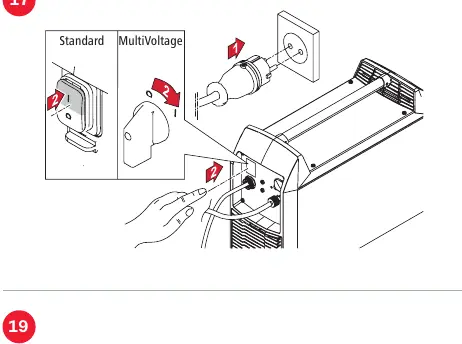
Power Connection
Connect the device to the appropriate power supply. For MultiVoltage models, ensure the correct voltage settings are applied before switching the unit on. Verify that the power cable is securely connected.
Support and Resources
For detailed operating instructions, troubleshooting, and advanced settings, refer to the e-Manuals available via the QR codes provided in the full documentation or at the Fronius website. For spare parts and service, visit spareparts.fronius.com or contact your local Fronius Sales & Service Partner.
Official resources from the manual
Manufacturer information
Fronius International GmbH
Practical help
Common problems
Gas pressure too high
Ensure the regulator is set to a maximum of 5 bar (72 psi).
Unstable assembly
Verify all screws are tightened using a TX25 tool and the power source is correctly seated on the cart.
Before use
- Read all provided and online documentation
- Verify gas cylinder size does not exceed 20L (0.7cft)
- Ensure all assembly screws are tightened with a TX25 tool
- Check that gas pressure is set to a maximum of 5 bar (72 psi)
- Verify all cable and torch connections are secure and locked
Specs in practice
- Max Gas Cylinder
- 20L (0.7cft)
- Max Gas Pressure
- 5 bar (72 psi)
Images and diagrams
- Steps 1-8: Cart assembly and power source mounting
- Steps 9-10: Gas cylinder connection and regulator setup
- Steps 11-13: Torch and grounding cable connection
- Steps 14-15: Gas pressure adjustment and power connection
- Step 17: MultiVoltage power setup
Model compatibility
- This guide applies to gas-cooled iWave 190i and 230i models.
- MultiVoltage models require specific power configuration.

Manual page author
David Miller
Documentation analyst
Organizes user manual content into clear summaries, with attention to model details, product context, and everyday usability.