Automotive / Towing Accessories
CURT 18220 Rooftop Cargo Bag Installation Instructions
Quick installation guide for the CURT 18220 Rooftop Cargo Bag. Learn how to properly load, secure, and maintain your cargo bag for safe travel.
Quick answers from the manual
Quick answer
- To install the CURT 18220, spread the bag on the roof rack, load heavy items first, close the zipper and flap, then secure the bag using the lashing straps attached to the rack's side bars, ensuring all slack is removed. p. 1
Key actions
- Secure the bag to the roof rack using lashing straps. p. 1
- Load the bag with heavy items first. p. 1
Problems and fixes
Excess webbing flapping
Tuck away and tie off excess webbing.
p. 1Maintenance and reset
- Examine the bag condition before each use and keep in good repair. p. 1
Where to find it in the PDF
- Installation and Maintenance p. 1
Table of contents
Manual images
Click an image to enlargeQuick guide from the manual
This document provides essential instructions for installing and using the CURT 18220 Rooftop Cargo Bag. The primary focus is on safe loading practices and secure attachment to your vehicle's existing roof rack. Always ensure you do not exceed the vehicle manufacturer's towing capacity or the roof rack's rated load capacity.

Installation
- Spread out the cargo storage bag onto the rooftop carrier.
- Unzip the cargo bag and begin loading, placing the larger, heavier objects in first. Continue to load the bag, placing smaller, lighter items on the top to create a compact load.
- Close the zipper, making sure the flap is pulled down to completely cover the entire zipper. Seal the bag with the provided hook and loop closures.
- Attach one end of the lashing strap to the rooftop carrier's side bars.
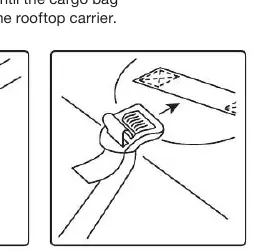
- Pull the strap through the loop on top of the cargo bag. Repeat the previous step by attaching the other end of the lashing strap to the adjacent side of the rooftop carrier.
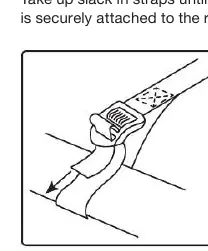
- Take up slack in straps until the cargo bag is securely attached to the rooftop carrier.
Warnings and safety
- Load Limits: Never exceed the vehicle manufacturer's recommended towing capacity or the roof rack's rated load capacity.
- Strap Security: When traveling, periodically check straps to ensure the load is securely held.
- Wind Noise/Flapping: Any excess webbing should be tucked away and tied off to prevent flapping while driving.
- Storage: After removing contents, remove the unit from the rooftop carrier and store it for safekeeping. Do not leave the empty cargo storage bag on the vehicle.
Maintenance
It is recommended that the general condition of any cargo bag be examined before it is used. Keep the cargo bag in good repair. Have necessary repairs made by qualified service personnel.
Practical help
Common problems
Excess webbing flapping while driving
Tuck away and tie off any excess webbing to prevent flapping.
Load feels loose or insecure
Periodically check straps during travel and take up any slack until the bag is securely attached.
Before use
- Verify the vehicle manufacturer's recommended towing capacity.
- Verify the roof rack's rated load capacity.
- Examine the general condition of the cargo bag for any damage.
- Ensure the bag is properly zipped and the flap covers the zipper completely.
Specs in practice
- Load Capacity
- Must not exceed the vehicle's or roof rack's rated capacity.
Images and diagrams
- Figure 1 shows the attachment of the lashing strap to the rooftop carrier side bars.
- Figure 2 illustrates pulling the strap through the loop on top of the cargo bag.
Model compatibility
- Designed to mount to an existing rooftop carrier.

Manual page author
David Miller
Documentation analyst
Organizes user manual content into clear summaries, with attention to model details, product context, and everyday usability.