Toys / RC Components
User Manual for FrSky X4R and X4R-SB Receiver
Comprehensive user guide for the FrSky X4R and X4R-SB 2.4GHz ACCST receivers. Includes instructions for binding, range checking, failsafe configuration, and connecting Smart Port sensors.
Quick answers from the manual
Quick answer
- To bind the X4R receiver, hold the F/S button on the receiver while connecting the battery, after putting the transmitter module into bind mode. p. 1
Key actions
- Binding the receiver p. 1
- Performing a range check p. 1
- Setting failsafe p. 2
First start
- Bind the receiver to the transmitter module before first use. p. 1
Problems and fixes
Signal loss
Check antenna separation and perform a range check.
p. 1Maintenance and reset
- To disable failsafe, re-bind the receiver. p. 2
Technical specifications
| Parameter | Value | Meaning | Pages |
|---|---|---|---|
| Operating Voltage | 4.0~10V | Voltage range for receiver operation | p. 1 |
| Weight | 5.8g | Physical weight of the unit | p. 1 |
Where to find it in the PDF
- Overview and Binding p. 1
- Failsafe and Connections p. 2
Table of contents
Manual images
Click an image to enlargeQuick guide from the manual
This manual covers the setup and operation of the FrSky X4R and X4R-SB receivers. Key procedures include binding the receiver to your transmitter, performing a pre-flight range check, and configuring failsafe settings to ensure model safety in case of signal loss.
Overview and Specifications
The X4R and X4R-SB are full-duplex telemetry receivers operating on 2.4GHz ACCST. Key specifications include:
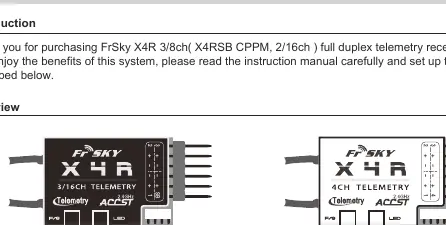
- Operating Voltage: 4.0 to 10V
- Operating Current: 100mA at 5V
- Weight: 5.8g
- Dimensions: 40 x 22.5 x 6mm
- Range: Full range (greater than 1.5km)
- Features: Smart Port enabled, RSSI PWM output (0-3.3V), firmware upgradeable.
Binding Procedure
Binding uniquely associates the receiver with a transmitter module. Follow these steps:
- Turn on the transmitter while holding the F/S button on the module (refer to module instructions for switch positions). Release the button; the RED LED on the module will flash.
- Connect the battery to the receiver while holding the F/S button on the receiver. The LED on the receiver will flash, indicating the binding process is complete.
- Turn off both the transmitter and the receiver.
- Turn on the transmitter and connect the battery. The GREEN LED on the receiver indicates it is receiving commands.
Range Check
Perform a pre-flight range check before every flying session:
- Place the model at least 60cm above non-metal ground.
- Ensure receiver antennas are separated and not touching the ground.
- Set the module antenna to a vertical position.
- Turn on the transmitter and receiver. Press the F/S button on the XJT module for 4 seconds to enter range check mode. The RED LED will turn off, and the GREEN LED will flash rapidly.
- Walk away from the model while operating controls to confirm normal operation.
- Press the F/S button on the XJT module for 1-2 seconds to exit range check mode.
Failsafe Configuration
Failsafe moves controls to a preset position if the signal is lost. To set it:
- Bind the receiver and turn on both the transmitter and receiver.
- Move the controls to the desired failsafe positions for all channels.
- Press the F/S button on the receiver briefly (less than 1 second). The Green LED will flash twice to confirm the setting.
To disable failsafe, re-bind the receiver. If failsafe is not set, the receiver will hold the last position before signal loss.
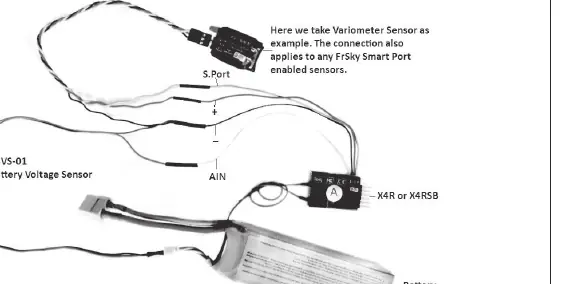
Connecting Smart Port Sensors
The Smart Port allows connection of sensors like the FBVS-01 voltage sensor. Refer to the connection diagrams in the manual for specific wiring. Always use heat shrink tubing on exposed wires to prevent short circuits during flight.
Manufacturer information
FrSky Electronic Co., Ltd.
Practical help
Common problems
Receiver not binding
Ensure the transmitter module is in the correct bind mode and the receiver F/S button is held while connecting the battery.
Signal loss during flight
Ensure antennas are separated and not touching the ground or metal parts. Perform a range check before flying.
Failsafe not working
If failsafe is not set, the receiver holds the last position. Manually set failsafe positions using the F/S button on the receiver.
Before use
- Bind the receiver to the transmitter module.
- Perform a pre-flight range check.
- Ensure antennas are separated and vertical.
- Configure failsafe positions for all channels.
- Check that the battery voltage is within 4.0-10V.
Specs in practice
- Operating Voltage
- 4.0-10V range; ensure your power source is within these limits.
Images and diagrams
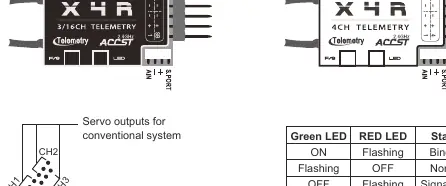
- Wiring diagram for servo outputs and SBUS/CPPM connections.
- LED status table for identifying binding and signal states.
- Connection chart for Smart Port sensors and FBVS-01 voltage sensors.
Model compatibility
- Not compatible with FrSky D-series modules.
- EU version only works with FrSky D16-EU mode.
- X4R/X4RSB supports D16 mode.

Manual page author
Michael Turner
Technical manual editor
Reviews PDF manuals for structure, safety notes, and practical product details so readers can find the right information quickly.