Toys / RC Components
FrSky ACCESS XM Receiver User Manual
Quick guide for the FrSky ACCESS XM receiver. Learn how to bind the receiver using Smart Match, configure Failsafe settings, and understand technical specifications.
Table of contents
Quick guide from the manual
The FrSky ACCESS XM is a compact 16-channel receiver designed for use with the FrSky ACCESS protocol. This guide provides essential information on binding, failsafe configuration, and technical specifications to help you set up your device quickly.
Overview
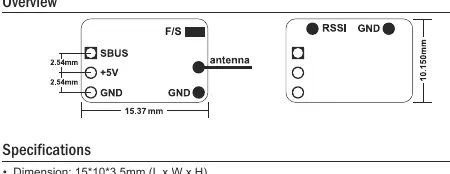
The receiver features an F/S button for binding and failsafe configuration, an antenna, and connection pins for SBUS, +5V, GND, and RSSI. Ensure the antenna is positioned correctly for optimal signal reception.
Specifications
- Dimensions: 15 x 10 x 3.5 mm
- Weight: 1g
- Operating Voltage: 3.5V - 10V
- Operating Current: 20mA at 5V
- Operating Range: >600m
- Channels: Up to 16CH via SBUS
- RSSI Output: Analog 0-3.3V
- Compatibility: Transmitters with ACCESS V1.1.2 or later
Registration & Automatic Binding (Smart Match)
The ACCESS protocol allows for binding without physically pressing the F/S button on the receiver in some cases. Follow these steps:
- Set your transmitter/module to [Reg] status (e.g., on Taranis X-Lite Pro: MENU-MODEL SETUP-PAGE 2, select Internal/External RF, then [Reg]).
- Connect the battery to the receiver while holding the F/S button. Both RED and GREEN LEDs will turn on, indicating [Reg] status.
- Select [ENTER] on the transmitter. The LEDs will flash, and the transmitter will display [Registration ok].
- Turn off the receiver.
- On the transmitter, select the receiver 1 [Bind] option.
- Connect the battery to the receiver. The GREEN LED will flash, indicating [Bind] status.
- Select the RX on the transmitter. Once the GREEN LED stays lit and the transmitter displays [Bind successful], binding is complete.
- Exit [Bind] mode on the transmitter. The GREEN LED will remain lit, and the RED LED will turn off, indicating normal operation.
Failsafe Configuration
Failsafe defines the channel output position if the control signal is lost. You can set this via the radio interface or the receiver button:
- Via Radio Interface: Navigate to MODEL SETUP/Internal RF/Failsafe on your transmitter.
- Via Receiver: After binding, move the channel to the desired position and perform a short press on the F/S button on the receiver.
Support
For further assistance, refer to the complete radio manual or visit www.frsky-rc.com. For technical support, contact [email protected].
Official resources from the manual
Manufacturer information
FrSky Electronic Co., Ltd.
Practical help
Common problems
Binding process fails
Ensure the transmitter is set to [Reg] status before connecting the battery to the receiver while holding the F/S button.
Channel 16 output is not working as expected
Press the F/S button for more than 5 seconds to toggle between RSSI and channel output.
Before use
- Verify your transmitter supports the ACCESS protocol (V1.1.2 or later).
- Ensure the power supply is within the 3.5V-10V range.
- Check that the antenna is clear of obstructions.
- Confirm the receiver is bound to the transmitter before flight.
Specs in practice
- Operating Voltage
- 3.5V-10V; do not exceed 10V to avoid damaging the receiver.
- Operating Range
- Greater than 600 meters under optimal conditions.
Images and diagrams
- The overview diagram illustrates the physical layout, including the F/S button, antenna, and the pinout configuration for SBUS, +5V, GND, and RSSI.
Model compatibility
- Requires a transmitter compatible with FrSky ACCESS protocol version 1.1.2 or higher.

Manual page author
David Miller
Documentation analyst
Organizes user manual content into clear summaries, with attention to model details, product context, and everyday usability.