Computers / Cooling Systems
Installation Guide for Gamdias Aeolus M2 1204R Case and Radiator Fan
Quick installation guide for the Gamdias Aeolus M2 1204R case and radiator fan. Includes step-by-step instructions for fan connection, RGB synchronization, and remote control setup.
Table of contents
Manual images
Click an image to enlargeQuick Guide from the Manual
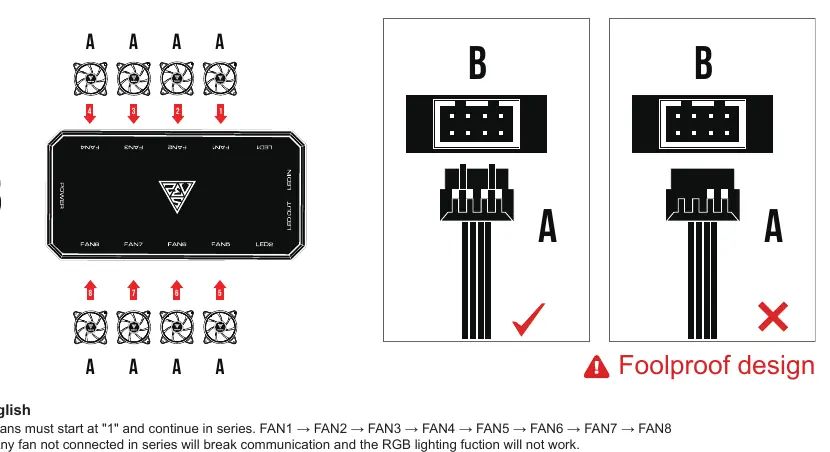
The Gamdias Aeolus M2 1204R system features a specific 'Foolproof design' for fan connections. Fans must be connected in series starting from FAN1 to FAN8 on the AEOLUS Box. Any fan not connected in this sequence will break communication, and the RGB lighting will not function. Additionally, the system only supports 5V 3-pin addressable (digital) RGB headers on motherboards; 12V headers are not compatible.
Package Contents
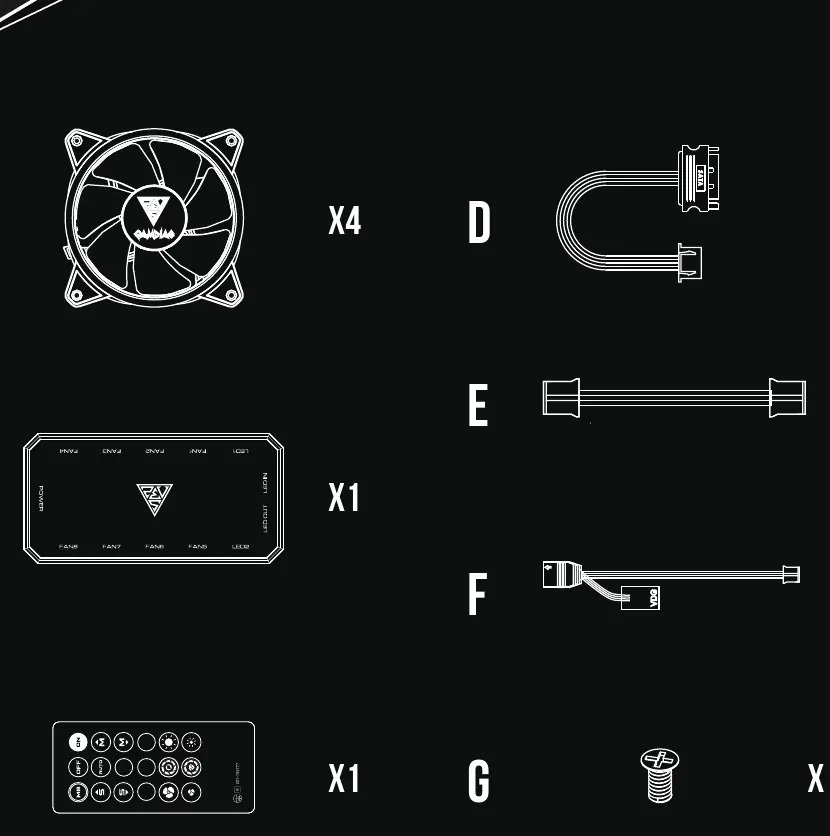
- 4x Fans
- 1x AEOLUS Box
- 1x Remote Controller
- 1x SATA Power Cable
- 1x RGB Sync Cable
- 1x Daisy Chain Cable
- 16x Screws
Installation Steps
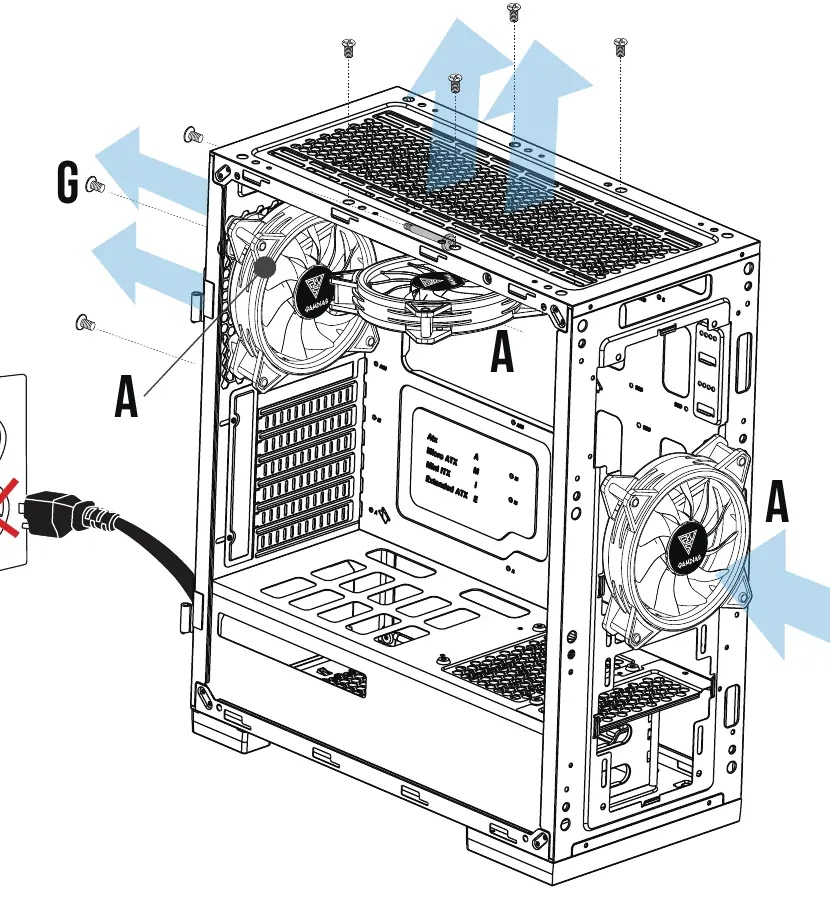

- Preparation: Turn off your computer and disconnect the power supply before starting installation.
- Fan Installation: Mount the fans into your computer case using the provided screws.
- AEOLUS Box Placement: Attach the AEOLUS Box to the computer case using the built-in magnet.
- Fan Connection: Connect the fans to the AEOLUS Box ports labeled FAN1 through FAN8. Ensure the sequence is continuous (FAN1 → FAN2 → FAN3, etc.).
- Liquid Cooler Support: The AEOLUS Box supports specific liquid coolers, including CHIONE P2-360R, P1A-360R, M1A-280R, M2-240R, M1A-240R, E2-120R, and E1A-120R.
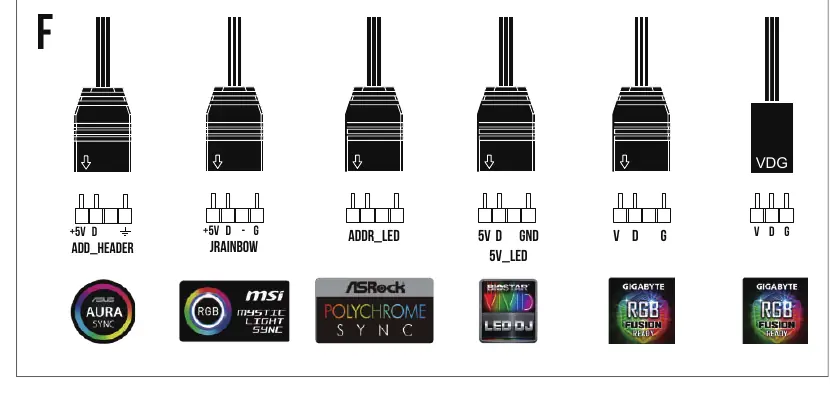
- Motherboard RGB Sync: If your motherboard has a 5V 3-pin addressable RGB header, connect the RGB sync cable to the AEOLUS Box and the motherboard to control lighting via software.
- Daisy Chaining: You can connect multiple AEOLUS Boxes together using the provided daisy chain cable for expanded lighting effects.
- Power Connection: Connect the SATA power cable from your power supply (PSU) to the AEOLUS Box.
- Finalization: Reconnect power and turn on your computer.
Remote Controller Operation
The remote controller allows you to manage lighting effects, fan speed, and brightness. Key functions include:
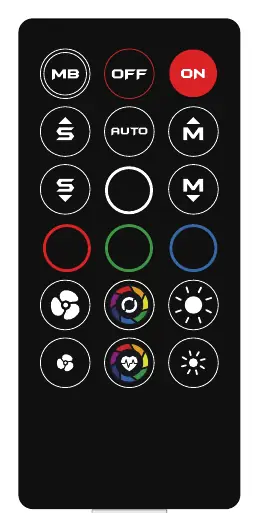
- ON/OFF: Turns the controller on or off. Note: If you press 'OFF', you must press 'ON' to reactivate.
- MB: Switches to motherboard sync mode.
- Mode/Lighting Effect: Adjusts lighting patterns.
- Light Speed/Fan Speed: Adjusts the speed of effects and fans.
- Brightness: Adjusts LED intensity.
Battery Replacement: The remote uses a CR2025 battery. Push the release tab and pull the battery tray to replace it.
Manufacturer information
GAMDIAS
Practical help
Common problems
RGB lighting is not working
Ensure all fans are connected in a continuous series starting from FAN1. Any break in the sequence (e.g., skipping a port) will disable communication.
Remote controller is unresponsive
Ensure the controller is activated by pressing the 'ON' button. If it still does not work, check if the CR2025 battery needs replacement.
Motherboard RGB sync is not working
Verify that you are using a 5V 3-pin addressable RGB header. The system does not support 12V RGB headers.
Before use
- Turn off the computer and disconnect the power cable.
- Verify all 4 fans and the AEOLUS Box are included in the package.
- Check your motherboard for a 5V 3-pin addressable RGB header.
- Ensure you have a CR2025 battery for the remote controller.
Specs in practice
- 5V 3-Pin Header
- Required for motherboard-controlled RGB lighting. Do not connect to 12V headers.
Images and diagrams
- Fan Connection: Fans must be plugged into the AEOLUS Box sequentially (FAN1 to FAN8).
- Daisy Chaining: Use the provided cable to link multiple AEOLUS Boxes together.
Model compatibility
- Compatible with Gamdias Chione liquid coolers: P2-360R, P1A-360R, M1A-280R, M2-240R, M1A-240R, E2-120R, E1A-120R.
- Only supports 5V addressable (digital) RGB headers.

Manual page author
Michael Turner
Technical manual editor
Reviews PDF manuals for structure, safety notes, and practical product details so readers can find the right information quickly.