Lighting / Fixtures
Installation Instructions for GE Lighting LED Buddy Downlight Tri-colour 18497L
Quick guide for the GE Lighting LED Buddy Downlight Tri-colour (18497L). Includes installation steps, clearance requirements, safety tips, and technical specifications.
Quick answers from the manual
Quick answer
- The 18497L is a dimmable LED downlight with selectable color temperatures (3000K/4000K/6500K). It requires a 90mm cut-out and is rated IC-4/IC-F for insulation contact. p. 1, 5
Key actions
- Install the downlight by cutting a 90mm hole, selecting the color temperature, and securing the unit with the spring clips. p. 2
First start
- Select the color temperature using the switch on the back of the luminaire before installation. p. 2
Problems and fixes
Buzzing or flickering
Ensure the dimmer is compatible and set to the maximum setting before turning on the light.
p. 1Maintenance and reset
- Clean with a soft, damp cloth. Ensure power is OFF and the unit has cooled down. p. 4
Technical specifications
| Parameter | Value | Meaning | Pages |
|---|---|---|---|
| Rated Wattage | 6.5 W | Power consumption | p. 5 |
| Cut-out Size | Ø90mm | Required hole diameter | p. 5 |
Where to find it in the PDF
- Installation Requirements p. 1
- Installation Directions p. 2
- Clearance Information p. 3
- Specifications p. 5
Table of contents
Manual images
Click an image to enlargeQuick Guide
The GE Lighting LED Buddy Downlight (18497L) is a dimmable, recessed LED luminaire with selectable color temperatures (3000K, 4000K, 6500K). It features an IC-4/IC-F rating, allowing it to be abutted against and covered by building insulation. Proper installation requires a 90mm cut-out and a compatible dimmer for optimal performance.
Installation Requirements
- Electrical: Ensure the installation location has access to a socket outlet connected to a wall light switch. All wiring must adhere to local rules (e.g., AS/NZS 3000).
- Mounting: The mounting point must support twice the weight of the luminaire.
- Insulation: The unit is rated IC-4/IC-F, meaning it can be covered by building insulation rated for 90°C.
- Dimming: Use only compatible dimmers. Using non-compatible dimmers may damage the unit and void the warranty.
- Safety: Ensure power is switched OFF before starting any electrical work.
Installation Directions

- Remove all packaging and check for missing components.
- Plug the luminaire into a socket outlet to test functionality before installation.
- Cut a 90mm diameter hole in the ceiling.
- Select the desired color temperature using the switch on the back of the luminaire.
- Insert the plug into the socket outlet and ensure it is fully connected.
- Push the springs up and install the module into the cut-out hole.
- Switch on the luminaire to test lighting functions.
Clearance Information
The luminaire must maintain specific clearances from structural members and building elements to prevent fire risks:
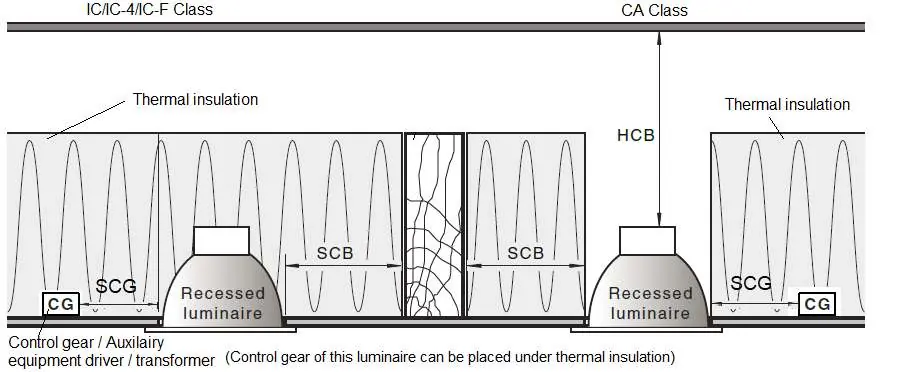

- HCB (Height clearance): 0 mm
- MIC (Minimum insulation clearance): 0 mm
- SCB (Side clearance to building element): 0 mm
- SCI (Side clearance to insulation): 0 mm
Safety Tips
- Always ensure power is OFF and the unit has cooled down before maintenance or cleaning.
- The light source is not replaceable; the entire unit must be replaced at the end of its life.
- Do not use if the diffuser is damaged or cracked.
- Clean with a soft, damp cloth. Do not soak or immerse in water.
- Ensure power leads and screws are secure before connecting power.
Specifications
- SKU: 18497L
- Rated Voltage: 220-240V~ 50Hz
- Rated Wattage: 6.5W
- Lumens: 800 lumens (at 4000K)
- Cut-out Size: 90mm
- IP Rating: IP44 (below ceiling), IP40 (inside ceiling)
- Weight: 0.16kg
Practical help
Common problems
Buzzing or flickering
Ensure the dimmer is compatible and set to the maximum setting before turning on the light, then adjust down.
Uneven light performance
This may occur when multiple luminaires are linked together; it is not a product fault.
Damaged diffuser
Do not operate the luminaire; return the complete product to the place of purchase.
Before use
- Ensure power is switched OFF.
- Check ceiling location for socket access.
- Verify mounting point supports 2x the weight of the luminaire.
- Check for transport damage.
- Select color temperature before installation.
Images and diagrams
- Fig 1: Cutting the 90mm installation hole.
- Fig 2: Selecting color temperature (3000K/4000K/6500K).
- Fig 3: Plugging the luminaire into the socket.
- Fig 4: Installing the module into the ceiling with springs.
Model compatibility
- Compatible with Lucci Power, Lucci Connect, and Buster + Punch dimmers.
- Some dimmers have a minimum load of 20W.

Manual page author
Michael Turner
Technical manual editor
Reviews PDF manuals for structure, safety notes, and practical product details so readers can find the right information quickly.