Home Appliances / Ice Makers
User Manual for Gevi Nugget Ice Maker GIMN-1000B
Quick guide for the Gevi GIMN-1000B Nugget Ice Maker. Learn how to set up, operate, clean, and troubleshoot your ice maker for optimal performance.
Table of contents
Manual images
Click an image to enlargeQuick Guide from the Manual
Important: Keep the ice maker in an upright position for at least 2 hours before plugging it in for the first time or after it has been heavily skewed or inverted during transport. This allows the refrigeration system to stabilize.
Setup and Installation
Proper placement is essential for the longevity and performance of your ice maker:
- Placement: Place the unit on a level surface. Ensure there is at least 6 inches of clearance on all sides for proper ventilation.
- Environment: Keep the unit away from heat sources (ovens, heaters) and corrosive gases. Operate in an ambient temperature between 50°F (10°C) and 90°F (32°C).
- Water Quality: Use water with a temperature between 46°F (8°C) and 82°F (28°C).
Operation
You can add water to the Gevi Nugget Ice Maker in two ways:
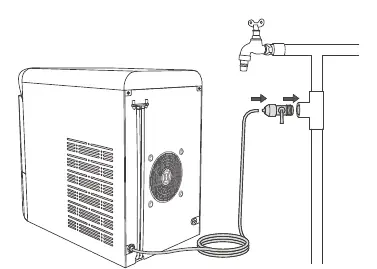
- Automatic: Connect the included 10ft 1/4" hose to the water inlet on the back of the unit and to a faucet adapter (not included).
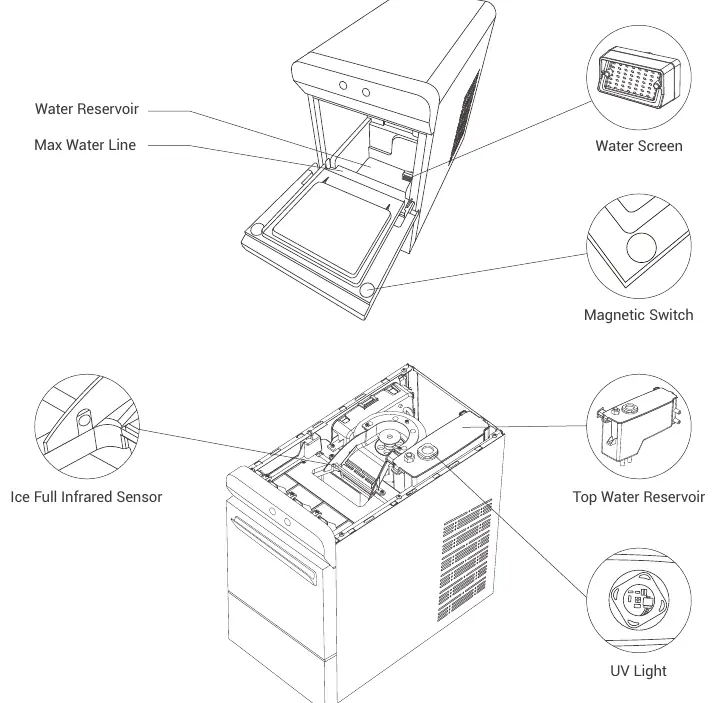
- Manual: Pour potable water directly into the water reservoir, ensuring you do not exceed the "Max" water line.
Control Panel:
- On/Off: Press to turn the machine on or off.
- Clean: Press and hold for 3 seconds to initiate the self-cleaning program.
- Indicators: The panel features status lights for ice making, self-cleaning, water supply, and full ice basket.
Cleaning and Descaling
It is recommended to clean the ice maker once a week to maintain ice quality and extend the machine's life.
- Remove all ice from the basket.
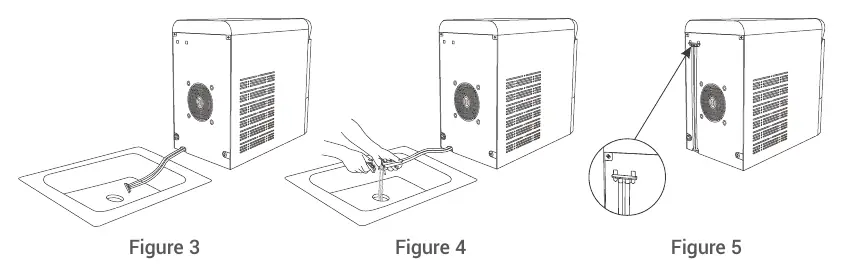
- Drain the unit using the drain hoses at the back.
- Pour a cleaning/descaling solution into the water reservoir and fill with water to the "Max" line.
- Press and hold the "Clean" button for 3 seconds.
- After the 5-minute cycle, drain the solution.
- Repeat the cycle with fresh water at least twice to rinse out residues.
Troubleshooting
If you encounter issues, check the following:
- "Add Water" indicator: Check if the water supply is connected or if the reservoir needs manual refilling.
- "Full" indicator: Empty the ice basket or check if the infrared sensor is blocked.
- No Ice: Ensure the ambient and water temperatures are within the specified operating ranges.
- Noise: Ensure the unit is on a level surface and not touching other objects.
Practical help
Common problems
"Add Water" indicator is on
Check if the water supply is functioning or add water manually to the reservoir.
"Full" indicator is on
Empty the ice basket or clean the infrared sensor if it is blocked.
No ice is being produced
Check that ambient temperature is 50-90°F and water temperature is 46-82°F. Ensure proper ventilation.
Excessive noise
Ensure the unit is on a level surface and not in contact with other objects.
Before use
- Keep the unit upright for at least 2 hours before plugging in.
- Ensure the unit is on a level surface.
- Maintain 6 inches of clearance on all sides.
- Run the self-cleaning program twice with fresh water.
- Verify the power source is 120V, 60Hz.
Images and diagrams
- The control panel diagram identifies the On/Off button, Clean button, and status indicators for ice making, cleaning, water level, and basket capacity.
- The water connection diagram illustrates how to attach the 10ft hose to the rear water inlet.
- The drainage diagram shows how to lower the drain hoses into a sink or bucket to empty the reservoir.
Model compatibility
- Requires a 120V, 60Hz, 15 amp grounded outlet.
- Do not use an extension cord unless it is rated for the appliance and has a grounding plug.

Manual page author
David Miller
Documentation analyst
Organizes user manual content into clear summaries, with attention to model details, product context, and everyday usability.