Lighting / Ceiling Fans
User Manual for Summit 100LB. Ice Machine
Quick guide for the Summit 100LB. Ice Machine (BIM100, SCIM101, ALIM100). Includes installation, operation, cleaning, sanitizing, and troubleshooting steps.
Table of contents
Manual images
Click an image to enlargeQuick guide from the manual
Before using your Summit 100LB. Ice Machine, ensure it has been standing upright for at least two hours to allow the cooling system to stabilize. The unit must be properly grounded and connected to a water supply with pressure between 20 and 80 psi. Before consuming any ice, run two full batches and discard them to ensure the system is clean and sanitary.
Installation
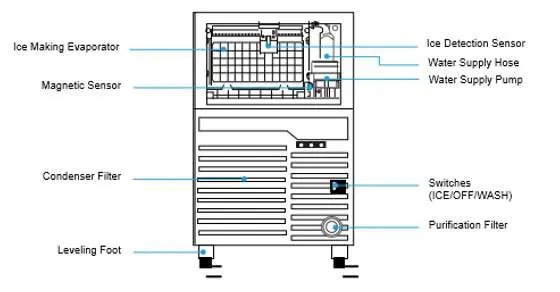
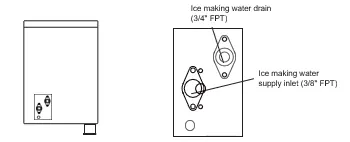
Place the ice maker on a floor strong enough to support it when fully loaded. Use the leveling feet to ensure the unit is stable. Connect the water supply using a 3/8" pipe and the drain using a 3/4" pipe. Install the included purification filter by removing the punch-out on the lower right front panel and turning the filter clockwise until locked.

Operation
The unit features a power switch with three positions: ICE, OFF, and WASH. Set the switch to ICE to begin production. The unit includes an automatic sensor to stop ice making when the bin is full. The ice thickness can be adjusted via the control screw (counter-clockwise for thinner, clockwise for thicker).
Cleaning and Sanitizing
Perform cleaning approximately once per month. Unplug the unit before cleaning. Use a solution of 10g of neutral detergent (such as baking soda) in 3L of warm water to clean the ice basin and water tank. To sanitize, use the WASH mode with a sanitizing liquid. Always dispose of the first batch of ice produced after any cleaning or sanitizing procedure.
Troubleshooting
If the unit does not operate, check the power connection and switch position. If ice is not forming, ensure the water supply is open and the filter is not clogged. If the unit is noisy, check the leveling feet. For persistent issues, contact technical support at 718-893-3900 ext. 513 or [email protected].
Practical help
Common problems
Ice maker does not operate
Check if the unit is plugged in, the switch is in the ON position, and the unit is level.
Water is not supplied
Ensure the water supply valve is open and the water supply hose is properly installed.
Ice is not well formed
Check for dust on the front filter panel, ensure the unit is away from heat sources, and adjust the thickness sensor screw.
Loud or strange sounds
Adjust the leveling feet to ensure the unit is on a stable, level surface.
Water does not drain properly
Remove any foreign materials from the drain hose.
Before use
- Remove all exterior and interior packaging.
- Attach the four leveling feet.
- Let the appliance stand upright for approximately two hours.
- Clean the interior surface with lukewarm water.
- Ensure water pressure is between 20 and 80 psi.
- Run two full batches of ice and discard them.
Specs in practice
- Maximum Ice Making
- 50kg (110.2 lbs) per day based on 10°C ambient temperature.
- Operation Temperature
- 5 to 38°C (41 to 100.4°F).
- Ice Thickness Default
- 3.2mm (.012").
Images and diagrams
- The front panel contains the power switch and the purification filter access.
- The rear panel provides access to the water supply connection and drainage.
- The interior view shows the ice making evaporator, sensors, and water pump.
Model compatibility
- Requires a 3/8" diameter pipe for water supply.
- Requires a 3/4" pipe for water drainage.
- Do not use if ambient temperature is below 5°C.

Manual page author
Michael Turner
Technical manual editor
Reviews PDF manuals for structure, safety notes, and practical product details so readers can find the right information quickly.