Computers / Laptops
User Manual for GIGABYTE G7 Laptop
Quick start guide and user manual for the GIGABYTE G7 laptop. Includes setup instructions, port layout, hotkey functions, system backup, and recovery procedures.
Table of contents
Manual images
Click an image to enlargeQuick Start Guide
Follow these steps to set up your GIGABYTE G7 laptop for the first time:
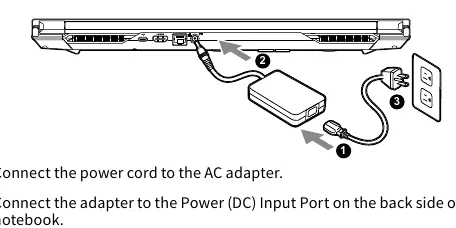
- Connect the power cord to the AC adapter.
- Connect the adapter to the Power (DC) Input Port on the back side of the notebook.
- Connect the power cord to a grounded power outlet.
- While the Battery Indicator lights on, press the Power Button to turn on the notebook.
Important: Do not turn off the notebook until the operating system has been configured. Audio volume will not function until Windows Setup is completed.
Notebook Tour
The GIGABYTE G7 features various ports and components:
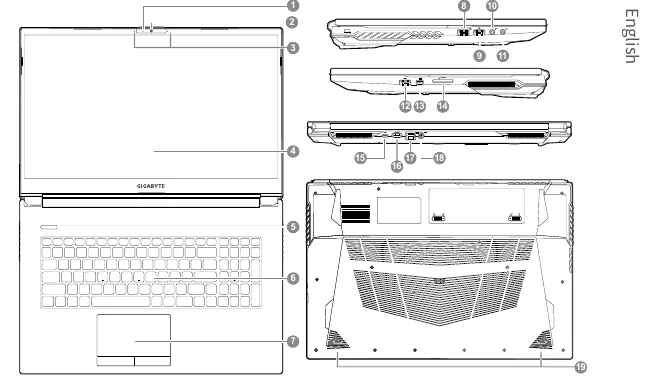
- Webcam & Microphone: Located at the top of the display panel.
- Connectivity: Includes USB 3.2 (Type-A and Type-C), USB 2.0, HDMI, Mini Display Port, SD Card Reader, Ethernet (LAN) port, and an Audio Combo Jack.
- Power: DC Input Port located on the back.
- Input: Keyboard and Touchpad.
Hotkeys
The computer uses hotkeys for quick control. Press and hold the Fn key before pressing the corresponding key:
- Fn + F1: Touchpad Toggle
- Fn + F2: Turn LCD Backlight OFF
- Fn + F3: Mute Toggle
- Fn + F5/F6: Volume Decrease/Increase
- Fn + F8/F9: Brightness Decrease/Increase
- Fn + F10: PC Camera Power on/off
- Fn + F11: Airplane Mode Toggle
- Fn + F12: Sleep Toggle
- Fn + Esc: Control Center Toggle
- Fn + !: Fan Automatic Control/Full Power
System Backup
You can create a recovery USB flash drive to restore your system in case of storage replacement or device damage.
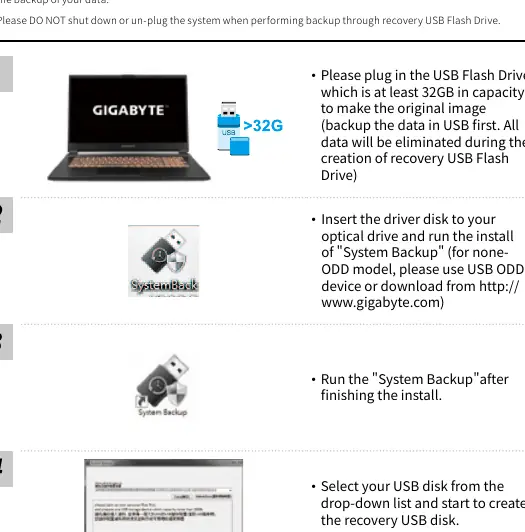
- Plug in a USB Flash Drive with at least 32GB capacity.
- Run the System Backup application (install from the driver disk or download from the GIGABYTE website).
- Select your USB disk from the drop-down list and start the creation process.
- To restore, press F12 during system startup and select boot from recovery USB Flash Drive.
System Recovery
If the operating system fails, you can use the hidden recovery partition to restore factory settings.
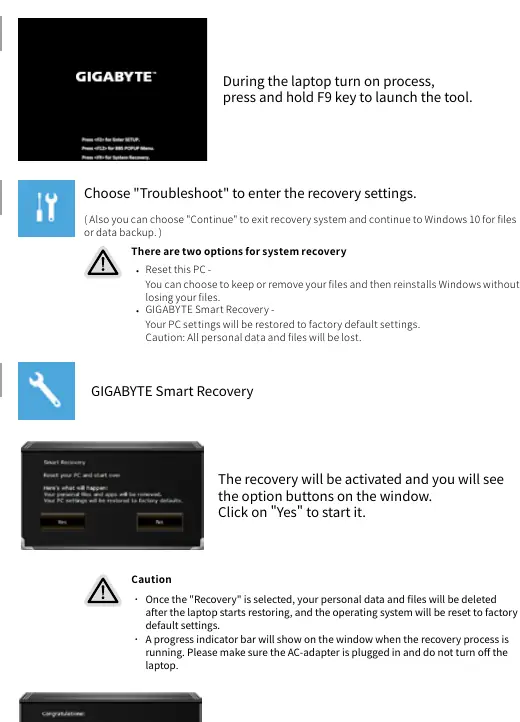
- Turn off and restart the laptop.
- During startup, press and hold F9 to launch the recovery tool.
- Choose Troubleshoot to enter recovery settings.
- Select GIGABYTE Smart Recovery to restore factory default settings.
Caution: All personal data and files will be lost during the recovery process. Ensure the AC adapter is connected.
Safety and Maintenance
- Do not remove the built-in lithium battery.
- Avoid installing the laptop on slanted surfaces or areas prone to vibrations.
- Do not store or use the laptop in direct sunlight or temperatures exceeding 112°F (45°C).
- Ensure vents on the side or bottom are not blocked to prevent overheating.
Manufacturer information
Gigabyte Technology Co., Ltd.
Practical help
Common problems
Audio not working after first boot
Volume will not function until Windows Setup is completed.
System overheating
Ensure vents on the side or bottom are not blocked and do not use on soft surfaces like bedding or cushions.
Recovery option not available
The recovery function is only available on devices with a preinstalled OS. Devices with DOS do not have this function.
Before use
- Connect power cord to AC adapter.
- Connect adapter to the DC input port on the laptop.
- Connect power cord to a grounded power outlet.
- Ensure the power adapter matches the laptop's input/output rating.
- Ensure the socket outlet is near and easily accessible.
Specs in practice
- Input voltage
- 100-240Vac
- Input frequency
- 50-60Hz
- Rating output voltage
- 19.5 Vdc / 9.23 A
Images and diagrams
- The power connection diagram shows the power cord connecting to the AC adapter, which then connects to the DC input port on the back of the laptop.
- The notebook tour diagram identifies 19 components, including webcam, ports, and speakers.
Model compatibility
- Recovery function is only available on devices with preinstalled OS.
- Devices with DOS do not have the recovery function.

Manual page author
Emily Carter
User documentation editor
Prepares concise manual descriptions and highlights the most useful setup, operation, and maintenance information for readers.