Computers / Laptops
Wireless Card Replacement Guide for HP Mini 110-1046NR
A comprehensive step-by-step guide for replacing the wireless card in an HP Mini 110-1046NR netbook. Includes detailed instructions for battery, keyboard, hard drive, and bezel disassembly.
Table of contents
Manual images
Click an image to enlargeQuick Guide for Wireless Card Replacement
This guide provides the necessary steps to access and replace the wireless card in an HP Mini 110-1046NR. The process requires significant disassembly of the netbook, including the battery, keyboard, hard drive, and keyboard bezel. Please ensure you have the correct tools and a clean workspace before beginning.
Tools Required
- Phillips #00 Screwdriver
- Phillips #0 Screwdriver
- Phillips #1 Screwdriver
- Spudger
- iFixit Opening Tools
Disassembly and Replacement Procedure
Battery and Keyboard Removal
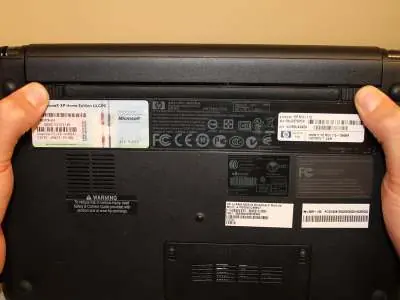
Start by powering off the netbook completely. Flip the device over and slide the battery tabs inward to release and remove the battery. With the screen closed, locate the three 2.9mm screws in the battery slot and remove them. Flip the netbook upright, open the screen, and use a spudger to pry up the keyboard from the top edge. Caution: Do not pull the keyboard away immediately, as it is connected to the motherboard by a fragile ribbon cable. Pivot the keyboard toward you and release the ribbon cable by flipping up the black tab on the connector.

Hard Drive and Bezel Removal
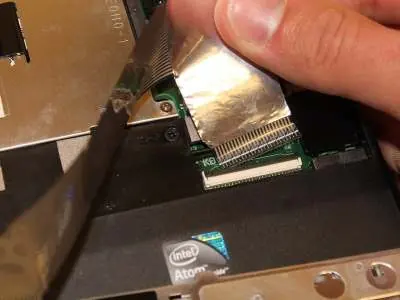
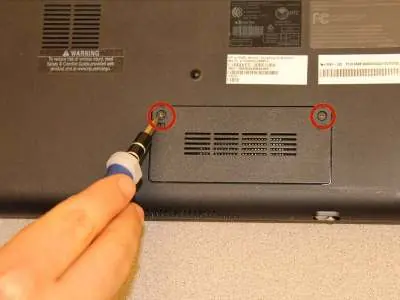
Remove the three screws securing the hard drive (two silver 3.4mm screws on the right, one black 10.3mm screw on the left). Pull the hard drive to the left using the black tab to unplug it. Flip the netbook over to remove the memory card cover screws. Remove the 4.9mm screw near the memory card. Pry the four rubber feet on the bottom of the case to reveal and remove the 6mm screws underneath. Flip the netbook over again and remove the eight 5.9mm screws securing the keyboard bezel. Use a spudger to pry the bezel away from the base, being careful of the touchpad ribbon cable.
Wireless Card Replacement
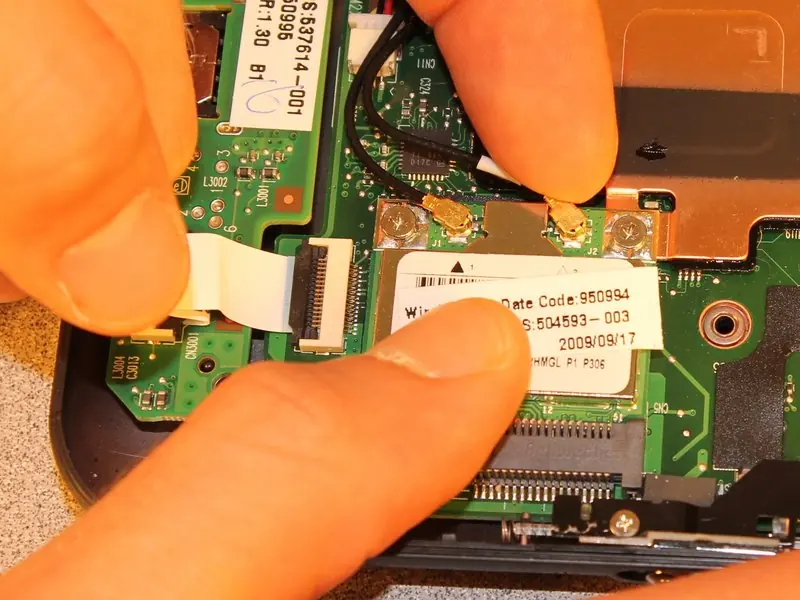
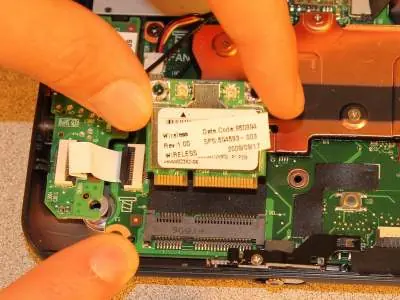
Once the bezel is removed, locate the wireless card. Use a pry stick to pop off the two antenna cables from the rearward edge of the card. Note: The cable with the white band must connect to the connector labeled 'J2'. Remove the two 3.4mm screws holding the card down. The card is spring-loaded and will pop up; slide it out of the receptacle. To install the new card, ensure it is fully seated in the receptacle before pushing it down to re-insert the screws.
Important Warnings
- Always power off the device and remove the battery before starting any internal work.
- Handle all ribbon cables with extreme care to avoid damage.
- Keep track of different screw sizes; using the wrong screw in the wrong hole can damage the casing or internal components.
- Place the hard drive in an anti-static bag after removal to prevent static damage.
Manufacturer information
HP Inc.
Practical help
Common problems
Wireless card not detected
Ensure the card is fully seated in the receptacle and that both antenna cables are securely attached to the correct terminals (J1 and J2).
Keyboard ribbon cable damage
Be extremely gentle when prying the keyboard; the ribbon cable is fragile and easily torn.
Difficulty removing keyboard bezel
Ensure all eight 5.9mm screws are removed from the bottom of the netbook before attempting to pry the bezel.
Before use
- Power off the netbook completely.
- Remove the battery.
- Prepare a magnetic screwdriver for small screws.
- Use an anti-static bag for the hard drive.
- Ensure you have the correct Phillips screwdrivers (#00, #0, #1).
Specs in practice
- Phillips #00 Screwdriver
- Used for small internal screws.
- Phillips #1 Screwdriver
- Used for larger chassis and hard drive screws.
Images and diagrams
- The antenna cable with the white band must connect to the connector labeled 'J2' on the wireless card.
Model compatibility
- This guide is specific to the HP Mini 110-1046NR model.

Manual page author
Michael Turner
Technical manual editor
Reviews PDF manuals for structure, safety notes, and practical product details so readers can find the right information quickly.