Health / Medical Devices
User Manual for GIMA 1200G ECG Electrocardiograph
Quick guide for the GIMA 1200G ECG 12-channel electrocardiograph. Includes setup, lead placement, operation, maintenance, and troubleshooting instructions.
Table of contents
Manual images
Click an image to enlargeQuick guide from the manual
The GIMA 1200G ECG is a 12-channel electrocardiograph designed for hospital, research, and ambulance use. It features a high-resolution color LCD, touch screen operation, and automated ECG analysis. The device can be powered by AC or its built-in rechargeable lithium battery.
Safety Precautions
- Ensure the device is placed on a flat, stable surface and avoid strong vibrations.
- The device must be connected to a power supply with protective grounding.
- If used with a defibrillator, use only defibrillation-proof electrodes and lead cables.
- Do not use the device in the presence of flammable anesthetic gases or in hyperbaric oxygen chambers.
- Keep the device away from high-power equipment like X-ray machines or mobile phones to avoid interference.
Device Overview
Front and Side Views
The front panel includes the paper compartment cover, display screen, and button area. The side panel features the lead cable interface, USB interface for data transmission, network interface, mains power switch, input socket, and equipotential terminal.
Buttons
The control panel includes buttons for power (ON/OFF), speed adjustment (SPEED), sensitivity (SEN), filter settings (FILTER), print mode (MODE), printing (PRINT), and navigation (Direction buttons).
Installation
Recording Paper
Lift the paper compartment cover, insert the roll paper with the grid side facing downwards, and ensure it is aligned with the slot.
Power Supply
Connect the provided 3-core power cord to the input socket. The device automatically grounds when connected to a properly wired AC outlet. Use the potential equalization wire when connecting to other medical equipment.
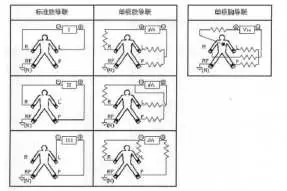
Lead Cable and Electrode Installation
Connect the lead cable to the interface on the device. For chest electrodes (C1-C6), clean the skin with alcohol and apply conductive paste. For limb electrodes, place them on the soft skin of hands and feet after cleaning and applying conductive paste.
Operation
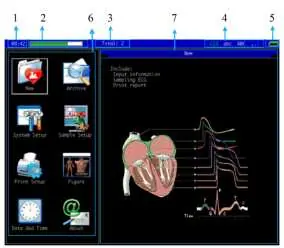

Main Interface
The main interface allows access to sampling, case management, system settings, and lead placement diagrams. Use the touch screen or keyboard to navigate.
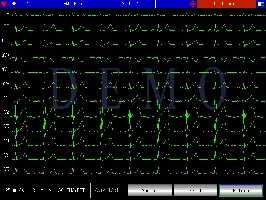
Sampling
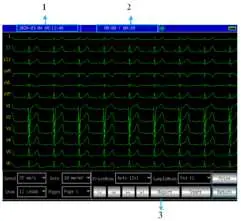
Enter the sampling interface to collect and display ECG waveforms. You can switch between 1, 3, 6, and 12-lead display modes. The device supports automatic and manual printing modes.
Case Management
The device stores medical records. You can query, modify, delete, and export case information via the USB interface. Exported files can be in JPEG, BMP, aECG (HL7), or DAT formats.
Maintenance
- Battery: The device has a built-in rechargeable lithium battery. Charge it fully before use. If not used for a long period, recharge every 3 months.
- Cleaning: Clean the device with neutral detergents. Do not use alcohol-based cleaners on the lead cables. Clean the thermal print head with a soft cloth dampened with alcohol at least once a month.
- Fuse: If the fuse blows, replace it with a T1.6A L250V fuse.
Troubleshooting
- Too large interference: Check grounding, ensure electrodes are connected correctly, and verify the patient is not touching metal parts of the bed.
- Baseline drift: Ensure electrode installation is stable and the patient is not moving.
- Unclear waveform: Charge the battery, clean the printer head, or replace the thermal paper.
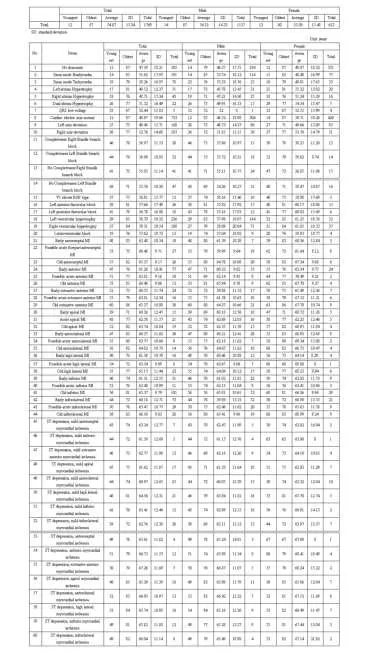
Automated Measurement & Interpretation
The device provides automated measurement of parameters like HR, PR-interval, P-duration, QRS-duration, and QT/QTc. It also offers automated interpretation of ECG findings, such as sinus bradycardia, tachycardia, or various myocardial infarction patterns. Note that these results should always be reviewed by a professional doctor.
Manufacturer information
Gima S.p.A.
Practical help
Common problems
Too large interference or disorderly waveform
Check grounding, ensure lead cables are connected correctly, and verify the patient is not touching metal parts of the bed.
Baseline drift
Check electrode stability, ensure skin is cleaned and conductive paste is applied, and check for patient movement.
Unclear waveform
Charge the battery, clean the printer head with alcohol, or replace the thermal paper.
Auto shutdown
Battery is low or AC power voltage is too high.
Before use
- Ensure the device is on a flat, stable surface.
- Check that the power cord is 3-core and properly grounded.
- Verify battery level and status.
- Clean skin with alcohol and apply conductive paste before electrode placement.
- Ensure lead cables are correctly connected and fastened.
Specs in practice
- Thermal printing system
- Uses high-speed thermal paper for waveform output.
- Class I type CF
- Safety type with defibrillation-proof applied part.
Images and diagrams
- Figure 6-3: Shows correct chest electrode placement (C1-C6).
- Figure 6-4: Shows limb electrode placement.
- Figure 4-6: Schematic diagram of control buttons.
Model compatibility
- Use only company-recommended accessories.
- If used with a defibrillator, use defibrillation-proof electrodes and lead cables.

Manual page author
David Miller
Documentation analyst
Organizes user manual content into clear summaries, with attention to model details, product context, and everyday usability.