Smart Home / Smart Relays
User Manual for GIRA Dimming Actuator 1-gang 200 W (5065 00)
Quick guide for the GIRA 5065 00 dimming actuator. Includes installation instructions, wiring diagrams, commissioning steps, parameter settings, and troubleshooting.
Table of contents
Manual images
Click an image to enlargeQuick guide from the manual
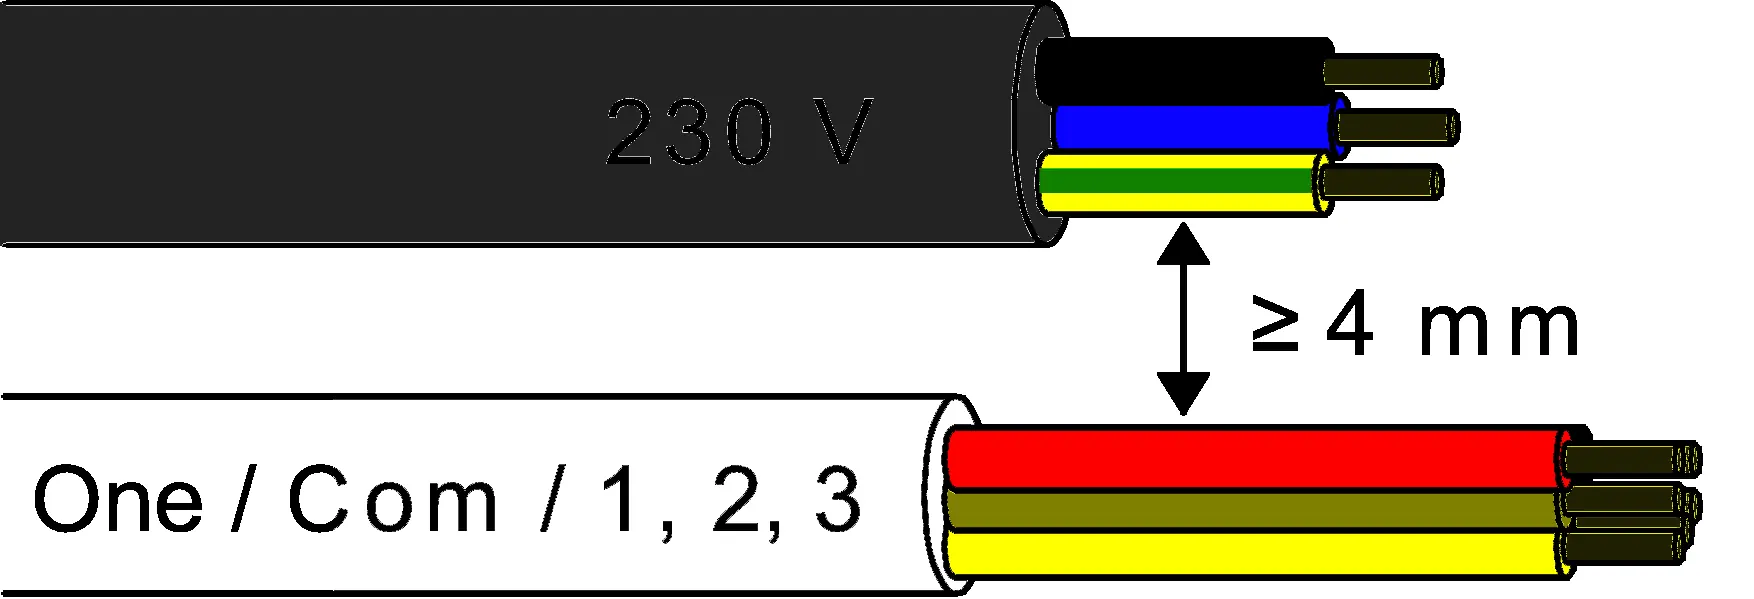
This device is a dimming actuator for the Gira One Smart Home system. It is designed for switching and dimming lighting and requires installation by an electrically skilled person. Commissioning must be performed using the Gira Project Assistant (GPA) version 5 or higher. Always ensure a minimum distance of 4 mm between mains voltage and bus/extension wires during installation.
Device components
- Programming LED
- Programming button
- Control cable (bus connection and extension inputs)
- Load connection (dimming output)
Safety instructions
Warning: Electrical devices may only be mounted and connected by electrically skilled persons. Serious injuries, fire, or property damage are possible if instructions are not followed.
- Electric Shock: The device is not suitable for disconnection from supply voltage. Always switch off associated circuit breakers before working on the device or load.
- Insulation: Maintain a minimum distance of at least 4 mm between bus conductors and mains voltage cores.
- Inputs: Do not connect external voltage to the inputs.
- Load Compatibility: Ensure the set operating mode and load type match to prevent damage.
Mounting and electrical connection
Mount the device in an appliance box with dimensions according to DIN 49073. It is recommended to use an electronic device box with a partition wall to separate mains voltage terminals from bus/extension terminals. Connect the bus line observing correct polarity and connect the load as specified in the wiring diagrams.

Commissioning
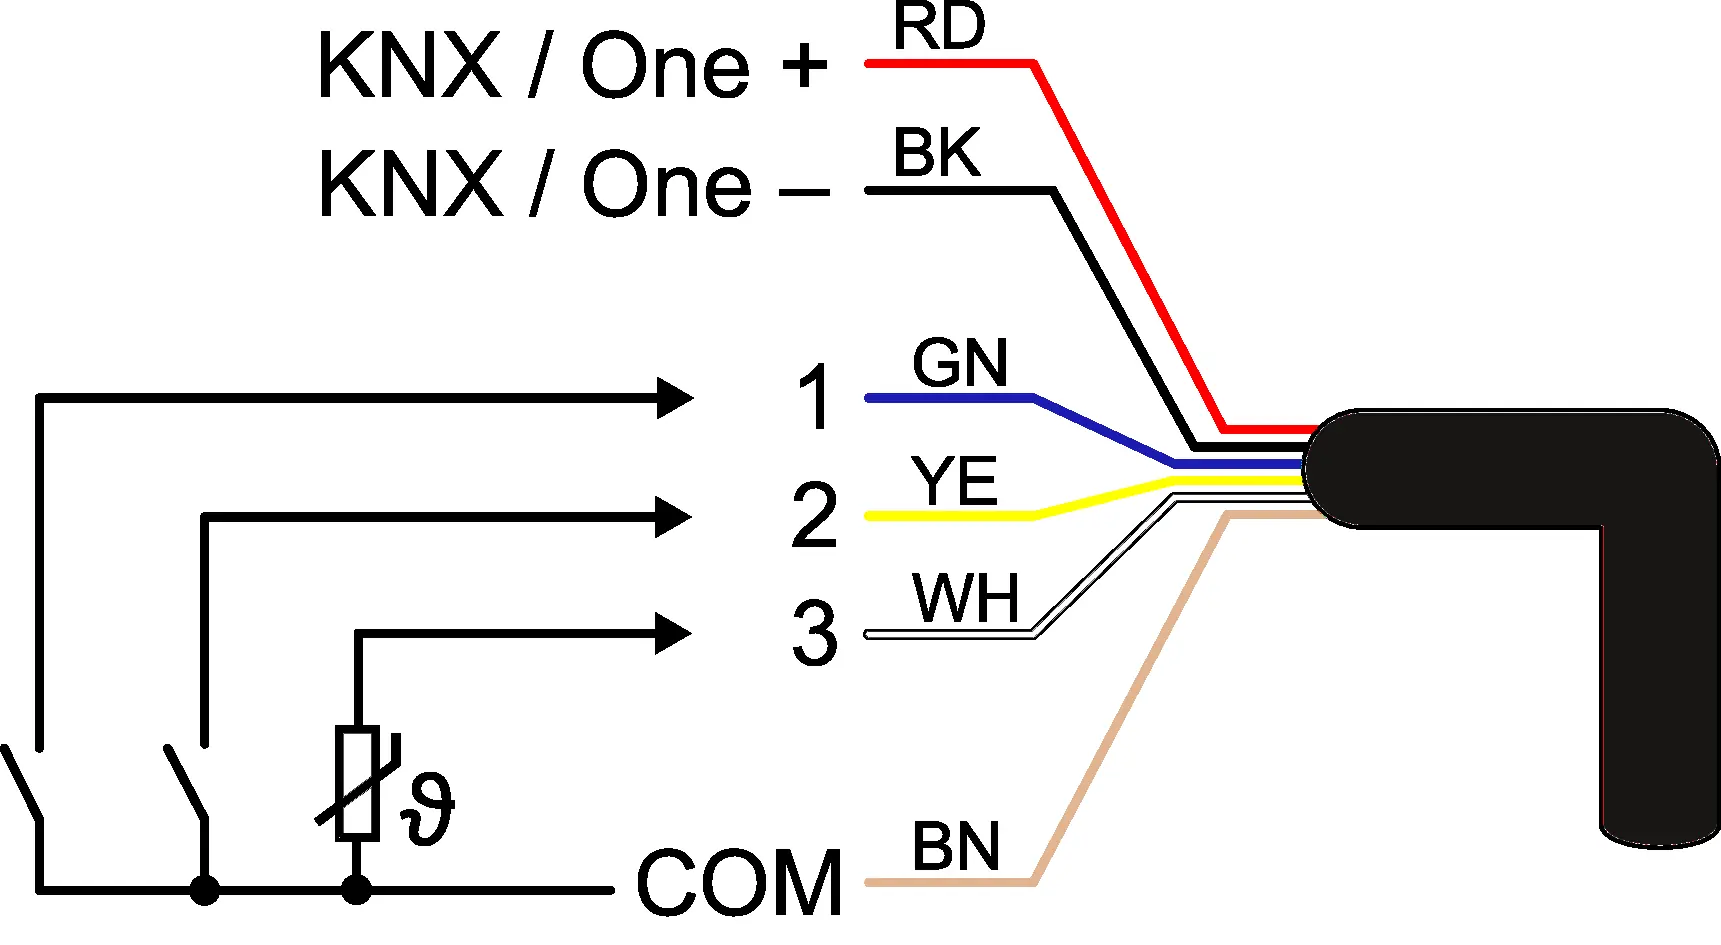
The device is commissioned via the Gira Project Assistant (GPA) version 5 or higher. In the delivery state, the output is set to the universal dimming principle with automatic load recognition. Input 1 controls ON/Brighter, Input 2 controls OFF/Darker, and Input 3 is inactive by default.
Technical data
- Rated voltage: DC 21 ... 32 V SELV
- Output: AC 230 V, 50/60 Hz
- Power loss: Max 1.5 W
- Inputs: 3 potential-free inputs for switches, sensors, or NTC temperature sensors
- Ambient temperature: -5 to +45 °C
Troubleshooting
- Lamps flicker or switch off: Check if the minimum brightness is set too low or if the load is incompatible.
- Overheating protection: Reduce the connected load, check installation for adequate cooling, and let the device cool down for at least 15 minutes.
- Short-circuit: Disconnect the output, eliminate the short-circuit, and switch the mains voltage back on.
Parameter list
Various parameters can be configured via the GPA, including:
- Load type: Universal (automatic calibration), electronic transformer, conventional transformer, or LED (leading/trailing edge).
- Brightness settings: Minimum brightness, switch-on brightness, and maximum brightness.
- Time delays: Switch-on/off delays and staircase function settings.
- Input configuration: Debounce time, contact type (NO/NC), and reaction when closing/opening contacts.
Practical help
Common problems
Lamps flicker or switch off in the lowest dimming position
The set minimum brightness is too low. Increase the minimum brightness setting.
Overheating protection has tripped
Reduce the connected load, check the installation situation to ensure adequate cooling, and let the device cool down for at least 15 minutes.
Short-circuit in output circuit
Disconnect the output from the mains, eliminate the short-circuit, and switch the mains voltage back on.
LED lamp is dimly lit when dimmer is switched off
The LED lamp is not optimally suited for this dimmer. Use a compensation module or try a different type of LED lamp.
Before use
- Ensure installation is performed by an electrically skilled person.
- Verify load type compatibility (LED, halogen, etc.).
- Check for adequate cooling and ambient temperature (-5 to +45 °C).
- Ensure correct bus polarity.
- Use an appliance box with a partition wall to separate mains and bus/extension wires.
- Have Gira Project Assistant (GPA) version 5 or higher ready for commissioning.
Specs in practice
- Rated voltage
- DC 21 ... 32 V SELV (bus powered).
Images and diagrams
- Image 1 shows the device components including programming LED and button.
- Image 2 illustrates the connection assignment for the control cable.
- Image 3 demonstrates mounting in an appliance box with a partition.
- Image 4 shows the required 4 mm spacing between mains and bus wires.
Model compatibility
- Compatible with Gira One Smart Home system.
- Requires Gira Project Assistant (GPA) version 5 or higher for commissioning.

Manual page author
Michael Turner
Technical manual editor
Reviews PDF manuals for structure, safety notes, and practical product details so readers can find the right information quickly.