Lighting / Controllers & Dimmers
User Manual for Sunricher RF+Bluetooth to DALI+0/1-10V Converter
Quick guide for the Sunricher RF+Bluetooth to DALI+0/1-10V Converter (70200022). Learn how to configure DIP switches, wire the device for DALI or 0/1-10V output, and pair with the EasyThings app.
Table of contents
Manual images
Click an image to enlargeQuick guide from the manual
This device is a 2-in-1 converter that bridges RF/Bluetooth signals to either DALI or 0/1-10V outputs. Before installation, ensure the power is disconnected. The device requires specific DIP switch configurations to set the output type, DALI device type, and addressing mode. It supports mesh networking and can be controlled via RF remote or the EasyThings App.
Safety & Warnings
- DO NOT set the DIP switches while the device is powered.
- DO NOT install the device with power applied.
- DO NOT expose the device to moisture.
Operation and Configuration
The device is configured using a series of DIP switches. Always ensure power is off before changing these settings.
1. Select Output Signal
Use Dial Switch 10 to select between DALI or 0/1-10V output.
2. Select DALI Device Type
If DALI output is selected, use Dial Switches 8-9 to choose the device type (e.g., DIM, DT8 Tc, DT8 XY Coordinates, DT8 RGBW).
3. Select Address or Group Control Mode
Use Dial Switch 7 to toggle between Address Mode and Group Mode.
4. Select Address or Group
Use Dial Switches 1-6 to select the specific DALI address (00-63) or DALI group (0-15) to be controlled.
Wiring
The device supports two main wiring configurations based on the selected output:

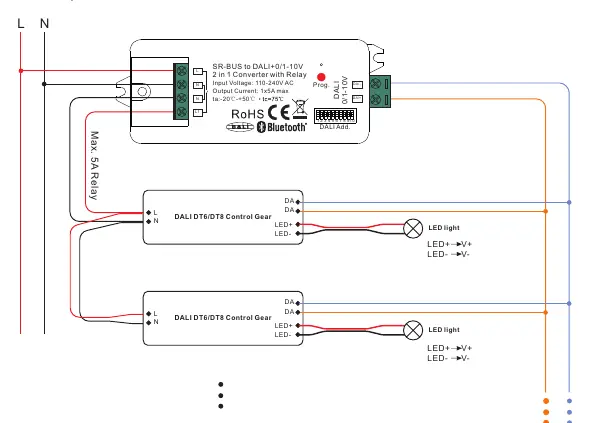
- 0/1-10V Output: Connects to a 0/1-10V dimmable driver.
- DALI Output: Connects to DALI DT6/DT8 control gears.
The device includes a relay output with a maximum load of 5A. The built-in DALI bus power supply provides up to 50mA, sufficient for up to 25 control gears.
Pairing and Reset
Pairing with RF+Bluetooth Remote
Refer to the specific instructions provided with your RF remote to pair it with the controller.
Pairing with Smart App
1. Complete the wiring according to the connection diagram.2. Use the EasyThings App to add the device. Refer to the app's user manual for detailed steps.
Factory Reset
If the "Prog." button is accessible, press and hold it for over 3 seconds. Alternatively, power cycle the device 8 times continuously until the connected light flashes to indicate a successful reset.
Technical Specifications
- Input Voltage: 110-240V AC
- Relay Output: Max 5A
- DALI Bus Power: Max 50mA
- Operating Temperature: -20°C to +50°C
- Waterproof Grade: IP20
- Dimensions: 80x36x20.5mm
Practical help
Common problems
Device not responding
Check wiring connections and ensure input power is 110-240V AC.
Cannot pair with remote or app
Ensure the device is in pairing mode. If necessary, perform a factory reset by power cycling 8 times or holding the Prog button for 3 seconds.
DALI devices not controlled
Verify that the correct DALI address or group is selected via DIP switches 1-6 and that the output mode is set to DALI.
Before use
- Ensure power is disconnected before adjusting DIP switches.
- Verify input voltage is 110-240V AC.
- Select the correct output mode (DALI or 0/1-10V) using switch 10.
- Ensure DALI bus load does not exceed 50mA.
- Check that the relay load does not exceed 5A.
Specs in practice
- DALI Bus Power
- Built-in power supply providing 50mA, supporting up to 25 control gears.
- Relay Output
- Maximum switching capacity of 5A for connected loads.
Images and diagrams
- Wiring Diagram 0/1-10V: Shows how to connect the converter to a 0/1-10V dimmable driver.
- Wiring Diagram DALI: Shows how to connect the converter to DALI control gears.
Model compatibility
- Compatible with Amazon Alexa and Google Home.
- Requires EasyThings App for smart control.
- Supports DALI DT6 and DT8 device types.

Manual page author
David Miller
Documentation analyst
Organizes user manual content into clear summaries, with attention to model details, product context, and everyday usability.