Electronics / AV Splitters
User Guide for Gofanco 1x2 HDMI CAT Splitter/Extender 4K30 - 70M
A comprehensive user guide for the Gofanco 1x2 HDMI CAT Splitter/Extender (HD14Ext-2P). Includes installation steps, wiring diagrams, IR control setup, RS232 configuration, and troubleshooting tips.
Quick answers from the manual
Quick answer
- The Gofanco 1x2 HDMI CAT Splitter/Extender distributes HDMI signals from one source to two remote displays via CAT6/7 cables, with an additional local HDMI loopout. It supports 4K resolution up to 40m and 1080p up to 70m. p. 3
Key actions
- Install the system p. 8
- Set up IR control p. 10
First start
- Power off all devices, connect HDMI and CAT cables, connect power adapters, then power on. p. 8
Problems and fixes
No video signal
Check HDMI cable connections and display resolution compatibility.
p. 12
No signal from CAT output
Press the reset button on both TX and RX units.
p. 12Maintenance and reset
- Press the reset button on the Transmitter or Receiver to restart the device. p. 5, 6
Technical specifications
| Parameter | Value | Meaning | Pages |
|---|---|---|---|
| Max Resolution | 4K @30Hz | Supports up to 4K @30Hz YUV 4:4:4 | p. 3, 13 |
| Transmission Distance | 70m (1080p) / 40m (4K30Hz) | Maximum cable length for signal transmission | p. 3, 13 |
Where to find it in the PDF
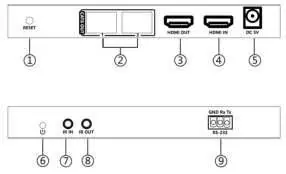
- Transmitter Layout p. 5
- Receiver Layout p. 6, 7
- Specifications p. 13
Table of contents
Manual images
Click an image to enlargeQuick guide from the manual
The Gofanco 1x2 HDMI CAT Splitter/Extender is designed to distribute HDMI signals from a single source device to two remote displays via CAT6/7 cables, while also providing a local HDMI loopout. It supports resolutions up to 4K @30Hz and includes features like bi-directional IR control and RS232 management.
Package Contents
- 1x 1x2 HDMI CAT Transmitter
- 2x CAT6/7 Receivers
- 1x IR Emitter cable
- 2x IR Receiver cables
- 1x TX power adapter (5V/1A)
- 2x RX power adapters (5V/500mA)
- Surface mount accessories
- 1x Terminal block (RS232)
Hardware Installation
- Power off all devices, including the HDMI source and displays.
- Connect the HDMI source device to the Transmitter's HDMI In port using an HDMI cable.
- Connect CAT6/7 cables between the Transmitter and the Receivers.
- Optional: Connect a local HDMI display to the Transmitter's HDMI Out port.
- Connect HDMI displays to each Receiver's HDMI Out port.
- Optional: Connect IR Emitter and Receiver cables to the respective IR ports if remote control is required.
- Connect the included power adapters to the Transmitter (5V/1A) and Receivers (5V/500mA).
- Power on the HDMI source and displays.
IR Control
The system supports bi-directional IR control, allowing you to control the source from the display location or vice versa.
- Controlling the Source: Connect the IR Emitter to the Transmitter's IR Out port and point it at the source device. Connect the IR Receiver to the Receiver's IR In port.
- Controlling the Display: Connect the IR Receiver to the Transmitter's IR In port and the IR Emitter to the Receiver's IR Out port, pointing it at the display.
RS232 Control
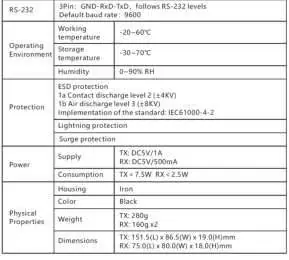
The Transmitter features an RS232 port for control via a PC. The COM port settings are: Baud Rate 9600, Data Bits 8, Stop Bits 1, Parity None.
Troubleshooting
- No video signal: Check HDMI cable connections and ensure the display resolution is compatible with the splitter.
- No signal from CAT output: Press the reset button on both the Transmitter and Receiver units.
- Snowy/fuzzy screen: Ensure HDMI cables are high quality and less than or equal to 5 meters in length. Verify CAT cable quality and length.
Specifications
The device supports HDMI 1.4 and HDCP 1.4. Transmission distance is up to 70m at 1080p and 40m at 4K30Hz. It operates in temperatures between -20 to 60 degrees Celsius.
Practical help
Common problems
Poor video quality or no video signal
Check that HDMI cables are connected properly and are in good working condition. Ensure the display resolution is compatible with the splitter.
No HDMI signal output from CAT6/7 connectors
Press the reset button on both the Transmitter and Receiver units and reconnect.
Snowy or fuzzy screen
Replace with higher quality HDMI cables. Ensure HDMI cable length is 5 meters or less. Try a different CAT cable.
Before use
- Power off all devices before starting installation.
- Ensure you have CAT6/7 cables (not included).
- Ensure you have HDMI cables (not included).
- Verify you have the correct power adapters: 5V/1A for the Transmitter, 5V/500mA for the Receivers.
- Ensure the environment is well-ventilated.
Specs in practice
- Transmission Distance
- Up to 70m at 1080p and 40m at 4K30Hz.
- Power Supply
- Transmitter requires 5V/1A; Receivers require 5V/500mA.
- RS232 Settings
- Baud Rate: 9600, Data Bits: 8, Stop Bits: 1, Parity: None.
Images and diagrams
- Transmitter Layout: Identifies the reset button, CAT outputs, HDMI ports, and power jack.
- Receiver Layout: Identifies the reset button, CAT input, IR ports, and HDMI output.
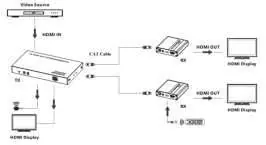
- Application Diagram: Shows the connection flow from the video source to the transmitter, then via CAT cable to the receivers and displays.
Model compatibility
- Supports up to 4K @30Hz YUV 4:4:4.
- Supports 2ch PCM audio and Stereo audio extraction.
- Recommended to use T568B wiring standard for CAT cables.

Manual page author
Emily Carter
User documentation editor
Prepares concise manual descriptions and highlights the most useful setup, operation, and maintenance information for readers.