HVAC / Air Conditioners
Goldair 7K BTU 2.0kW Portable Air Conditioner User Manual
Quick guide for the Goldair 7K BTU 2.0kW Portable Air Conditioner (GCPAC200A). Includes installation steps, control panel operation, maintenance, and troubleshooting.
Quick answers from the manual
Quick answer
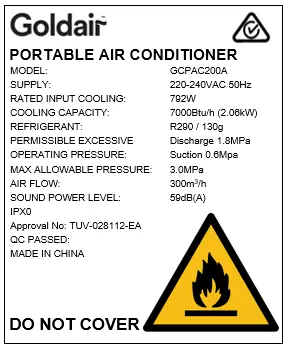
- The Goldair GCPAC200A is a portable air conditioner. It requires a 7m² minimum room size, 300mm clearance, and must stand for 2 hours after transport before first use. It features cooling, fan, and dehumidifying modes. p. 1, 5, 6
Key actions
- Install the exhaust hose by screwing it counterclockwise into the rear panel. p. 5
- Clean the EVA filter screen in warm water with neutral detergent. p. 9
First start
- Allow the refrigerant to settle by leaving the appliance to stand for two hours after transport. p. 6
Problems and fixes
Displays 'E1' or 'E2'
Room or pipe temperature sensor is abnormal; check circuitry or contact service.
p. 10Error codes
| Code | Meaning | Action | Pages |
|---|---|---|---|
| E1 | Room temperature sensor is abnormal. | Check the room temperature sensor and related circuitry. | p. 10 |
| E2 | Pipe temperature sensor is abnormal. | Check the pipe temperature sensor and related circuitry. | p. 10 |
Technical specifications
| Parameter | Value | Meaning | Pages |
|---|---|---|---|
| Cooling Capacity | 7000 Btu/h (2.0kW) | Cooling power | p. 3 |
| Refrigerant | R290 / 130g | Type and amount of refrigerant | p. 3 |
Where to find it in the PDF
- Safety Guide p. 2, 3
- Components p. 4
- Installation p. 5
- Control Panel p. 6, 7
- Care and Maintenance p. 8, 9
- Troubleshooting p. 10
Table of contents
Manual images
Click an image to enlargeQuick guide from the manual
This document provides essential instructions for the Goldair 7K BTU 2.0kW Portable Air Conditioner (GCPAC200A). Key requirements include ensuring the unit stands upright for two hours after transport before use, installing the unit in a room larger than 7m², and maintaining proper clearance around the unit.
Components
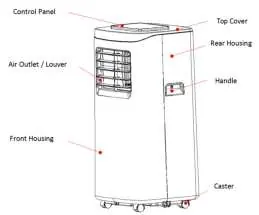
The unit features a control panel on top, air outlet/louvers, handles, and casters for mobility. The rear houses the EVA filter, air vent, CON filter, and drainage holes. The exhaust pipe assembly and window sealing plate are included for installation.
Installation
The air conditioner must be installed on a flat surface with at least 300mm clearance on all sides, including the top. Do not install in bathrooms or humid environments.
- Exhaust Hose: Screw the heat pipe assembly counterclockwise into the exhaust port on the rear panel. The hose length should be between 280mm and 1500mm. Do not use extensions.
- Window Sealing Plate: Mount the assembly in the window (horizontal or vertical). Adjust the components to fit the window frame.
Operation
The unit operates in Cooling, Fan, or Dehumidifying modes. Ensure the unit is in the OFF setting before connecting to the mains. When powered on for the first time, it will beep and enter standby.
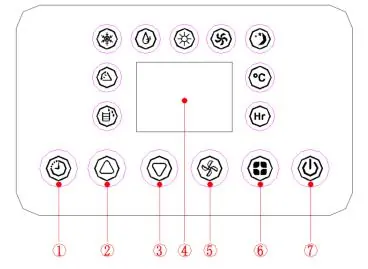
- Timer: Set to turn the unit ON or OFF from 1-24 hours.
- Temperature: Adjustable between 16-31°C (not available in fan or dehumidification modes). Press both Up and Down buttons to switch between Celsius and Fahrenheit.
- Fan Speed: Select between high or low in cooling/fan modes. Dehumidification mode defaults to low speed.
- Sleep Mode: Activated by pressing Up and Fan Speed buttons simultaneously. The fan is set to low, and the temperature rises by 1°C after one hour and another 1°C after the second hour.
Care and Maintenance
Regular maintenance is required for optimal performance.
- Drainage: The unit can be drained manually by removing the water plug at the bottom or via a continuous drainage hose connected to the top drain hole.
- Cleaning: Clean the EVA filter screen in warm water with neutral detergent (approx. 40°C) and dry in the shade. Never use the unit without the air filter.
- Exterior: Wipe with a soft, dry cloth or slightly damp cloth. Do not use harsh chemicals or spray with water.
Troubleshooting
If the unit does not work, check for power, ensure the water-full indicator is not flashing (drain if necessary), and verify the ambient temperature is between 7-35°C. For E1 or E2 error codes, the temperature sensors may be abnormal; contact an authorized service technician.
Manufacturer information
Goldair
Practical help
Common problems
Air conditioner does not work
Check power supply, ensure water tank is not full (drain if necessary), and verify ambient temperature is within 7-35°C.
Cooling/heating effect is poor
Close doors and windows, remove heat sources, clean the filter, and ensure air inlet/outlet is not blocked.
Loud noise
Ensure the unit is placed on a flat, hard surface.
Remote control does not work
Move closer to the unit, ensure direct line of sight, or replace batteries.
E1/E2 error codes
Indicates sensor abnormality; contact an authorized service technician.
Before use
- Let the unit stand upright for 2 hours after transport.
- Ensure the unit is in the OFF setting before connecting to power.
- Verify the room size is larger than 7m².
- Ensure the exhaust hose is installed and unobstructed.
- Check that the power supply is nearby.
Specs in practice
- Cooling Capacity
- 7000 Btu/h (2.0kW)
- Operating Temperature
- 7-35°C
- Sound Power Level
- 59dB(A)
Images and diagrams
- Control Panel: Shows buttons for Timer, Temp, Fan Speed, Mode, Power, and Sleep.
- Drainage: Shows top and bottom drainage holes for continuous or manual drainage.
- Installation: Shows exhaust hose connection and window sealing plate mounting.
Model compatibility
- Do not use with external timers, programmers, or remote-control systems.
- Do not use in bathrooms or humid environments.
- Use only in rooms larger than 7m².

Manual page author
Emily Carter
User documentation editor
Prepares concise manual descriptions and highlights the most useful setup, operation, and maintenance information for readers.