HVAC / Air Conditioners
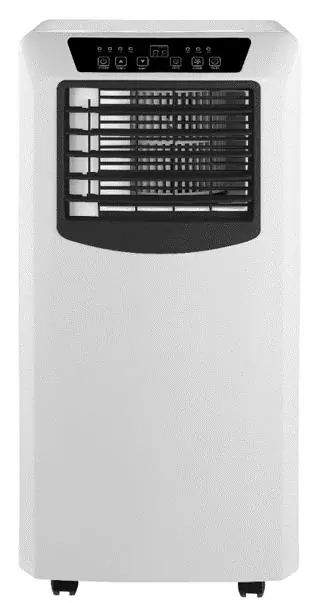
User Manual for Goldair 2.9kW Portable Air Conditioner GCPAC295
Quick guide for the Goldair 2.9kW Portable Air Conditioner GCPAC295. Includes installation steps, operating modes, cleaning instructions, and troubleshooting.
Quick answers from the manual
Quick answer
- The Goldair GCPAC295 is a portable air conditioner with cooling, dehumidifying, and fan modes. It requires a 30cm clearance around the unit and proper exhaust hose installation to function correctly. p. 1, 4, 7
Key actions
- Cooling Mode: Press POWER, then MODE until 'COOL' appears. Set temperature (16-31°C) and fan speed. p. 7
- Cleaning Filter: Open inlet grill, remove filter, wash in lukewarm (40°C) water with neutral detergent, and dry in shade. p. 7
First start
- Allow the refrigerant to settle by leaving the appliance to stand for one hour after transport before connecting to mains. p. 7
Problems and fixes
Unit does not start
Empty water tank or reset temperature.
p. 8Error codes
| Code | Meaning | Action | Pages |
|---|---|---|---|
| E0 | Room temperature sensor failed | Replace room temperature sensor | p. 8 |
| E2 | Water tank is full | Empty water tank | p. 8 |
Technical specifications
| Parameter | Value | Meaning | Pages |
|---|---|---|---|
| Supply | 220-240VAC 50Hz | Power requirements | p. 2 |
| Wattage | 1110W | Power consumption | p. 2 |
Where to find it in the PDF
- General Care and Safety p. 2
- Components p. 3
- Mounting Position p. 4, 5
- Operating Instructions p. 7
- Troubleshooting p. 8
Table of contents
Manual images
Click an image to enlargeQuick guide from the manual
This portable air conditioner is designed for household use. Before first use, ensure the unit has stood upright for at least one hour after transport to allow the refrigerant to settle. The unit requires a flat surface with at least 30cm of clearance on all sides, including the top, to ensure proper airflow. Do not use this appliance with external timers or programmers.
Components
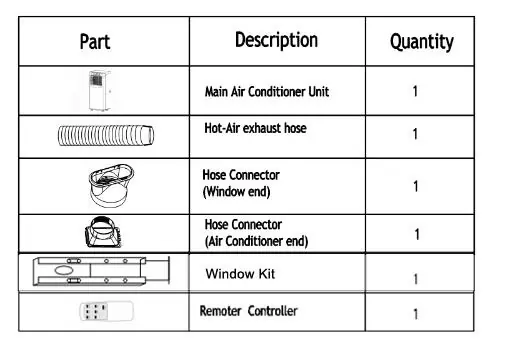
- Main Air Conditioner Unit
- Hot-Air exhaust hose
- Hose Connectors (Window end and Air Conditioner end)
- Window Kit
- Remote Controller
Installation
Mounting Position: Place the unit on a flat surface. Ensure the power supply is nearby and the air outlet is not blocked. Maintain 30cm clearance around the unit.
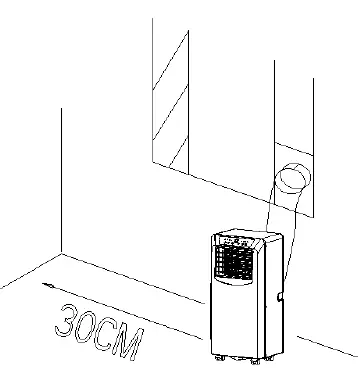

Exhaust Hose Installation:
- Twist both ends of the exhaust hose into the square fixing clip and the flat fixing clip.
- Insert the square fixing clip into the openings at the back of the air conditioner.
- Install the exhaust hose so that exhaust air is removed from the room (you may need to cut a hole in your window pane).
Operating your Air Conditioner
The unit features Cooling, Dehumidifying, and Fan modes. Keep an interval of at least 3 minutes between switching functions or turning the unit ON/OFF.
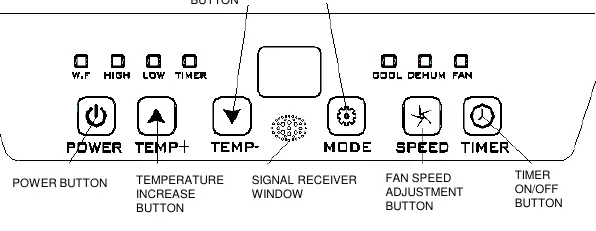
- Cooling Operation: Press the POWER button, then press MODE until the 'COOL' icon appears. Use TEMP+ or TEMP- to set the desired temperature (16°C - 31°C). Adjust fan speed using the FAN SPEED button.
- Dehumidify Operation: Press MODE until the 'DEHUMIDIFY' icon appears. The unit automatically sets the temperature to room temperature minus 2°C and sets the fan to LOW.
- Fan Operation: Press MODE until the 'Fan' icon appears and select the desired speed.
- Timer: Use the Timer button to set ON or OFF times within a 0-24 hour range.
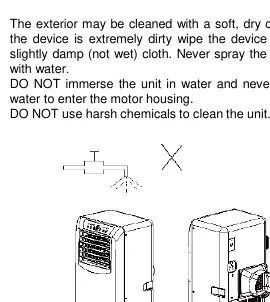
Care and Cleaning
Air Filter: Open the air inlet grill, remove the filter, and wash it with a neutral detergent in lukewarm water (40°C). Allow it to dry thoroughly in the shade before replacing. Never use the unit without the air filter.
Storage: Remove the plug from the socket. Remove the rubber plug from the drainage hole at the bottom of the unit and connect a drain hose to drain the water tank. Allow the unit to dry completely before storing in a dust-free location.
Troubleshooting
If the unit does not start, check if the water tank is full (indicated by a blinking light) or if the room temperature is lower than the set temperature. If the unit is not cooling enough, ensure windows/doors are closed, remove heat sources, check that the exhaust hose is connected, or lower the temperature setting. If the unit is noisy, ensure it is on a flat, level surface.
Manufacturer information
Goldair
Practical help
Common problems
Unit does not start
Check if the water tank is full (empty it) or if the room temperature is lower than the set temperature.
Not cooling enough
Ensure windows and doors are closed, remove heat sources, check that the exhaust hose is connected/not blocked, or lower the temperature setting.
Noisy operation
Ensure the unit is placed on a flat, level surface.
E0 Code
Room temperature sensor failed.
E2 Code
Water tank is full; empty the water tank.
Before use
- Ensure all packaging has been removed.
- Check for transport damage.
- Allow the unit to stand for one hour after transport before plugging in.
- Ensure the unit is on a flat surface with 30cm clearance.
- Ensure hands are dry before handling the plug.
Images and diagrams
- Exhaust hose installation: Connect hose to square and flat fixing clips, then attach to the back of the unit.
- Drainage: Remove the rubber plug at the bottom of the unit to drain the water tank.
Model compatibility
- Do not use with external timers, programmers, or remote-control systems that switch the unit on automatically.
- Intended for household use only; not for commercial or industrial use.

Manual page author
Michael Turner
Technical manual editor
Reviews PDF manuals for structure, safety notes, and practical product details so readers can find the right information quickly.