Power / Batteries & Chargers
User Manual for Gooloo A6 Gear Air Inflator (PT-16)
Quick guide and user manual for the Gooloo A6 Gear (PT-16) air inflator. Learn how to operate, charge, and troubleshoot your device.
Table of contents
Manual images
Click an image to enlargeQuick Start Guide
To begin using your Gooloo A6 Gear air inflator, follow these steps:
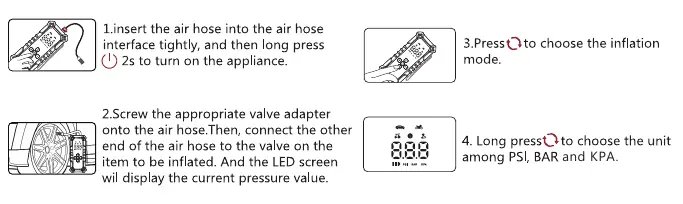
- Insert the air hose tightly into the inflation port.
- Long press the power button for 2 seconds to turn on the device.
- Press the setting button to choose the desired inflation mode (Car, Motorcycle, Bicycle, Ball, or Custom).
- Long press the setting button to select the pressure unit (PSI, BAR, or KPA).
- Use the '+' or '-' buttons to set your target pressure.
- Connect the hose to the item's valve and press the power button to start inflation. The device will automatically stop when the target pressure is reached.
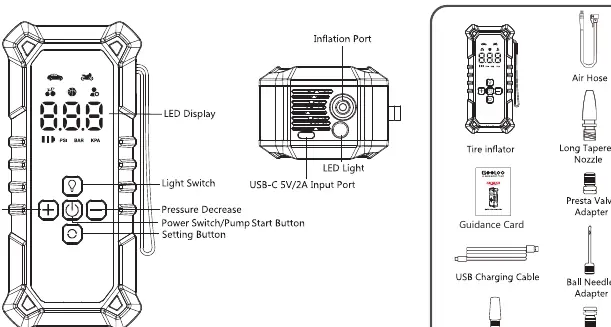
Product Overview
The device features an LED display, light switch, pressure adjustment buttons, power/start button, and a setting button. It includes an inflation port and a USB-C input port for charging. The package comes with an air hose, various nozzles (long/short tapered), a Presta valve adapter, a ball needle adapter, and a British valve adapter.
Inflation Modes and Operation
The inflator offers 5 preset modes with adjustable pressure ranges:
- Car Mode: 36 PSI default (15-51 PSI range)
- Motorcycle Mode: 36 PSI default (15-43 PSI range)
- Bike Mode: 44 PSI default (20-160 PSI range)
- Ball Mode: 9 PSI default (4-16 PSI range)
- Custom Mode: 20 PSI default (4-160 PSI range)
The device also includes an LED light function. Long press the light button to turn on the white light, press again for flashing mode, and long press again to turn it off.
Charging the Device
The unit is charged via the USB-C port. During charging, the battery icon will flash. Each bar represents a different battery level (0-100%). Once fully charged, the icon will display three bars. It is recommended to recharge the unit every 3 months.
Troubleshooting
If you encounter issues, check the following error codes on the display:
- E02: Over-heat protection. Wait 10 minutes before trying again.
- LO: Battery voltage is too low. Charge the device before use.
- E05: Sensor abnormal. Contact customer service for assistance.
If the unit fails to charge, ensure you are using a standard USB-C cable and wall charger, and allow it to charge overnight.
Safety Warnings
- Do not submerge the device in water.
- Do not disassemble or modify the unit.
- Keep away from children; this is not a toy.
- Do not operate in explosive environments (flammable liquids, gas, or dust).
- The air hose may become hot after use; handle with care.
- Store in temperatures below 60°C (140°F).
- Charge only at ambient temperatures between -10°C and 45°C.
Practical help
Common problems
Device displays E02
Over-heat protection activated. Wait 10 minutes before using again.
Device displays LO
Battery voltage is too low. Charge the device.
Device displays E05
Sensor abnormality. Contact customer service.
Unit will not charge
Use a USB-C cable and wall charger to charge the unit overnight.
Before use
- Ensure the battery level is sufficient.
- Check the required pressure for the item to be inflated.
- Ensure the air hose is securely connected to both the device and the item valve.
- Select the correct inflation mode and pressure unit.
Specs in practice
- Inflation Pressure Range
- 4-160 PSI
- Battery Capacity
- 27.75Wh
- Charging Input
- 5V/2A (USB Type-C)
- Working Noise
- Lower than 85dB within 1 meter
Images and diagrams
- The control panel includes a display, light switch, pressure increase/decrease buttons, power/start button, and a setting button.
- The top of the device houses the inflation port and LED light.
Model compatibility
- Includes adapters for Presta valves, balls, and general inflatables.
- Suitable for cars, motorcycles, bicycles, and sports balls.

Manual page author
Michael Turner
Technical manual editor
Reviews PDF manuals for structure, safety notes, and practical product details so readers can find the right information quickly.