Electronics / Gaming Peripherals
User Manual for Zebronics 17T14 Tire Inflator
Quick guide for the Zebronics 17T14 Tire Inflator. Learn how to operate, inflate tires, use the power bank feature, and manage the flashlight/SOS modes.
Quick answers from the manual
Quick answer
- The Zebronics 17T14 is a portable, cord-free tire inflator with 4 preset modes, power bank functionality, and an integrated flashlight. It charges via Type-C and features an automatic stop function when the target pressure is reached. p. 1, 3, 5
Key actions
- Inflating a tire p. 6, 7
- Using Power Bank p. 8
First start
- Charge the device fully using the Type-C port before first use. p. 5, 8
Problems and fixes
Device overheating
Allow the device to cool down after 8-10 minutes of continuous use.
p. 2, 7Maintenance and reset
- Recharge the unit after use to ensure it is ready for the next time. p. 9
Technical specifications
| Parameter | Value | Meaning | Pages |
|---|---|---|---|
| Motor Input Voltage | DC 7.4V | Operating voltage | p. 3 |
| Charging Time | 3-4 Hours | Time to fully charge battery | p. 4 |
Where to find it in the PDF
- Product Diagram p. 5
- Inflation Instructions p. 6, 7
Table of contents
Manual images
Click an image to enlargeQuick Guide
The Zebronics 17T14 is a portable, cord-free tire inflator designed for cars, bikes, bicycles, and sports balls. It features 4 preset pressure modes, a digital display, and a built-in power bank function. For optimal performance, allow the device to cool down after every 8 to 10 minutes of continuous use.
Product Overview
The device consists of the following key components:
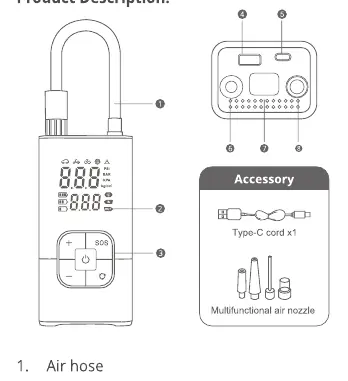
- Air hose
- Digital display
- Operation buttons
- USB Output (for power bank function)
- Type-C input (for charging)
- LED light
Inflation Instructions
Follow these steps to inflate your tires:
- Preparation: Ensure the inflator is fully charged before use.
- Attach Hose: Connect the air hose (male screw) to the tire inflator by screwing it in.
- Connect to Valve: Screw the female nozzle end of the hose to the tire valve, ensuring there are no air leaks.
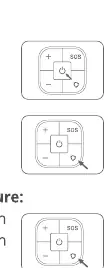
- Power On: Press the Power button to turn on the device.
- Select Mode: Single press the Mode selection button to choose the appropriate preset mode.
- Set Pressure: Use the "+" or "-" buttons to adjust the desired pressure. To switch units (Psi, KPa, Bar, kg/cm²), press and hold the Mode selection button for 2-3 seconds.
- Inflate: Press the Power button to start inflation. The device will automatically stop once the target pressure is reached.
- Disconnect: Turn off the inflator by long-pressing the Power button, then carefully disconnect the hose from the tire valve.
Power Bank Mode
The inflator can be used as a power bank for emergency charging of smartphones:
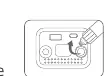
- Locate the USB Output Port at the bottom of the unit.
- Connect your device using the appropriate USB cable.
- Charging should begin automatically.
- Note: Do not charge mobile devices while tire inflation is in progress.
Flashlight and SOS Mode
To use the light functions:
- Turn on the inflator.
- Single press the SOS button to turn on the flashlight.
- Subsequent single presses will cycle through: Slow Blinker (Red LED) -> Fast Blinker (Red LED) -> Off.
Storage and Maintenance
- Coil the inflation hose neatly to avoid tangling or sharp bends.
- Store in a cool, dry place; avoid extreme temperatures.
- Recharge the unit after use if the battery is low.
- Ensure ventilation openings are not obstructed during use.
Practical help
Common problems
Device gets hot during use
Allow the tire inflator to cool down after every 8 to 10 minutes of continuous usage.
Inaccurate pressure reading
Preset pressure is based on global averages; manually adjust the pressure value to match your specific vehicle's requirements.
Device not charging
Ensure you are using a DC 5V adapter and the provided Type-C cable.
Before use
- Charge the device fully before first use.
- Check the hose and all connections for damage or wear.
- Ensure the inflator is placed on a stable, dry, and non-combustible surface.
- Verify that ventilation openings are clear of obstructions.
Specs in practice
- Motor Input Voltage
- DC 7.4V
- Charging Time
- 3-4 Hours
Images and diagrams
- 2. Digital display
- 3. Operation buttons
- 4. USB Output
- 5. Type-C input
- 6. Air hose storage port
Model compatibility
- Suitable for Bike, Car, Bicycle, and Sports ball inflation.

Manual page author
Emily Carter
User documentation editor
Prepares concise manual descriptions and highlights the most useful setup, operation, and maintenance information for readers.