Lighting / Fixtures
Hampton Bay 2-in-1 Wall Sconce User Guide
Comprehensive user guide for the Hampton Bay 2-in-1 Wall Sconce. Includes detailed instructions for both hardwire and plug-in installation, safety guidelines, maintenance tips, and troubleshooting steps.
Quick answers from the manual
Quick answer
- This Hampton Bay 2-in-1 Wall Sconce can be installed as a hardwired fixture or a plug-in lamp. Follow the specific installation section in the manual based on your preferred method. p. 5, 9
Key actions
- Hardwire Installation p. 5, 6, 7, 8
- Plug-in Installation p. 9, 10
First start
- Ensure power is off at the circuit breaker or fuse box before beginning any installation. p. 2, 11
Problems and fixes
Light will not illuminate
Check power supply, wiring connections, switch, and bulb.
p. 11Maintenance and reset
- Clean with a dry or damp, clean cloth. Do not use abrasive cleaners or chemical solvents. p. 11
Technical specifications
| Parameter | Value | Meaning | Pages |
|---|---|---|---|
| Voltage | 120V AC 60Hz | Required electrical circuit. | p. 7 |
| Bulb | 60W max | Maximum wattage per bulb. | p. 8 |
Where to find it in the PDF
- Safety Information p. 2
- Hardwire Installation p. 5, 6, 7, 8
- Plug-in Installation p. 9, 10
Table of contents
Manual images
Click an image to enlargeQuick guide from the manual
This document provides installation and maintenance instructions for the Hampton Bay 2-in-1 Wall Sconce. The fixture can be installed as a permanent hardwired light or as a plug-in lamp. Always ensure the power is disconnected before performing any installation or maintenance.
Safety Information
WARNING: Before touching any wire, use a voltage tester to ensure it is not live. When checking for voltage in a receptacle, check both outlets as each may be controlled by a separate wiring circuit. Before working on a circuit, go to the main service panel and remove the fuse or trip the breaker that controls the circuit.
- Use tools with insulated handles made of wood or fiberglass.
- Keep dry-chemical fire extinguishers in the kitchen, basement, and workshop.
- Never disable grounding devices.
- Always work with enough light to see what you are doing.
- If in doubt about the safety of any electrical repair or test, call in a professional.
Pre-Installation
Before starting, compare all parts with the Hardware Included and Package Contents sections. If any part appears missing or damaged, do not install the product.
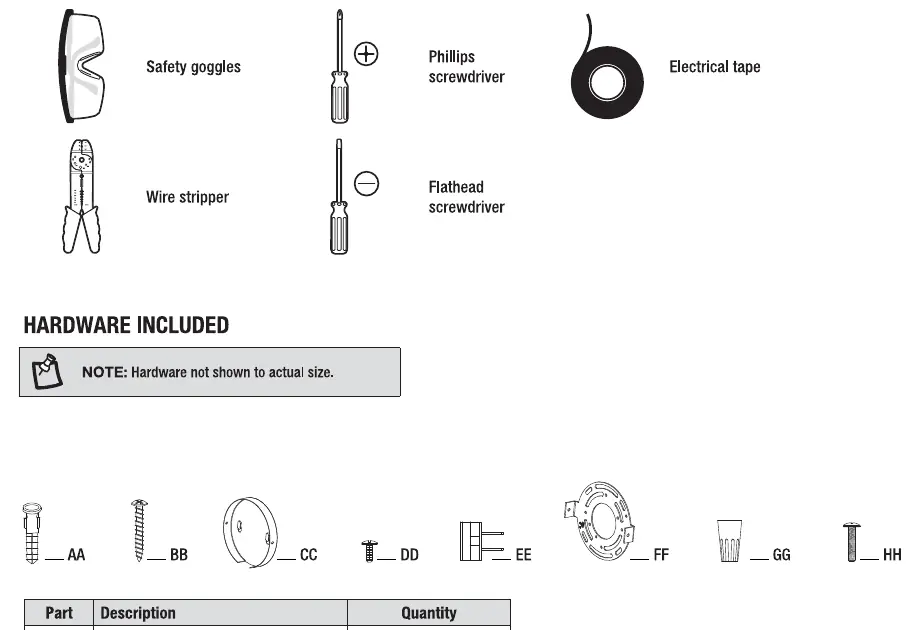
Tools Required
- Safety goggles
- Phillips screwdriver
- Flathead screwdriver
- Electrical tape
- Wire stripper
Hardwire Installation
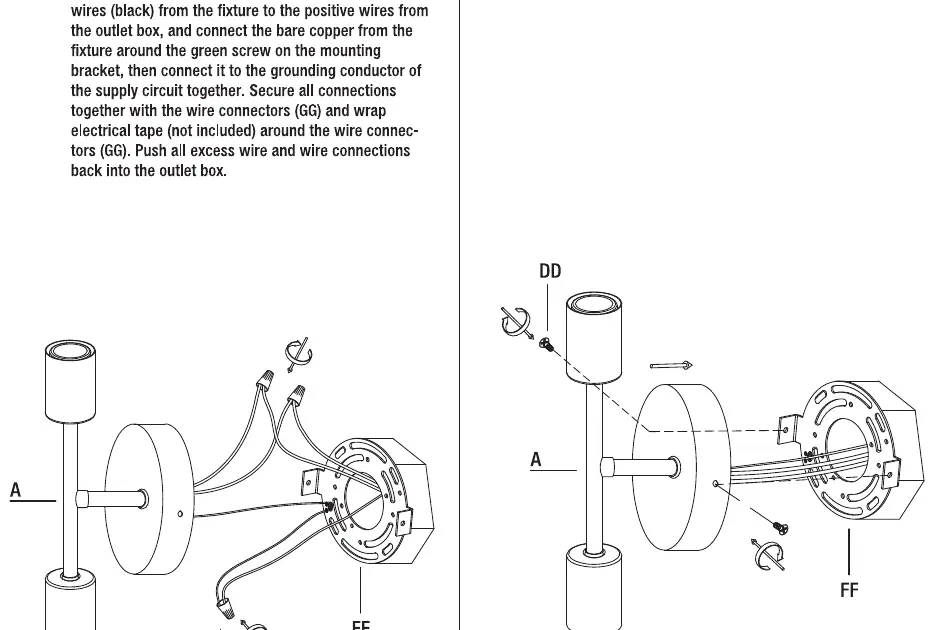
- Removing the cord: Unpack parts, remove the preassembled back plate (CC) by unscrewing the back plate screws (DD). Remove electrical tape on the wire connectors (GG) and remove them from the black and white cord. Unwire the black and white wire from the cord and slide the cord out through the hole.
- Installing the mounting plate: Attach the mounting bracket (FF) to the outlet box using the outlet box screws (HH).
- Making electrical connections: Connect the negative wire (white) from the fixture to the negative wire from the outlet box. Connect the positive wires (black) from the fixture to the positive wires from the outlet box. Connect the bare copper wire from the fixture to the grounding conductor of the supply circuit. Secure all connections with wire connectors (GG) and wrap with electrical tape.
- Attaching the canopy: Place the fixture (A) over the mounting bracket (FF) and secure with mounting bracket screws (DD).
- Installing the light bulb: Install two 60-Watt max E26-base Type A or S bulbs or LED equivalent (not included).
Plug-in Installation
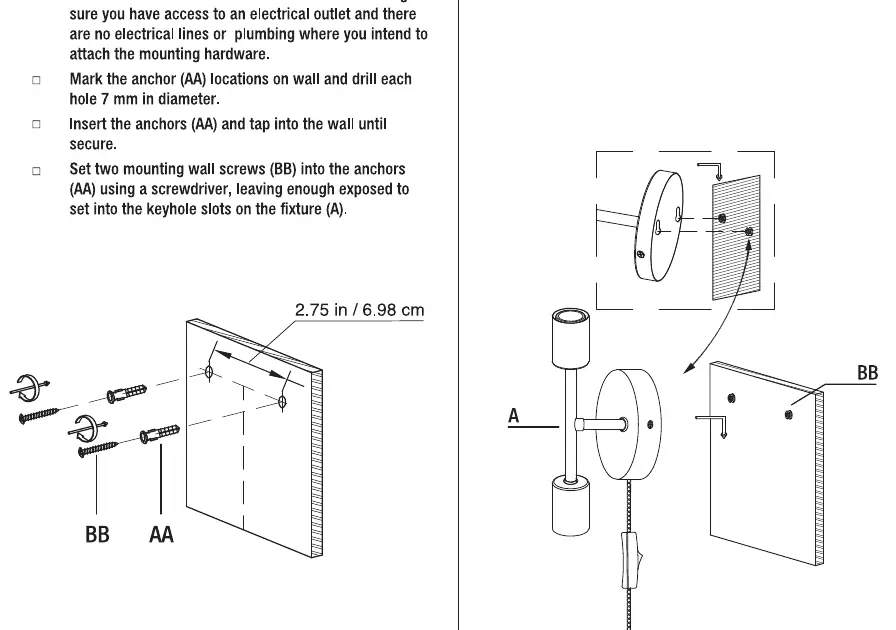
- Preparing for installation: Determine the desired location, ensuring access to an electrical outlet. Mark anchor (AA) locations, drill 7 mm holes, insert anchors, and set mounting wall screws (BB) into the anchors, leaving enough exposed to set into the keyhole slots.
- Attaching the canopy: Align the keyhole slots on the fixture (A) with the mounting wall screws (BB) and slide down until secure.
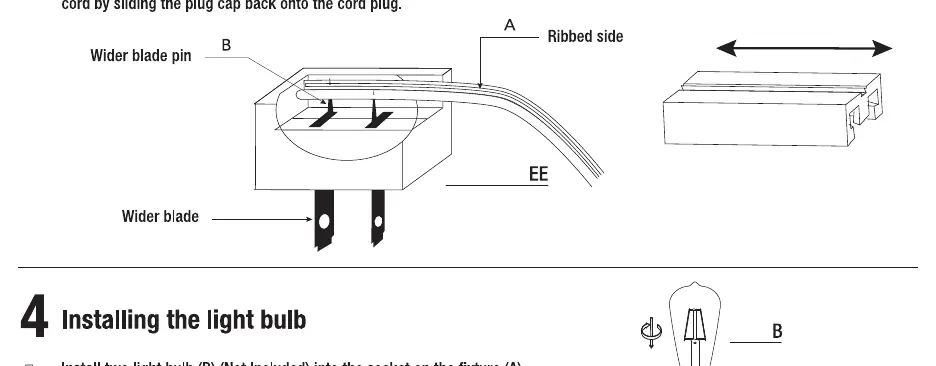
- Adjusting the cord (optional): The cord length should be at least 5 ft (152.4 cm). Slide the plug cap off the cord plug. The insulation of the ribbed side (neutral) wire shall be pierced by the wider blade pin of the plug. Cut the cord to the desired length. Re-attach the cord to the cord plug by inserting the cord back into the plug and pressing down firmly. Secure by sliding the plug cap back onto the cord plug.
- Installing the light bulb: Install two 60-Watt max E26-base Type A or S bulbs or LED equivalent (not included).
Care and Cleaning
WARNING: Before cleaning, disconnect the electrical power by turning off the circuit breaker or removing the fuse.
- Use a dry or damp, clean cloth to wipe the surface of the fixture.
- Do not use abrasive cleaners or chemical solvents.
- Allow the fixture to dry completely before power is restored.
Troubleshooting
If the light will not illuminate, ensure the power supply is on. Check the wiring and contact a qualified electrician if you are not comfortable troubleshooting wiring issues. Test or replace the switch, or replace the bulb. If the fuse blows or the circuit breaker trips, check for crossed wires or improper grounding.
Manufacturer information
Hampton Bay
Practical help
Common problems
The light will not illuminate.
Ensure power is on, check wiring, test/replace the switch, or replace the bulb.
Fuse blows or circuit breaker trips.
Check for crossed wires or ensure the power wire is properly grounded.
Before use
- Ensure power is disconnected at the circuit breaker or fuse box.
- Verify all parts are present according to the hardware list.
- Gather required tools: Phillips screwdriver, flathead screwdriver, wire stripper, electrical tape, safety goggles.
- For plug-in installation, ensure the location has access to an electrical outlet.
- For hardwire installation, ensure the outlet box is compatible.
Images and diagrams
- The manual provides distinct steps for Hardwire Installation (pages 5-8) and Plug-in Installation (pages 9-10).
- Diagrams illustrate the removal of the cord for hardwiring and the adjustment of the cord length for plug-in use.
Model compatibility
- Designed for 120V AC 60Hz circuits.
- Plug is polarized (one blade wider than the other) to reduce electric shock risk.

Manual page author
Emily Carter
User documentation editor
Prepares concise manual descriptions and highlights the most useful setup, operation, and maintenance information for readers.