Lighting / Outdoor Lighting
User Manual for Hampton Bay Outdoor Wall Lantern 7072-2RT
Quick guide for the Hampton Bay Outdoor Wall Lantern 7072-2RT. Includes installation steps, wiring instructions, bulb requirements, and troubleshooting tips.
Quick answers from the manual
Quick answer
- To install the Hampton Bay Outdoor Wall Lantern, mount the bracket to the junction box, connect the fixture wires to the power source (black to black, white to white, copper to ground), secure the fixture to the bracket, and install a compatible medium-base bulb. p. 5
Key actions
- Turn off power at the circuit breaker before installation. p. 2
- Connect wires using wire nuts and secure with electrical tape. p. 5
First start
- Install a 100W max incandescent or 23W max CFL bulb, then turn on the light switch. p. 5, 6
Problems and fixes
Bulb will not light
Replace bulb, ensure power is on, check wiring, or check circuit breaker.
p. 6Maintenance and reset
- Clean with a soft, dry cloth. Do not use chemicals or harsh abrasives. p. 6
Technical specifications
| Parameter | Value | Meaning | Pages |
|---|---|---|---|
| Max Bulb Wattage (Incandescent) | 100W | Maximum wattage for medium-base incandescent bulb. | p. 5 |
| Max Bulb Wattage (CFL) | 23W | Maximum wattage for CFL bulb. | p. 5 |
Where to find it in the PDF
- Installation Instructions p. 5
Table of contents
Manual images
Click an image to enlargeQuick guide from the manual
This guide provides essential instructions for installing and maintaining your Hampton Bay Outdoor Wall Lantern. Before beginning, ensure you have all necessary tools and that the power is disconnected at the circuit breaker. This fixture requires a medium-base bulb (100W max incandescent or 23W max CFL).
Safety Information
Warning: Before starting installation or removal of a previous fixture, disconnect the power by turning off the circuit breaker or removing the fuse at the fuse box.
Caution: Inspect wire insulation for any cuts, abrasions, or exposed copper that may have resulted during shipping. If there is a defect in the wire, do not attempt installation.
Consult a qualified electrician if you have any electrical questions.
Pre-Installation
Tools Required: Ladder, safety glasses, electrical tape, Phillips screwdriver, flat blade screwdriver, pliers, and wire strippers.

Hardware Included:
- Mounting bracket (2)
- Mounting screw (4)
- Wire nut (6)
- Ground screw (2)
Installation
1. Attaching the mounting bracket
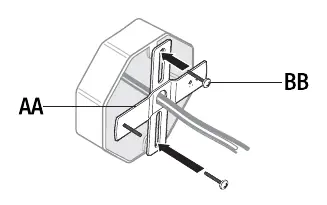
Remove the pre-installed ball nuts from the mounting bracket and place them in a safe location. Attach the mounting bracket to the junction box using the mounting screws. Ensure the pre-installed support screws on the mounting bracket protrude away from the junction box.
2. Making the electrical connections
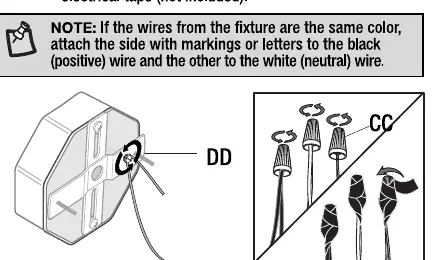
Connect the copper wire from the light fixture to the mounting bracket by securing it with the ground screw. Connect the black wire from the fixture to the black (power) wire from the power source, and the white wire to the white (neutral) wire using the wire nuts. Secure the connections with electrical tape.
3. Installing the light fixture
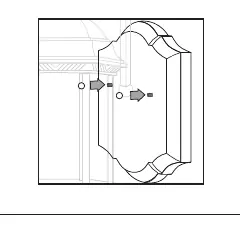
Secure the light fixture to the junction box by placing it over the pre-installed screws on the mounting bracket and securing it with the previously removed ball nuts.
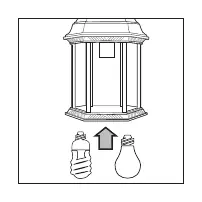
4. Installing the light bulbs
Install one 100-watt max medium-base incandescent bulb or one 23-watt max CFL bulb (not included).
Operation
Turn the light switch on to activate the fixture.
Care and Cleaning
Clean the lamp with a soft, dry cloth. Do not use any cleaners with chemicals, solvents, or harsh abrasives.
Troubleshooting
If the bulb will not light, check the following:
- Ensure the bulb is not burned out and replace if necessary.
- Ensure the power supply is on.
- Check the wiring connections.
- Ensure the circuit breaker is in the On position.
If the fuse blows or the circuit breaker trips when the light is turned on, check for crossed wires or a grounded power wire. Contact a qualified electrician or Hampton Bay Customer Service if issues persist.
Manufacturer information
Hampton Bay
Practical help
Common problems
The bulb will not light.
Check if the bulb is burned out, ensure power is on, verify wiring connections, and check if the circuit breaker is in the On position.
The fuse blows or circuit breaker trips when the light is turned on.
Check for crossed wires or a power wire that is grounding out. Contact a qualified electrician.
Before use
- Turn off power at the circuit breaker or fuse box.
- Inspect wire insulation for cuts or abrasions.
- Gather required tools: ladder, safety glasses, electrical tape, screwdrivers, pliers, and wire strippers.
- Ensure you have the correct bulb type (100W max incandescent or 23W max CFL).
Images and diagrams
- The manual includes diagrams for mounting bracket attachment, wiring connections using wire nuts, and bulb installation.
- Ensure the mounting bracket support screws protrude away from the junction box.
Model compatibility
- Designed for standard junction boxes.
- Compatible with medium-base bulbs only.

Manual page author
David Miller
Documentation analyst
Organizes user manual content into clear summaries, with attention to model details, product context, and everyday usability.