Lighting / Outdoor Lighting
Instruction Manual for Hampton Bay 1LT Exterior Wall Lantern with Photocell
A comprehensive guide for the Hampton Bay 1LT Exterior Wall Lantern with Photocell. Includes assembly, installation, wiring, maintenance, and troubleshooting instructions.
Quick answers from the manual
Quick answer
- This manual provides instructions for assembling, installing, and maintaining the Hampton Bay 1LT Exterior Wall Lantern with Photocell. It includes wiring diagrams and troubleshooting steps. p. 1, 6, 8
Key actions
- Assemble the fixture p. 4, 5
- Install the fixture p. 6, 7
- Clean the fixture p. 8
First start
- Ensure power is off, install bulb, mount fixture, connect wires, and test photocell. p. 3, 6
Problems and fixes
Light bulb will not illuminate
Check bulb, power, wiring, switch, or photocell.
p. 8Maintenance and reset
- Clean with a dry or slightly dampened cloth; do not use solvents. p. 8
Technical specifications
| Parameter | Value | Meaning | Pages |
|---|---|---|---|
| Max Wattage | 100W | Maximum bulb wattage | p. 2 |
Where to find it in the PDF
- Assembly p. 4, 5
- Installation p. 6, 7
- Troubleshooting p. 8
Table of contents
Manual images
Click an image to enlargeQuick guide from the manual
This document provides instructions for the Hampton Bay 1LT Exterior Wall Lantern with Photocell. The fixture features a dusk-to-dawn sensor that automatically turns the light on at dusk and off at dawn. It is designed for outdoor use and requires a 100W maximum incandescent bulb or equivalent CFL.
Tools required
Before beginning, ensure you have the following tools (not included):

- Safety goggles
- Ladder
- Gloves
- Wire strippers
- Flathead and Phillips screwdrivers
- Electrical tape
- Wire cutters
- Silicon rubber sealant for exterior use
Assembly instructions

- Unpack the fixture and lay out all parts on a clean surface.
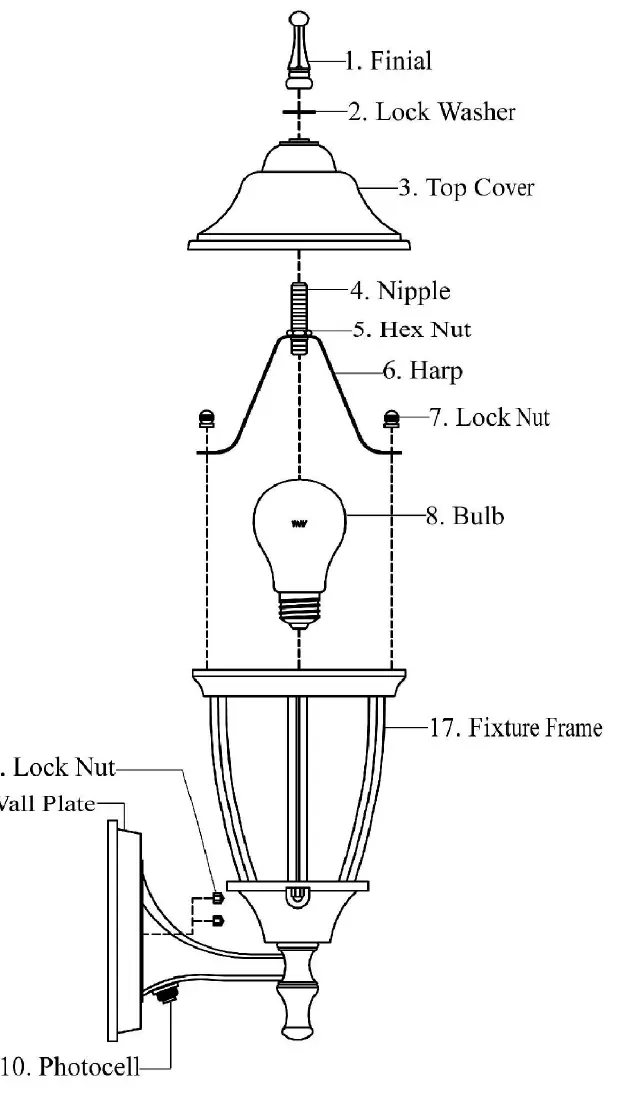
- Install a 100W maximum incandescent bulb or equivalent SBCFL into the socket in the Fixture Frame (#17).
- Place the Nipple (#4) onto the Harp (#6) and secure with the Hex Nut (#5). Attach the Harp and Nipple to the fixture using the two Lock Nuts (#7).
- Place the Top Cover (#3) and Lock Washer (#2) over the Nipple (#4). Secure the Top Cover by screwing the Finial (#1) onto the end of the Nipple.
Installation instructions
- Preparation: Turn off power at the circuit breaker or fuse box before starting.
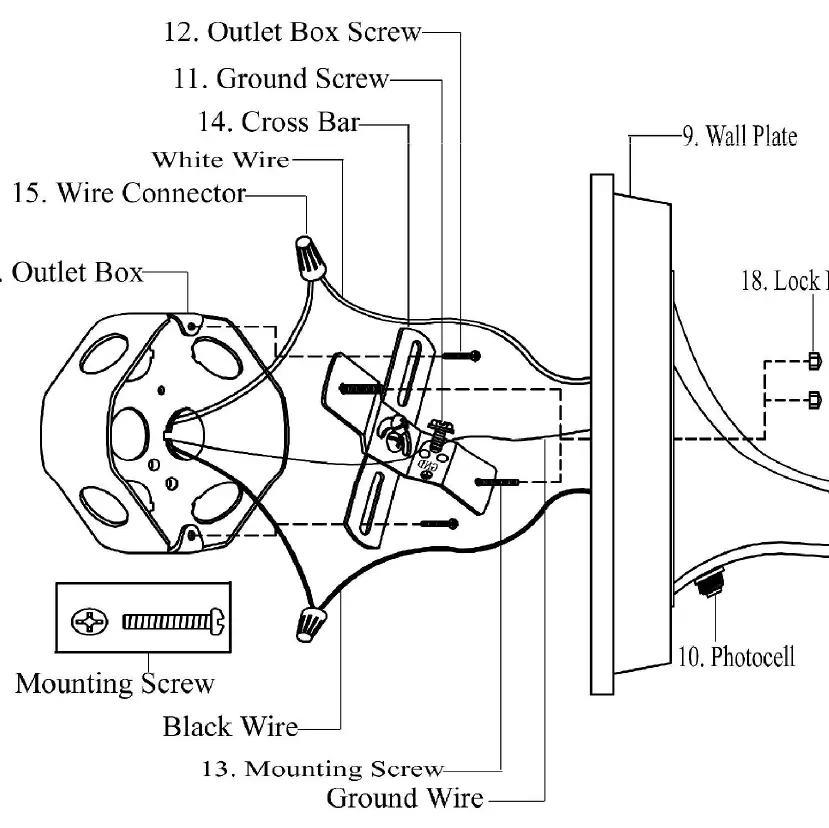
- Mounting: Screw the Mounting Screws (#13) into the Cross Bar (#14). Mount the Cross Bar to the Outlet Box (#16) using the Outlet Box Screws (#12). Ensure the threads of the Mounting Screws face outward.
- Wiring: Connect the ground wire from the fixture to the Ground Screw (#11) on the Cross Bar, then to the ground wire from the Outlet Box. Connect the white wire from the fixture to the white (neutral) wire from the Outlet Box. Connect the black wire from the fixture to the black (live) wire from the Outlet Box. Secure connections with Wire Connectors (#15) and wrap with electrical tape.
- Final Mounting: Align the fixture with the protruding Mounting Screws and secure it to the wall using the two Lock Nuts (#18).
- Sealing: Caulk the space between the wall and the upper 3/4 of the Wall Plate (#9) to prevent water ingress. Leave the bottom 1/4 uncaulked for drainage.
Testing the photocell
If it is daylight, the light will not turn on. To test the fixture, cover the Photocell (#10) with electrical tape. The light should illuminate. Remove the tape once confirmed.
Maintenance
- Clean the outside of the fixture with a dry or slightly dampened clean cloth. Use clean water only; do not use solvents.
- To clean the inside, disconnect power first, then wipe the interior glass and surface with a dry or slightly dampened cloth.
- Do not use harsh chemicals or abrasives.
Troubleshooting
If the light bulb does not illuminate, check the following:
- Ensure the bulb is not burned out.
- Verify the power supply is on.
- Check for faulty wire connections.
- Test or replace the wall switch.
- If it is daylight, the photocell may be preventing operation; cover the photocell to test.
If the fuse blows or the circuit breaker trips, check for crossed wires or grounding issues.
Manufacturer information
Hampton Bay
Practical help
Common problems
Light bulb will not illuminate
Check if the bulb is burned out, ensure power is on, inspect wiring, test the switch, or cover the photocell to test if it is daylight.
Fuse blows or circuit breaker trips
Check for crossed wires or power wire grounding out.
Before use
- Turn off power at the circuit breaker or fuse box.
- Verify you have all required tools (screwdriver, wire strippers, etc.).
- Ensure you have a compatible bulb (100W max incandescent or equivalent CFL).
- Consult a qualified electrician if you have electrical questions.
Images and diagrams
- Assembly diagram shows the order of parts: Finial, Lock Washer, Top Cover, Nipple, Hex Nut, Harp, Bulb, and Fixture Frame.
- Installation diagram illustrates the wiring connections between the fixture and the outlet box.
Model compatibility
- For outdoor use.
- Compatible with 100W incandescent or equivalent SBCFL (Self-Ballasted Compact Fluorescent Lamp).

Manual page author
Emily Carter
User documentation editor
Prepares concise manual descriptions and highlights the most useful setup, operation, and maintenance information for readers.