Lighting / Fixtures
Hampton Bay Solomone 2-Light Vanity Fixture User Guide
Quick guide for the Hampton Bay Solomone 2-Light Vanity Fixture (Model CP2563). Includes installation steps, wiring instructions, bulb requirements, and troubleshooting tips.
Quick answers from the manual
Quick answer
- The Hampton Bay Solomone 2-Light Vanity Fixture (CP2563) is a wall-mounted light that can be installed facing up or down. It requires two 60W max incandescent or 13W max CFL bulbs. p. 1, 5
Key actions
- Turn off power at the circuit breaker before installation. p. 2
- Connect wires: black to black, white to white, and copper to ground. p. 5
First start
- Turn the light switch on to activate the fixture. p. 6
Problems and fixes
The bulb will not light.
Replace the bulb, ensure power is on, check wiring, or check circuit breaker.
p. 6Maintenance and reset
- Clean the lamp with a soft, dry cloth. Do not use chemicals or harsh abrasives. p. 6
Technical specifications
| Parameter | Value | Meaning | Pages |
|---|---|---|---|
| Bulb Compatibility | 60W max incandescent / 13W max CFL | Maximum wattage per socket | p. 5 |
Where to find it in the PDF
- Installation Instructions p. 5
Table of contents
Manual images
Click an image to enlargeQuick Guide
The Hampton Bay Solomone 2-Light Vanity Fixture (Model CP2563) is designed for indoor use and can be installed as an up-light or down-light. Before beginning, ensure you have the necessary tools and that the power is disconnected at the circuit breaker.
Safety Information
- Always consult a qualified electrician if you have electrical questions.
- Before starting installation or removing a previous fixture, disconnect the power by turning off the circuit breaker or removing the fuse.
- Inspect wire insulation for any cuts, abrasions, or exposed copper before installation. Do not install if the wire is defective.
Installation
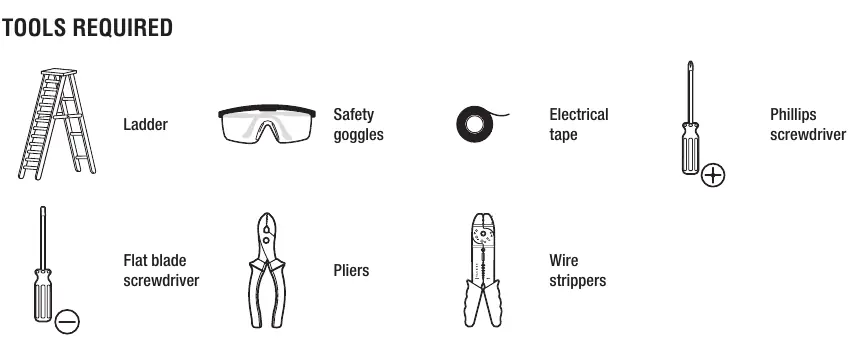
Tools Required: Ladder, safety goggles, electrical tape, Phillips screwdriver, flat blade screwdriver, pliers, and wire strippers.
Steps:
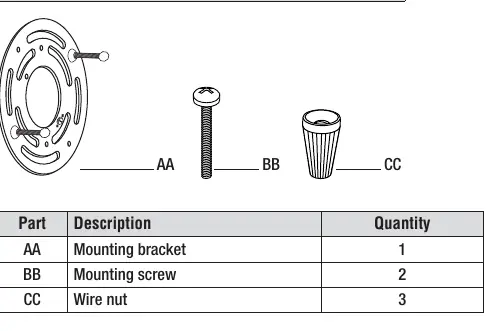
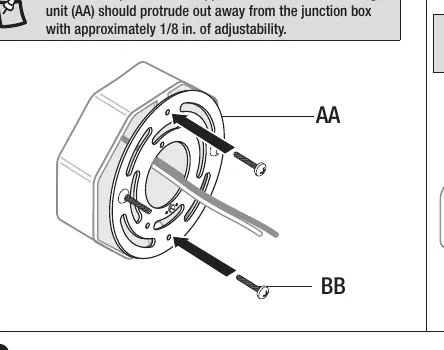
- Attaching the mounting bracket: Remove the preinstalled ball nuts from the mounting unit (AA) and attach the unit to the junction box using the mounting screws (BB). Ensure the support screws protrude approximately 1/8 inch.
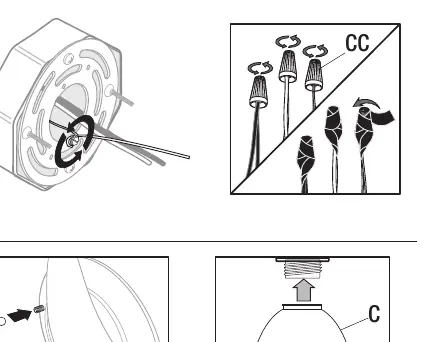
- Making electrical connections: Connect the copper wire on the fixture to the mounting bracket using the ground screw. Connect black to black (power), white to white (neutral), and copper to ground using wire nuts (CC). Secure connections with electrical tape.
- Securing the fixture: Place the fixture over the mounting screws and secure it with the ball nuts. If the fixture is sagging, adjust the ball nuts.
- Installing shades and bulbs: Remove the socket ring (B), add the shade (C), and re-secure the socket ring. Install two 60-watt max. medium-base incandescent bulbs or two 13-watt max. CFL bulbs.
Care and Cleaning
Clean the lamp with a soft, dry cloth. Do not use any cleaners with chemicals, solvents, or harsh abrasives.
Troubleshooting
If the bulb will not light, ensure the power is on, the circuit breaker is in the ON position, and check the wiring connections. If the fuse blows or the circuit breaker trips, check for crossed wires or grounding issues and contact a qualified electrician.
Manufacturer information
Hampton Bay
Practical help
Common problems
The bulb will not light
Replace the bulb, ensure the power supply is ON, check the wiring connections, and ensure the circuit breaker is in the ON position.
The fuse blows or circuit breaker trips when the light is turned on
Check for crossed wires or power wire grounding. Contact a qualified electrician or customer service.
Before use
- Turn off power at the circuit breaker or fuse box.
- Gather required tools: ladder, safety goggles, electrical tape, screwdrivers, pliers, wire strippers.
- Inspect wire insulation for cuts or damage.
- Verify the junction box is compatible.
- Keep receipt and instructions for proof of purchase.
Specs in practice
- Installation Orientation
- Can be installed as an up-light or down-light.
Images and diagrams
- Wiring diagram shows connecting black to black, white to white, and copper to ground.
- Mounting bracket diagram illustrates the use of mounting screws and ball nuts for securing the fixture.
Model compatibility
- Designed for standard junction boxes.
- Not compatible with harsh chemical cleaners.

Manual page author
David Miller
Documentation analyst
Organizes user manual content into clear summaries, with attention to model details, product context, and everyday usability.