Lighting / Outdoor Lighting
User Manual for Hampton Bay Olympus 2-Tier Fountain 10141
Quick guide for the Hampton Bay Olympus 2-Tier Fountain (Model 10141). Includes assembly instructions, safety warnings, maintenance tips, and troubleshooting for water flow issues.
Quick answers from the manual
Quick answer
- The Hampton Bay Olympus 2-Tier Fountain (Model 10141) is assembled by stacking the base, large bowl, small base, small bowl, and finial, with the pump placed in the large bowl. It requires a GFCI outlet and should be stored indoors during winter. p. 1, 5, 6, 7
Key actions
- Assemble on a soft surface to avoid damage. p. 3
- Fill water to 2 inches below the rim of the large bowl. p. 7
First start
- Plug the pump into a GFCI outlet. p. 8
Problems and fixes
No water comes out
Check for bent hose, low water level, debris in intake, or ensure pump is fully submerged.
p. 9Maintenance and reset
- Store indoors during winter and clean the pump nozzle periodically. p. 8
Technical specifications
| Parameter | Value | Meaning | Pages |
|---|---|---|---|
| Power | 120V-60Hz | Required electrical supply | p. 2 |
| Pump Model | WP-450 | Pump assembly model number | p. 2 |
Where to find it in the PDF
- Assembly Instructions p. 5, 6, 7
- Troubleshooting p. 9
Table of contents
Manual images
Click an image to enlargeQuick guide from the manual
The Hampton Bay Olympus 2-Tier Fountain (Model 10141) is designed for outdoor decorative use. Before assembly, ensure you have a GFCI (Ground Fault Circuit Interrupter) electrical outlet available. Assemble the unit on a soft, non-abrasive surface like carpet or cardboard to prevent damage. Always ensure the pump is fully submerged in water before turning it on to prevent damage.
Safety Information
- Electrical Safety: Always disconnect the power supply before working on the fountain. Use only a UL-approved extension cord. Connect only to a grounded 120V-60Hz outdoor outlet.
- Drip Loop: Allow the pump power cord to hang at a lower level than the wall outlet to form a drip loop, preventing water from entering the outlet.
- Usage Warnings: Do not use for commercial purposes. Keep children and pets away from the fountain. Do not drink the water.
- Damage Prevention: Do not operate the pump if it has been dropped or has a damaged cord. Do not place heavy items on the bowl edges.
Assembly
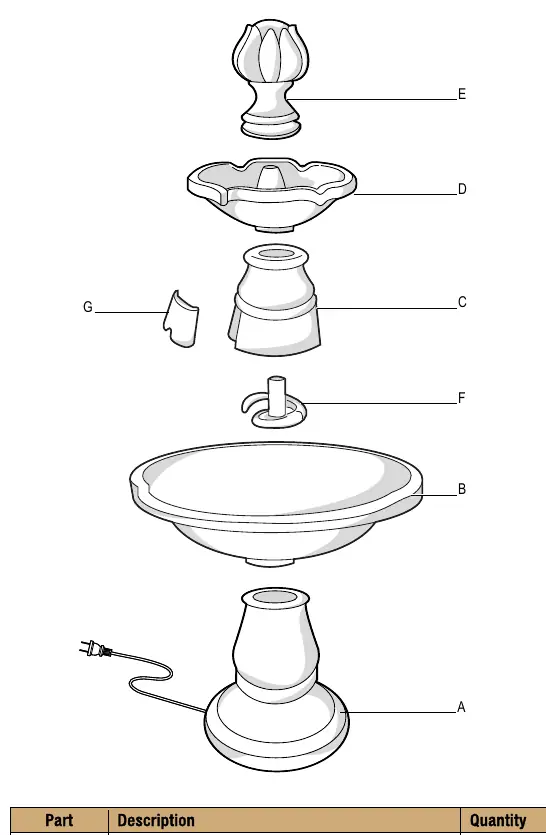
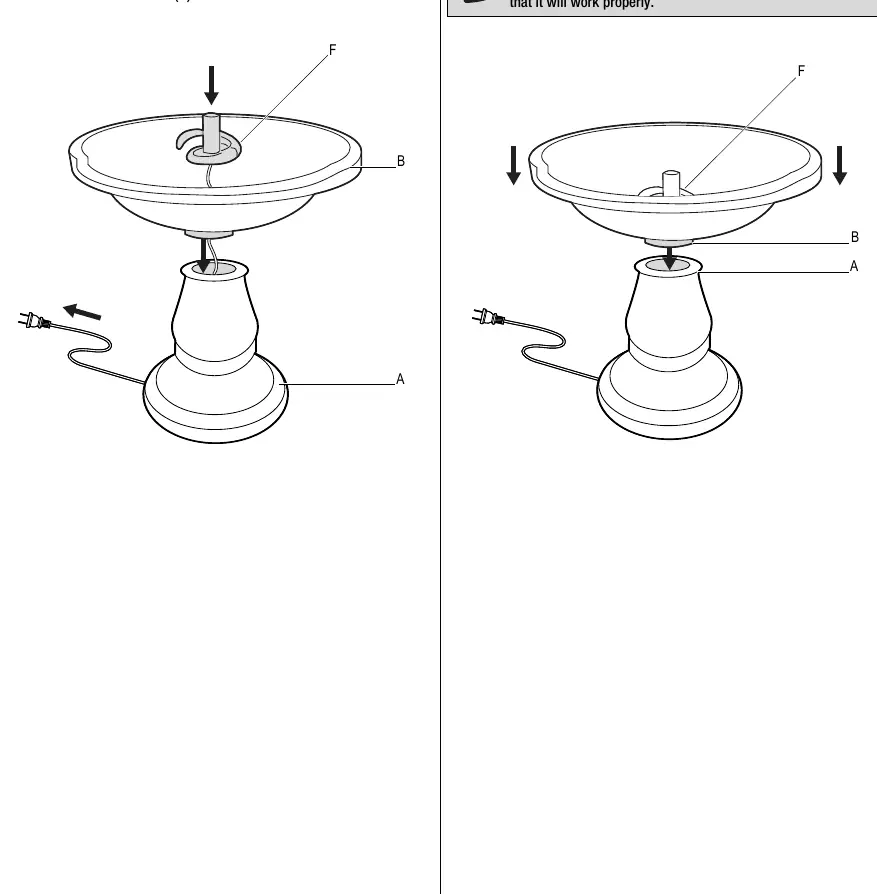
- Installing the pump: Place the pump (F) in the center of the large bowl (B). Thread the electrical cord through the large bowl and into the base (A), positioning it through the groove on the bottom.
- Connecting base and large bowl: Insert the bottom of the large bowl (B) into the base (A) and lock them together. Ensure the pump sits level.
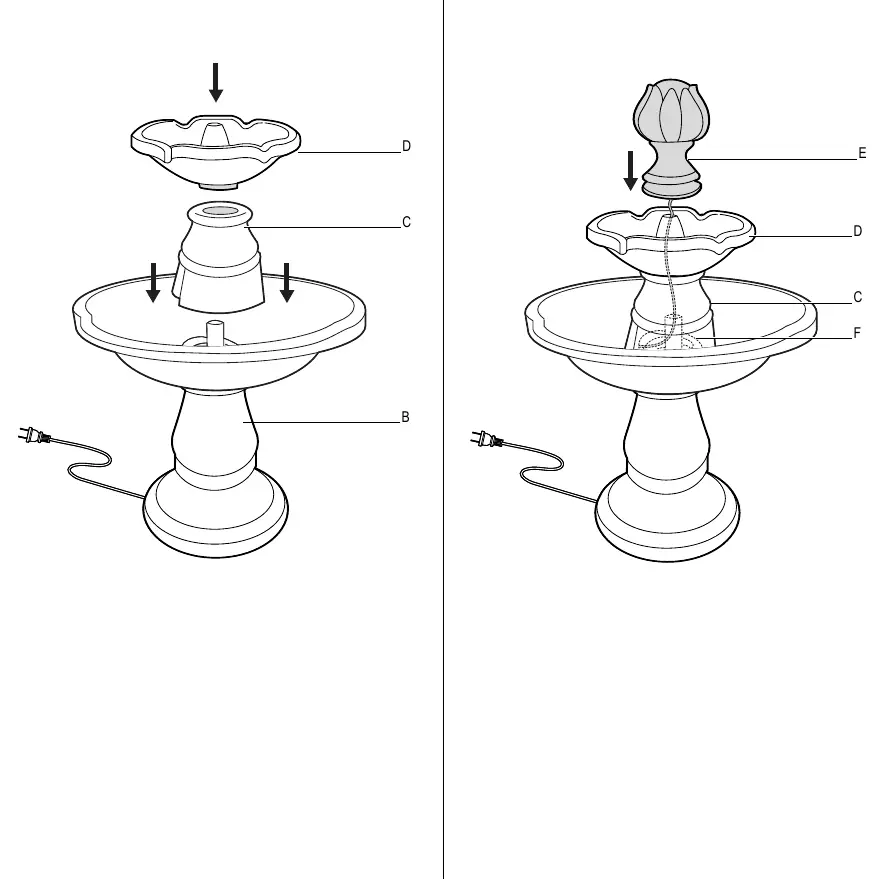
- Connecting small bowl and base: Insert the small base (C) into the large bowl (B) and lock. Then, insert the small bowl (D) into the small base (C) and lock.
- Installing the finial: Thread the hose of the finial (E) into the small bowl (D) and pull it through the opening in the small base (C). Lock the finial (E) to the small bowl (D) and connect the hose to the pump (F).
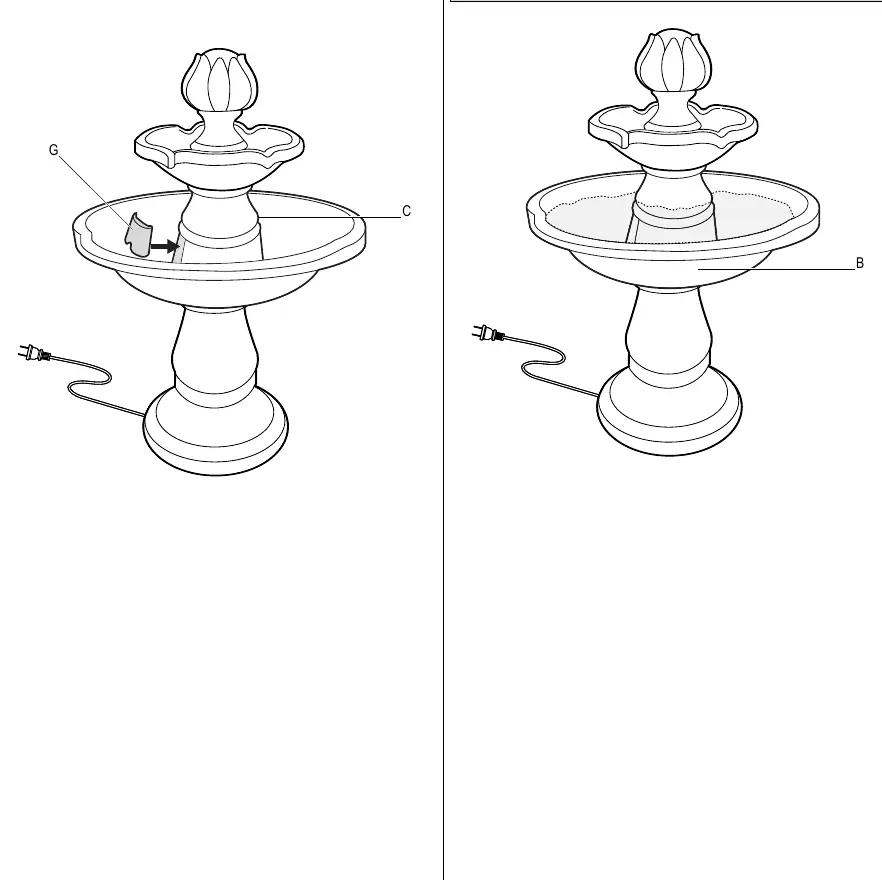
- Attaching the back cover: Assemble the back cover (G) to the back of the small base (C) and close it.
- Adding water: Fill the large bowl (B) with water, stopping 2 inches below the rim. Check for leaks while filling.
Operation
Plug the electrical cord into a GFCI outlet. Water should begin to flow after a few moments.
Maintenance and Cleaning
- Winter Storage: Store the fountain indoors during the winter months.
- Cleaning: Keep water clean by changing it periodically. Clean the water basin with a damp cloth and clean the pump's outlet nozzle.
- Pump Care: Ensure the pump hose is free from dirt and debris and that the pump remains completely immersed in water.
Manufacturer information
Hampton Bay
Practical help
Common problems
No water comes out
Check for a bent or crushed hose, ensure the pump is fully submerged, verify water level, or check for debris in the intake hose.
Pump not working
Disconnect and reconnect the power to the pump several times to reset.
Water not circulating
Run the pump for several minutes to allow it to prime and circulate water.
Before use
- Assemble on a soft, non-abrasive surface (carpet or cardboard).
- Ensure access to a GFCI (Ground Fault Circuit Interrupter) electrical outlet.
- Check for leaks while filling the bowl.
- Ensure the pump is sitting level on the bottom of the large bowl.
- Form a drip loop with the power cord.
Specs in practice
- Electrical Requirement
- 120V-60Hz grounded outdoor outlet.
Images and diagrams
- The parts diagram identifies the base, bowls, finial, pump, and back cover.
- Assembly diagrams illustrate the locking mechanism for the bowls and base.
- The pump installation diagram shows the correct routing of the power cord through the base.
Model compatibility
- For outdoor decorative use only.
- Not intended for commercial use.
- Must use a GFCI outlet.

Manual page author
David Miller
Documentation analyst
Organizes user manual content into clear summaries, with attention to model details, product context, and everyday usability.