Garden / Water Features
User Guide for Hampton Bay 2-Pack Connected Solar Deck Lights NXT-1781
Quick guide for the Hampton Bay 2-Pack Connected Solar Deck Lights (NXT-1781). Includes installation steps for wood and wall mounting, synchronization instructions, battery maintenance, and troubleshooting tips.
Quick answers from the manual
Quick answer
- The NXT-1781 solar deck lights feature a photosensor for automatic dusk-to-dawn operation and a synchronization system using a 5-switch address selector to interconnect multiple lights. p. 1
Key actions
- Mounting the lights p. 1
- Synchronizing lights p. 1
First start
- Set the ON/OFF switch to the ON position and allow the unit to charge for a full sunny day. p. 1
Problems and fixes
Light does not turn on at night
Verify the switch is in the ON position, ensure it has charged for a full sunny day, and check for interference from other light sources.
p. 1Maintenance and reset
- Replace batteries annually with 3x AA, 1000mAh, 1.2V NiMH rechargeable batteries. p. 1
Technical specifications
| Parameter | Value | Meaning | Pages |
|---|---|---|---|
| Battery Type | 3x AA, 1000mAh, 1.2V NiMH | Rechargeable batteries required for operation. | p. 1 |
| Operating Temperature | -14°F to 122°F | Temperature range for proper function. | p. 1 |
Where to find it in the PDF
- Installation and Operation p. 1
Table of contents
Quick guide from the manual
This document provides instructions for the Hampton Bay 2-Pack Connected Solar Deck Lights (Model NXT-1781). These solar-powered lights feature a built-in photosensor for automatic dusk-to-dawn operation and a synchronization system that allows multiple lights to activate simultaneously when motion is detected.
Installation
The lights can be mounted on wood posts/fences or concrete/brick walls. Use the provided template (CC) to mark the mounting locations.
Wood Post/Fence Mounting
- Use the template (CC) to mark screw locations or measure 3.86 in. (98 mm) on-center.
- Insert mounting screws (AA) into the surface, leaving about 1/4 in. sticking out.
- Align the mounting holes on the back plate of the light over the screws.
Wall Mounting
- Use the template (CC) to mark screw locations or measure 3.86 in. (98 mm) on-center.
- Drill two holes at the marked locations.
- Insert plastic anchors (BB) into the holes.
- Insert mounting screws (AA) into the anchors, leaving about 1/4 in. sticking out.
- Align the mounting holes on the back plate of the light over the screws.
Synchronization and Operation
The lights feature a Device Address switch with 5 individual switches on the back. By adjusting these switches, you can create 32 different states. Lights with the same switch configuration will interconnect; when one detects motion, the others will activate.
First Start: Set the ON/OFF switch to the ON position and allow the unit to charge for a full sunny day before use.
Test Mode: When turned ON, the lights enter a 30-60 second test mode. They will light up for 5 seconds when motion is detected. After this period, they enter normal operation.
Maintenance
To ensure optimal performance, clean the solar panel periodically with a damp cloth. Do not use harsh chemicals or abrasives.
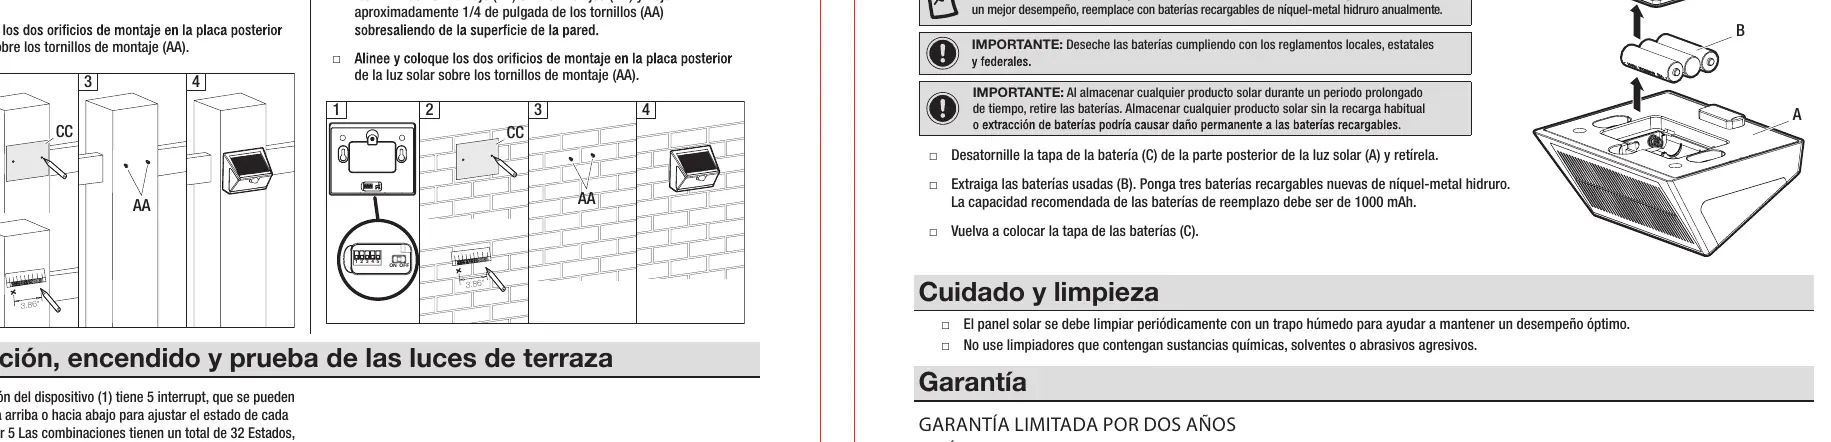
Battery Replacement
- Unscrew the battery cover (C) from the back of the light.
- Remove the old batteries (B).
- Replace with three new 1000mAh, 1.2V Nickel Metal Hydride (NiMH) rechargeable batteries.
- Replace the battery cover.
- Note: Replace batteries annually for best performance. Remove batteries if storing the product for an extended period.
Safety Information
- Operating temperature range: -14°F (-10°C) to 122°F (50°C).
- Use only rechargeable batteries.
- Do not open, short circuit, or mutilate batteries.
Manufacturer information
Hampton Bay
Practical help
Common problems
Short nightly run time
Ensure the solar panel is located in an area receiving maximum direct sunlight and keep the panel clean.
Light does not turn on at night
Ensure the ON/OFF switch is set to ON and the unit has charged for a full sunny day. Check that the light is not installed too close to other light sources.
Before use
- Set the ON/OFF switch on the back plate to the ON position.
- Allow the unit to charge for a full sunny day.
- Ensure the mounting location allows the solar panel to receive direct sunlight.
Specs in practice
- Operating Temperature
- Functions between -14°F (-10°C) and 122°F (50°C).
Images and diagrams
- The Device Address switch (1) consists of 5 switches that can be flipped up or down to create 32 unique combinations for interconnecting lights.
Model compatibility
- Only use rechargeable NiMH batteries.

Manual page author
Michael Turner
Technical manual editor
Reviews PDF manuals for structure, safety notes, and practical product details so readers can find the right information quickly.