Electronics / AV Splitters
User Manual for 18Gbps 8x8 Seamless Matrix HDP-MXB88VW
Quick guide for the HDP-MXB88VW 18Gbps 8x8 Seamless Matrix. Learn how to configure video walls, manage EDID, control via Web GUI, RS-232, and IR remote.
Quick answers from the manual
Quick answer
- The HDP-MXB88VW is an 18Gbps 8x8 Seamless Matrix switcher that allows routing of 8 HDMI sources to 8 displays. It supports 4K@60Hz, video wall functions, and can be controlled via front panel, IR remote, RS-232, or Web GUI. p. 3
Key actions
- Access Web GUI p. 13
- Perform Factory Reset p. 5, 24
Problems and fixes
Web GUI not accessible
Ensure the PC is in the same network segment as the matrix (default IP: 192.168.0.100).
p. 13Maintenance and reset
- Factory Reset via Front Panel p. 5
Technical specifications
| Parameter | Value | Meaning | Pages |
|---|---|---|---|
| Resolution | Up to 4K@60Hz 4:4:4 | Maximum supported video resolution. | p. 4 |
| Power Supply | 24V/3.75A | Required power input. | p. 3 |
Where to find it in the PDF
- Front Panel p. 5
- Rear Panel p. 6
- RS-232 Commands p. 25
Table of contents
Manual images
Click an image to enlargeQuick guide from the manual
The HDP-MXB88VW is an 18Gbps 8x8 Seamless Matrix switcher designed for high-performance video transmission. It allows routing of 8 HDMI sources to 8 displays with support for resolutions up to 4K@60Hz 4:4:4. The device features seamless switching, built-in video wall capabilities, and multiple control methods including front panel buttons, IR remote, RS-232, and a Web GUI.
Device Overview
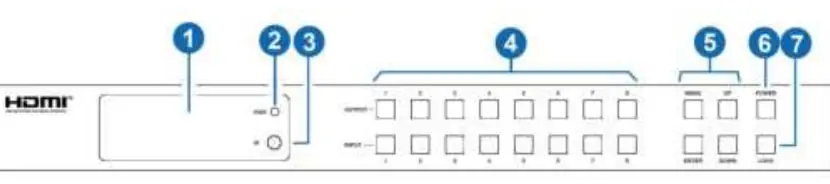
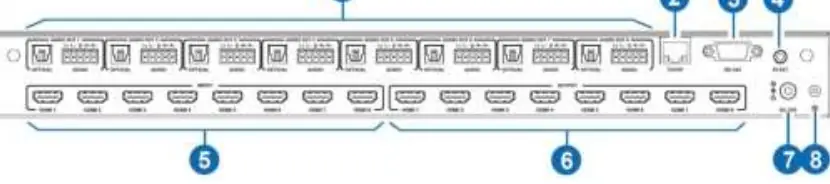
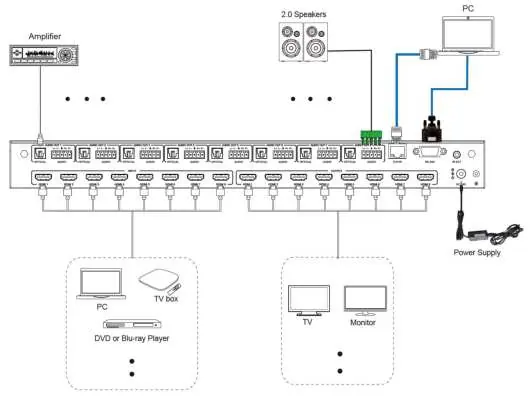
The front panel includes an OLED screen for status monitoring, input/output selection buttons, a power button, and a lock button. The rear panel houses 8 HDMI inputs and 8 HDMI outputs, along with optical and L/R balanced audio outputs, TCP/IP control port, RS-232 port, and an IR extension port.
Installation and Connections
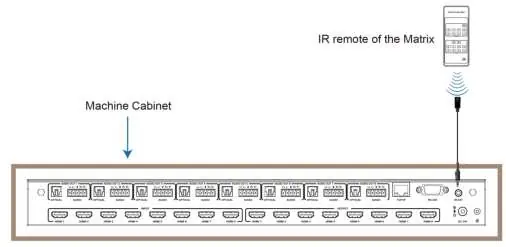
Ensure all devices are powered off before making connections. Connect HDMI sources to the input ports and displays to the output ports. For audio, use the optical or L/R audio outputs as needed. Connect the provided 24V/3.75A power supply to the DC 24V port. If the unit is installed in a closed cabinet, use the included IR receiver cable connected to the IR EXT port.
Operation and Controls
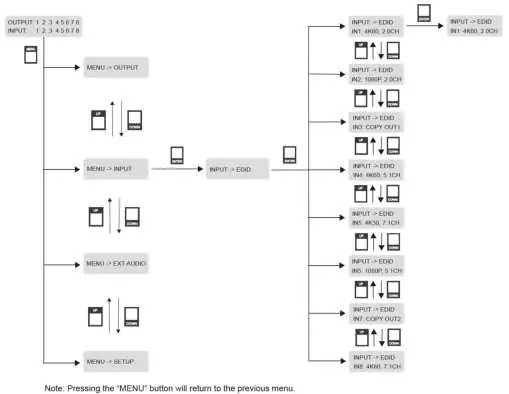
Front Panel: Use the input and output buttons to route signals. Press an output button (1-8) followed by an input button (1-8) to switch sources. The MENU button allows access to system settings like IP info, baud rate, and factory reset.
IR Remote: Use the remote to select inputs and outputs. The 'All' button allows simultaneous routing of one input to all outputs.
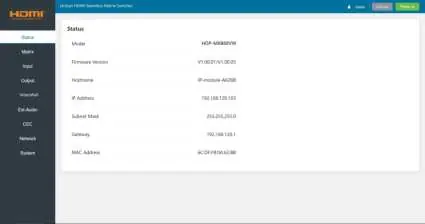
Web GUI Configuration
The matrix can be managed via a web browser. The default IP address is 192.168.0.100. Connect the matrix to a PC via TCP/IP, ensure the PC is on the same network segment, and enter the IP address in a browser. Default login credentials are Username: Admin, Password: admin.
EDID Management
The matrix supports 12 factory-defined EDID settings, 2 user-defined modes, and 8 copy modes. EDID can be managed via the front panel menu, RS-232 commands, or the Web GUI Input page.
RS-232 Control
The device supports RS-232 control via a serial connection. Use a terminal tool to send ASCII commands. Key commands include 'r status!' for device status, 's power z!' for power control, and 's output x in source y!' for routing.
Video Wall Setup
Video wall configurations can be managed via the Web GUI Video Wall page. Users can define rows and columns (1-8), set presets, and adjust bezel compensation for a seamless display experience.
Technical Specifications
- HDMI Compliance: HDMI 2.0b
- HDCP Compliance: HDCP 2.2
- Video Bandwidth: 18Gbps
- Resolution: Up to 4K@60Hz 4:4:4
- Control Ports: TCP/IP, RS-232, IR EXT
Practical help
Common problems
No signal on display
Check HDMI cable connections and ensure the input source is active. Verify the output resolution settings.
Web GUI not accessible
Ensure the PC is in the same network segment as the matrix (default IP: 192.168.0.100).
IR remote not working
Ensure the IR receiver is not blocked. If installed in a cabinet, use the included IR extension cable.
Before use
- Ensure all HDMI sources and displays are powered off before connection.
- Use high-quality HDMI cables.
- Connect the power supply to the DC 24V port.
- If using a network connection, ensure the PC is on the same subnet.
Specs in practice
- Video Bandwidth
- 18Gbps, supports up to 4K@60Hz 4:4:4 resolution.
- HDCP Compliance
- HDCP 2.2 compliant for protected content.
- Control Ports
- TCP/IP (RJ45), RS-232 (D-Sub 9), and IR EXT.
Images and diagrams
- The front panel diagram shows the OLED screen, IR receiver, and input/output selection buttons.
- The rear panel diagram illustrates the layout of HDMI ports, audio outputs, and control interfaces.
- The application example shows a typical setup with a PC, Blu-ray player, and displays connected to the matrix.
Model compatibility
- Supports HDMI 2.0b and HDCP 2.2.
- Compatible with standard 1U rack installation.
- Requires UTP connectors for specific wiring if applicable.

Manual page author
Emily Carter
User documentation editor
Prepares concise manual descriptions and highlights the most useful setup, operation, and maintenance information for readers.