Electronics / Video Transmission
User Manual for HDMI Splitter 1X4 AA6047
Quick guide for the HDMI Splitter 1X4 (Model AA6047). Learn how to connect your HDMI source to four displays using Cat6/7 cables, troubleshoot common issues, and view technical specifications.
Quick answers from the manual
Quick answer
- The HDMI Splitter 1X4 (AA6047) extends one HDMI source to four displays using Cat6/7 cables up to 60m. It supports 3D, 1080p, and various high-definition audio formats. p. 2
Key actions
- Connect HDMI source to TX input (max 15m cable). p. 5
- Connect TX to 4 RX units using Cat6/7 cables (max 60m). p. 5
- Connect RX units to displays (max 20m cable). p. 5
First start
- Connect all cables, then power on the source, the splitter, and the displays. p. 7
Problems and fixes
Non-Power Connected
Check if the power adapter head is truly and correctly inserted the power socket. Check the power switch if it is in on status.
p. 7
No Picture
Ensure the TV is on, the signal source is on, and check system connection quality and cable quality.
p. 7Technical specifications
| Parameter | Value | Meaning | Pages |
|---|---|---|---|
| Max bandwidth | 225MHz | Maximum data throughput capacity | p. 6 |
| Max baud rate | 6.75Gbps | Maximum data transmission speed | p. 6 |
Where to find it in the PDF
- Introduction and Features p. 2
- Connection and EDID p. 3, 4
- Operating and Specifications p. 5, 6
- Troubleshooting p. 7
Table of contents
Manual images
Click an image to enlargeQuick guide from the manual
The HDMI Splitter 1X4 (Model AA6047) is designed to extend and distribute one HDMI source to four displays or projectors simultaneously using Cat6/7 cables. It supports transmission distances up to 60m, 3D video, and various high-definition audio formats. The system consists of one transmitter (TX) and four receivers (RX).
Installation and Connection
Follow these steps to set up your device:

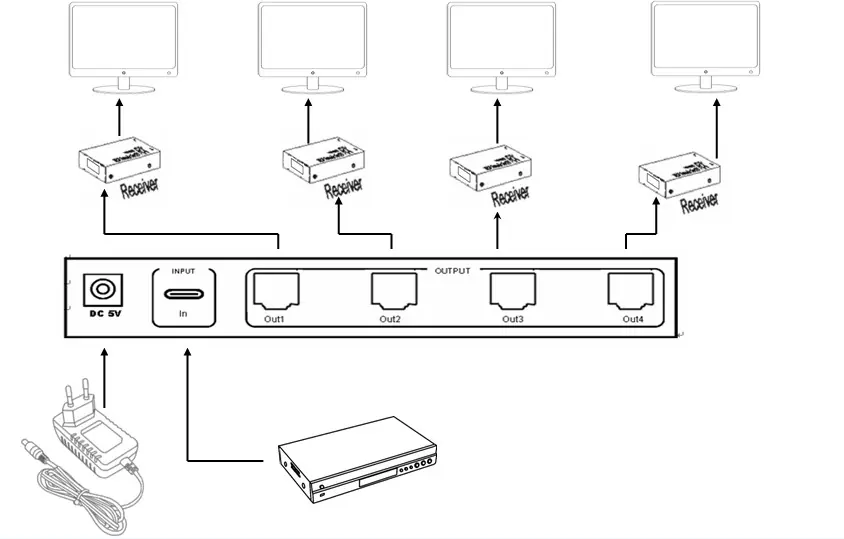
- Connect your HD source to the HDMI input port of the transmitter (TX) using an HDMI cable (max length 15m).
- Connect the TX output ports to the CAT input ports of the four receivers (RX) using Cat6/7 cables (max length 60m).
- Connect each RX unit to its respective display using an HDMI cable (max length 20m).
- Connect the provided power adapters: 5V/3A for the TX unit and 5V/1A for each RX unit.
EDID Management
The device includes an EDID reading function to ensure compatibility with displays that may not work automatically:
- Connect the power adapter and HDMI cables as described above.
- Keep the display in working status and select the correct HDMI input.
- Press the Switcher key on the TX unit. The "Input/EDID" LED will turn green when the action is finished.
- The device reads EDID information from the connected displays one by one.
Troubleshooting
If you encounter issues, check the following:
- Non-Power Connected: Ensure the power adapter is correctly inserted and the power switch is on.
- No Picture: Verify that the TV and signal source are powered on and properly connected. Check the quality of all cables and system connections.
- Obscure Picture: Reconnect the cables to ensure a secure connection and verify cable quality.
Technical Specifications
- Max Bandwidth: 225MHz
- Max Baud Rate: 6.75Gbps
- Operating Temperature: 0 to +40°C
- Operating Humidity: 5 to 90% RH (No Condensation)
- Weight: 750g
Safety Notes
- Place the machine in an environment free from dampness, high temperatures, dust, and corrosive substances.
- Avoid strong shocks, hits, or falls.
- Do not touch the power adapter with wet hands.
- Always hold the power adapter head when unplugging; do not pull the cord.
- Turn off the power when the device is not in use for a long time.
- Do not open the cover or touch internal parts.
- Use only the original factory power adapter.
Practical help
Common problems
Non-Power Connected
Check if the power adapter is correctly inserted into the socket and ensure the power switch is in the ON position.
No Picture
Ensure the TV and signal source are powered on and connected properly. Check the quality of all cables and system connections.
Obscure Picture
Reconnect the cables to ensure a secure connection and verify the quality of the cables used.
Before use
- Ensure all interfaces are connected correctly before powering on.
- Use Cat6/7 cables for the connection between TX and RX units.
- Ensure the HDMI input cable is no longer than 15m.
- Ensure the HDMI output cable (RX to display) is no longer than 20m.
- Use the provided 5V/3A power adapter for the TX unit.
- Use the provided 5V/1A power adapters for each RX unit.
Specs in practice
- Max bandwidth
- 225MHz
- Max baud rate
- 6.75Gbps
- Operating Temperature
- 0 to +40°C
Images and diagrams
- The connection diagram illustrates the TX unit connected to the power source and HDMI input, with four Cat6/7 cables running to four separate RX units, each connected to a display.
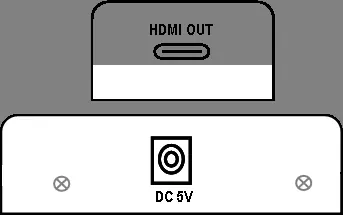
- The rear panel diagram shows the RJ45 output ports, HDMI input port, and DC 5V power interface.
Model compatibility
- Supports 3D video.
- Supports resolutions up to 1080p.
- Supports audio formats: DTS-HD, Dolby-trueHD, LPCM7.1, DTS, Dolby-AC3, DSD.

Manual page author
David Miller
Documentation analyst
Organizes user manual content into clear summaries, with attention to model details, product context, and everyday usability.