Electronics / USB Hubs & Docking
Stoltzen SOLVERA 18G HDMI Manager User Manual
Quick guide for the Stoltzen SOLVERA 18G HDMI Manager. Learn how to configure EDID and HDCP settings, perform firmware upgrades, and understand the device's panel and specifications.
Quick answers from the manual
Quick answer
- The Stoltzen SOLVERA is an 18G HDMI Manager used to handle EDID and HDCP settings, block CEC, and manage 5V power. It supports 4K@60 4:4:4 resolution. p. 1
Key actions
- Configure EDID/HDCP settings using the 4-pin DIP switch. p. 3
- Perform firmware upgrade via USB-C by copying the file 08009000.APP to the BOOTDISK drive. p. 4
First start
- Connect the HDMI source to the HDMI IN port and the display to the HDMI OUT port. Power the device via HDMI or USB-C. p. 3
Problems and fixes
Firmware update failure
If UNKNOW.TXT appears on the BOOTDISK, the update failed. Ensure direct connection without hubs.
p. 4Technical specifications
| Parameter | Value | Meaning | Pages |
|---|---|---|---|
| Bandwidth | 18Gbps | Data transmission capacity | p. 2 |
| Power Consumption | 2.4W (MAX) | Maximum power usage | p. 2 |
Where to find it in the PDF
- Panel Description p. 3
- EDID Settings p. 3
- Firmware Upgrade p. 4
Table of contents
Manual images
Click an image to enlargeQuick guide from the manual
The Stoltzen SOLVERA is an 18G HDMI Manager designed to resolve installation issues by managing EDID and HDCP settings. It supports resolutions up to 4K@60 4:4:4 and includes a CEC blocker. The device can be powered via HDMI or USB-C.
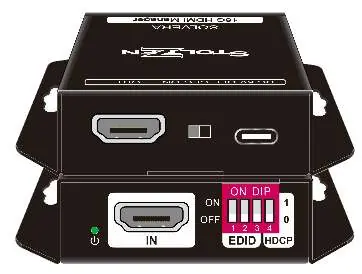
Panel Description
- Power LED: Indicates green when the device is powered on.
- HDMI IN: Connects to your HDMI source.
- DIP Switch: A 4-pin switch used for EDID and HDCP management.
- USB-C: Used for power, uploading custom EDID files, and firmware upgrades.
- CEC Switch: Used to turn the CEC function on or off.
- HDMI OUT: Connects to your display device.
EDID & HDCP Management
The device uses a 4-pin DIP switch to configure predefined EDID settings. Refer to the table below to set the switch positions (0=OFF, 1=ON):
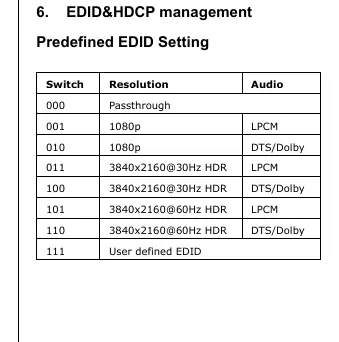
- 000: Passthrough
- 001: 1080p, LPCM
- 010: 1080p, DTS/Dolby
- 011: 3840x2160@30Hz HDR, LPCM
- 100: 3840x2160@30Hz HDR, DTS/Dolby
- 101: 3840x2160@60Hz HDR, LPCM
- 110: 3840x2160@60Hz HDR, DTS/Dolby
- 111: User defined EDID
User Defined EDID Setting
- Rename your EDID file to 0803C000.DAT.
- Connect the SOLVERA to a PC using a USB cable. The PC will detect a drive named "BOOTDISK".
- Copy the renamed file into the BOOTDISK drive.
- Open the drive; if a SUCCESS.TXT file appears, the upload is successful.
- Disconnect the USB cable and power on the device.
Firmware Upgrade
- Rename the upgrade file to 08009000.APP.
- Disconnect HDMI and connect the SOLVERA to a PC via USB.
- Copy the file to the detected "BOOTDISK" drive.
- If a SUCCESS.TXT file appears, the upgrade is successful. If an UNKNOW.TXT file appears, the upgrade failed.
- Note: Do not use hubs or docking stations between the SOLVERA and the host PC during the update.
Specifications
- Bandwidth: 18Gbps
- Power Supply: 5V 1A
- Power Consumption: 2.4W (MAX)
- Dimensions: 54x18x60mm
- Net Weight: 85g
Official resources from the manual
Practical help
Common problems
Firmware update failed
Ensure no hubs or docking stations are used between the SOLVERA and the host PC. Check for an UNKNOW.TXT file on the BOOTDISK.
EDID upload failed
Verify the file is renamed exactly to 0803C000.DAT and copied to the BOOTDISK drive.
Before use
- Ensure the HDMI source is connected to the HDMI IN port.
- Ensure the display is connected to the HDMI OUT port.
- Verify the power source (HDMI or USB-C).
- Set the 4-pin DIP switch according to your required EDID/HDCP configuration.
Specs in practice
- Power Supply
- 5V 1A, can be powered via HDMI or USB-C.
Images and diagrams
- The DIP switch (4-pin) is located on the front panel for easy access to EDID/HDCP settings.
- The USB-C port serves a dual purpose: power input and data interface for firmware/EDID updates.
Model compatibility
- Supports HDMI 2.0.
- Supports HDCP 2.2.

Manual page author
Emily Carter
User documentation editor
Prepares concise manual descriptions and highlights the most useful setup, operation, and maintenance information for readers.