Home Appliances / Fans
User Manual for Hicfm 20-Inch Oscillating Pedestal Shroud Fan
Quick guide for the Hicfm 20-Inch Oscillating Pedestal Shroud Fan (SFSD1-500B3IW). Includes assembly instructions, operation steps, safety warnings, and maintenance tips.
Quick answers from the manual
Quick answer
- The Hicfm 20-Inch Oscillating Pedestal Shroud Fan is assembled by attaching the pole to the base and the fan head to the pole. It is operated via a speed switch (0-3) and an oscillation button. p. 1
Key actions
- Assemble the fan by attaching the pole to the base and the head to the pole. p. 1
- Adjust tilt by loosening the fan head knob. p. 1
First start
- Plug in the fan, set the speed switch to 1, 2, or 3, and press the oscillation button if rotation is desired. p. 1
Problems and fixes
Fan not working
Check power connection and ensure the speed switch is not set to 0.
p. 1Maintenance and reset
- Unplug the fan, wipe with a soft cloth, and vacuum the grille if necessary. p. 1
Technical specifications
| Parameter | Value | Meaning | Pages |
|---|---|---|---|
| Voltage | 120V | Operating voltage | p. 1 |
| Frequency | 60Hz | Operating frequency | p. 1 |
Where to find it in the PDF
- Assembly and Operation p. 1
Table of contents
Manual images
Click an image to enlargeQuick guide from the manual
This document provides instructions for the assembly, operation, and maintenance of the Hicfm 20-Inch Oscillating Pedestal Shroud Fan. Always ensure the fan is unplugged before performing any assembly or maintenance tasks. Do not use the fan outdoors or with an extension cord.
Package Contents
- A: Fan head
- B: Standing pole
- C: Base
Assembly Instructions
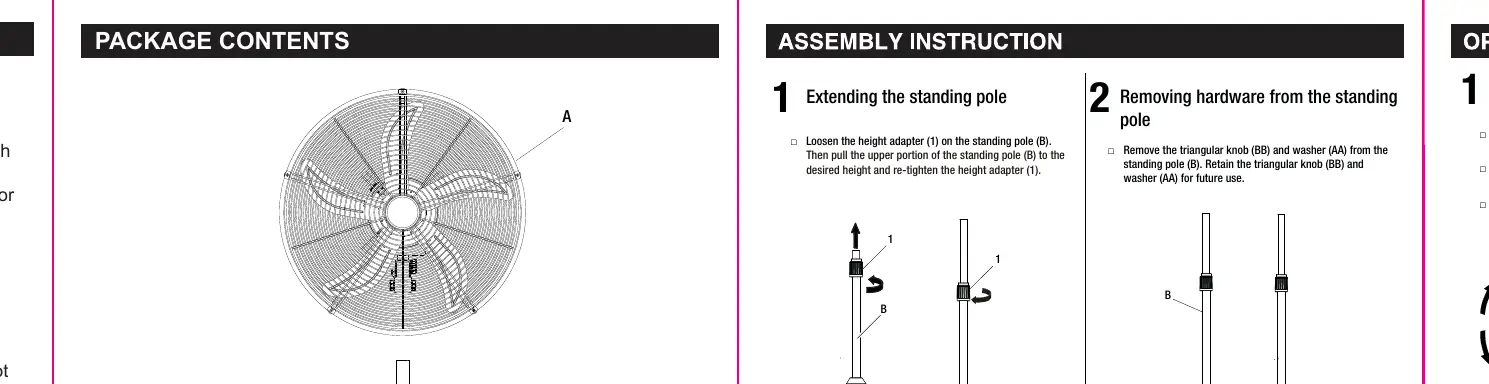
- Extending the standing pole: Loosen the height adapter on the standing pole (B), pull the upper portion to the desired height, and re-tighten the adapter.
- Removing hardware: Remove the triangular knob (BB) and washer (AA) from the standing pole (B). Keep these for assembly.
- Attaching the standing pole to the base: Attach the standing pole (B) to the base (C) using the triangular knob (BB) and washer (AA).
- Attaching the fan head: Place the fan head (A) on top of the standing pole (B) and secure it using the plum knob (CC).
Operation
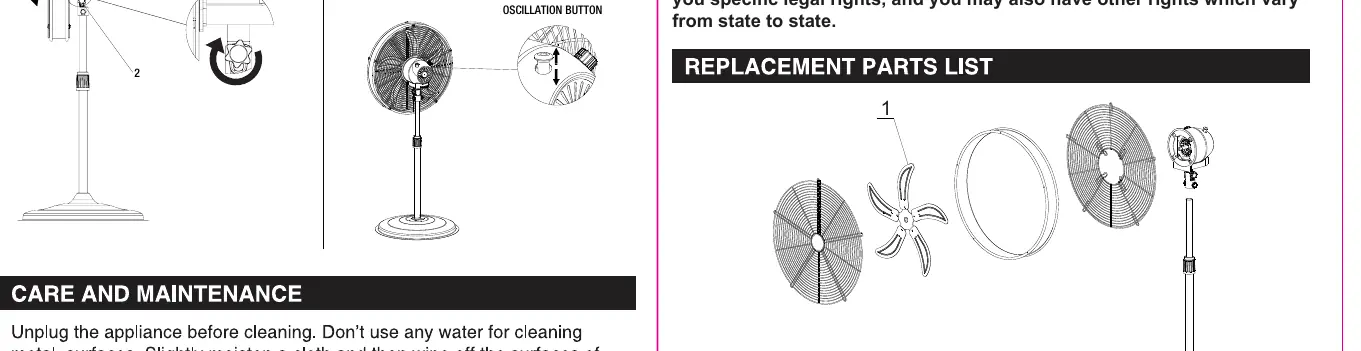
Adjusting the fan tilt angle
Ensure the fan is unplugged. Loosen the fan head knob, tilt the fan head (A) to the desired angle, and re-tighten the knob.
Turning the fan On/Off and adjusting airflow
- Plug the power cord into an outlet.
- Turn the switch to the desired speed: 0 (Off), 1 (Low), 2 (Medium), 3 (High).
- Oscillation: Press the oscillation button down to turn it on; pull it up to turn it off.
Care and Maintenance
Unplug the fan before cleaning. Use a soft cloth to wipe the surfaces. Do not immerse the fan in water. If the grille needs cleaning, use a vacuum cleaner or remove the front grille by loosening the screws on the edge.
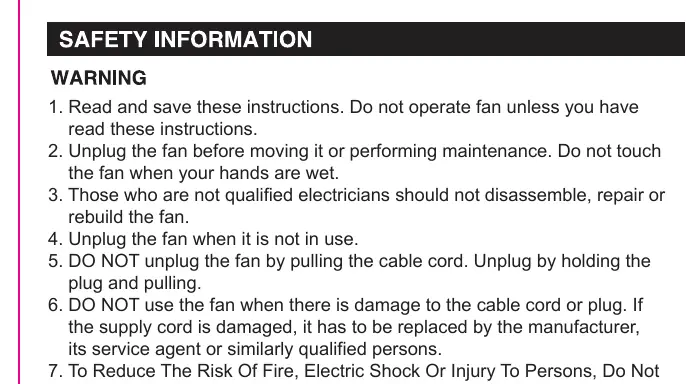
Safety Information
- Do not operate the fan if the cable or plug is damaged.
- Do not insert hands or objects into the grille.
- Do not use the fan near fires.
- This fan is for indoor use only.
- Do not use with solid-state speed control devices.
Practical help
Common problems
Fan does not start
Ensure the power cord is securely plugged into an outlet and the speed switch is set to 1, 2, or 3.
Oscillation not working
Ensure the oscillation button on the fan head is pressed down.
Fan head is loose or tilting unexpectedly
Ensure the fan head knob is fully tightened after adjusting the tilt angle.
Before use
- Ensure the fan is unplugged before assembly or maintenance.
- Verify that the guard is properly fitted before starting the fan.
- Check that the power supply matches the 120V/60Hz rating.
- Do not use an extension cord.
- Ensure the fan is placed on a stable surface.
Specs in practice
- Voltage/Frequency
- 120V / 60Hz - Standard US household power.
Images and diagrams
- The assembly diagram illustrates the connection of the standing pole to the base using the triangular knob and washer.
- The operation diagram shows the location of the oscillation button and the speed switch.

Manual page author
David Miller
Documentation analyst
Organizes user manual content into clear summaries, with attention to model details, product context, and everyday usability.