Home Appliances / Fans
User Manual for Utilitech 20-Inch Oscillating Pedestal Fan SFSD1-500B3IW
Quick guide for the Utilitech 20-Inch Oscillating Pedestal Fan (SFSD1-500B3IW). Includes assembly instructions, operating steps, maintenance tips, and safety warnings.
Quick answers from the manual
Quick answer
- This manual provides assembly, operation, and maintenance instructions for the Utilitech 20-Inch Oscillating Pedestal Fan (SFSD1-500B3IW). p. 1
Key actions
- Assemble the fan by attaching the pole to the base and the fan head to the pole. p. 6, 7
- Adjust speed using the switch (0=off, 1=low, 2=medium, 3=high). p. 8
First start
- Ensure all parts are present, assemble the stand and head, place on a flat surface, and plug in. p. 3, 5, 6, 7
Problems and fixes
Dust accumulation
Use a vacuum or remove the front screen by unscrewing the securing screw.
p. 8Maintenance and reset
- Unplug before cleaning. Do not use water on metal surfaces. Use a vacuum or remove the front screen. p. 8
Technical specifications
| Parameter | Value | Meaning | Pages |
|---|---|---|---|
| Speed Settings | 0, 1, 2, 3 | Off, Low, Medium, High | p. 8 |
Where to find it in the PDF
- Assembly Instructions p. 6, 7
- Operating Instructions p. 8
Table of contents
Manual images
Click an image to enlargeQuick guide from the manual
This manual provides instructions for the Utilitech 20-Inch Oscillating Pedestal Fan (Model SFSD1-500B3IW). Before beginning assembly, ensure all parts are present and you have a Phillips screwdriver and a wrench. The estimated assembly time is 20 minutes. Always unplug the fan before moving, cleaning, or performing maintenance.
Package contents
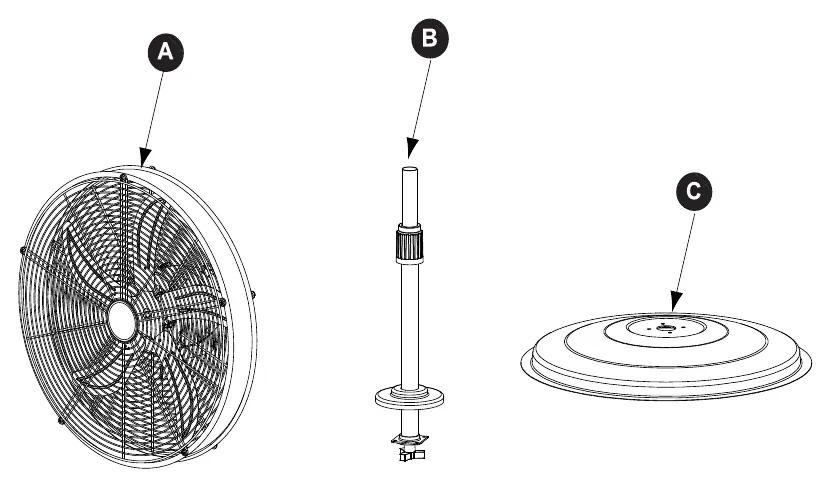
- A: Fan Body
- B: Stand Pole
- C: Base
- Hardware: Bushing (AA), Triangular Screw (BB), Plum Screw (CC)
Assembly instructions
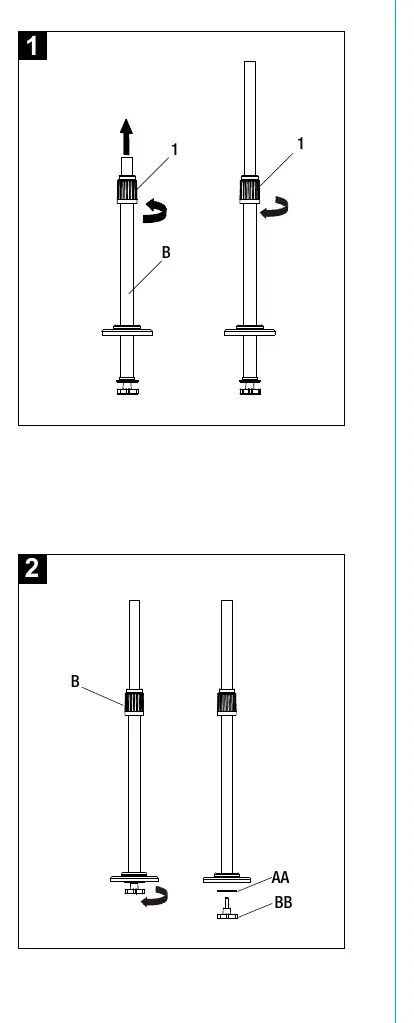
- Extending the standing pole: Loosen the height adapter on the standing pole (B), pull the upper portion to the desired height, and re-tighten the adapter.
- Removing hardware: Remove the triangular screw (BB) and bushing (AA) from the standing pole (B). Keep these for later use.
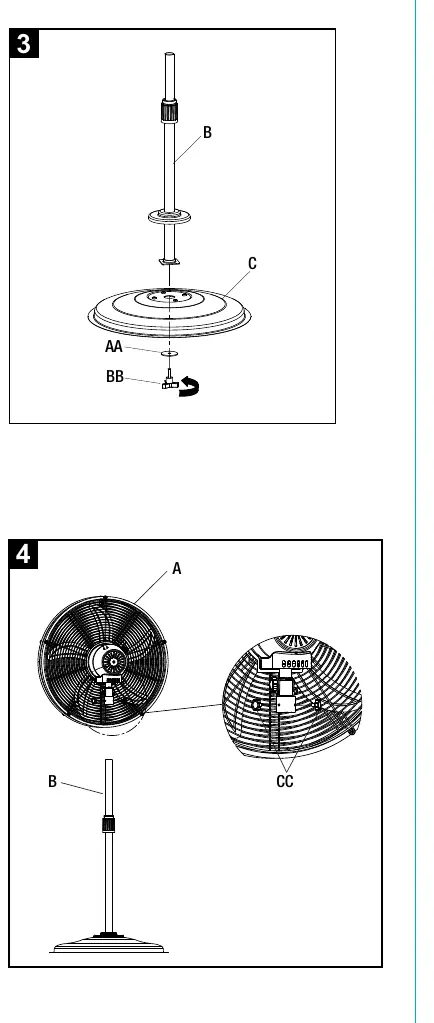
- Attaching the pole to the base: Secure the standing pole (B) to the base (C) using the triangular screw (BB) and bushing (AA).
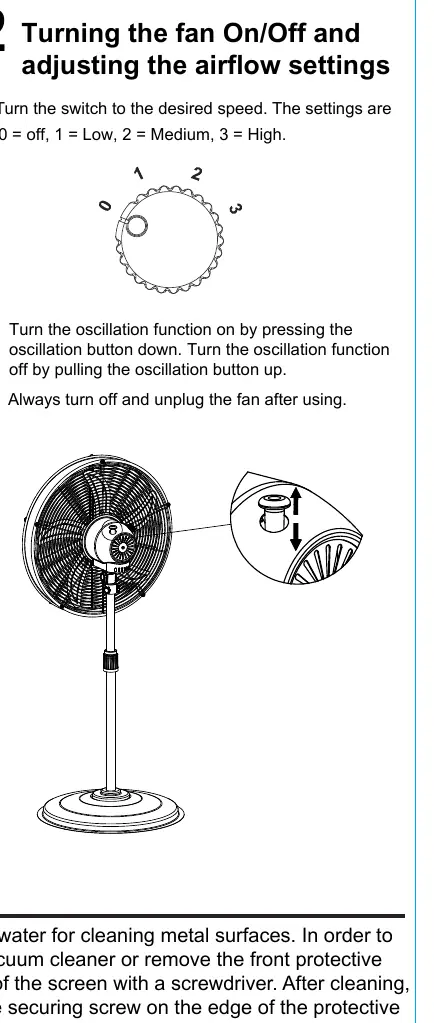
- Attaching the fan head: Place the fan body (A) on top of the standing pole (B) and secure it using the plum screw (CC).
Operating instructions
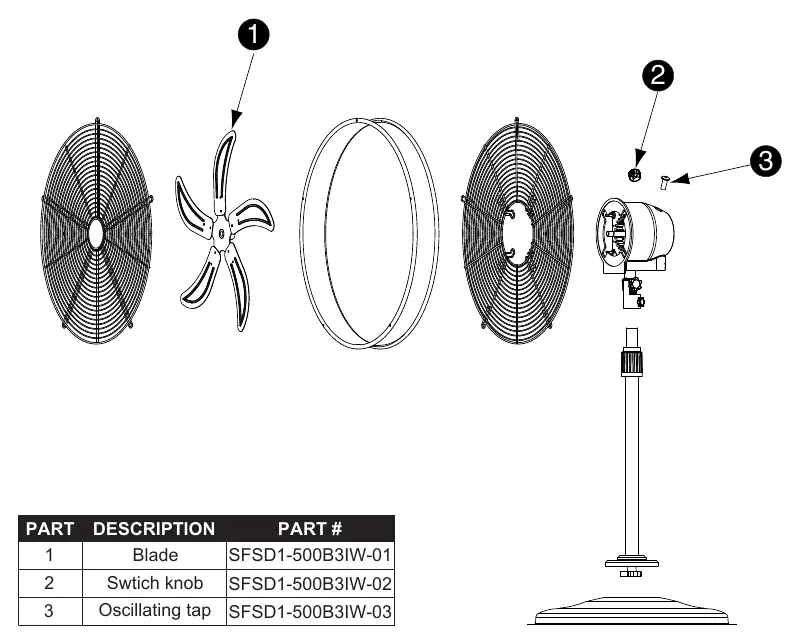
Adjusting tilt angle: Ensure the fan is unplugged. Loosen the fan head knob (2), tilt the fan body (A) to the desired angle, and re-tighten the knob.
Speed and oscillation: Turn the switch to the desired speed: 0 (off), 1 (low), 2 (medium), 3 (high). To activate oscillation, press the oscillation button down. To stop oscillation, pull the button up.
Care and maintenance
Unplug the appliance before cleaning. Do not use water to clean metal surfaces. To remove dust from the protective screen, use a vacuum cleaner or remove the front protective screen by unscrewing the securing screw on the edge of the screen. After cleaning, remount the screen and fasten the screw.
Customer support
For replacement parts or assistance, contact customer service at 866-994-4148, 8 a.m. - 8 p.m., EST, Monday - Sunday, or email [email protected].
Manufacturer information
Utilitech
Practical help
Common problems
Fan does not turn on
Ensure the fan is plugged in and the speed switch is set to 1, 2, or 3.
Dust buildup on screen
Use a vacuum cleaner or remove the front protective screen by unscrewing the securing screw.
Before use
- Ensure all parts (Fan Body, Stand Pole, Base) are present.
- Have a Phillips screwdriver and wrench ready.
- Place the fan on a safe, flat surface.
- Ensure the fan is unplugged before assembly.
- Check that the power cord and plug are not damaged.
Images and diagrams
- Assembly diagrams illustrate how to attach the pole to the base and the fan head to the pole.
- Operating diagrams show the location of the tilt knob and the speed switch.
Model compatibility
- Use only manufacturer-recommended replacement parts.
- Do not use with solid-state speed control devices.

Manual page author
Michael Turner
Technical manual editor
Reviews PDF manuals for structure, safety notes, and practical product details so readers can find the right information quickly.