Automotive / Car Audio
User Manual for Hifonics PLUTO II Amplifier
Quick guide for the Hifonics PLUTO II 2-channel amplifier. Includes installation steps, wiring diagrams, technical specifications, and troubleshooting tips.
Quick answers from the manual
Quick answer
- The Hifonics PLUTO II is a 2-channel digital class D amplifier for 12V vehicle systems. It supports RCA and high-level inputs, features adjustable high-pass and low-pass filters, and provides up to 320W RMS power in bridged mode. p. 1, 4, 18
Key actions
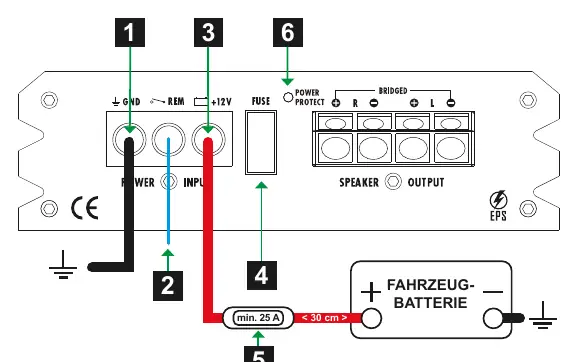
- Disconnect the ground wire from the vehicle battery before starting any installation to avoid short circuits. p. 5, 19
First start
- Mount the amplifier in a well-ventilated area, connect the GND, REM, and +12V terminals, and install a fuse within 30cm of the battery. p. 6, 7, 20, 21
Problems and fixes
Power LED is red
Check for short circuits on speaker cables, verify load impedance is not too low, ensure proper ventilation, and check cable cross-sections.
p. 15, 29Technical specifications
| Parameter | Value | Meaning | Pages |
|---|---|---|---|
| RMS Power @ 4 Ohm | 2 x 100 W | Output power per channel | p. 4, 18 |
Where to find it in the PDF
- Safety Instructions p. 2, 3, 16, 17
- Technical Specifications p. 4, 18
- Installation p. 5, 6, 19, 20
- Troubleshooting p. 12, 13, 14, 15
Table of contents
Manual images
Click an image to enlargeQuick guide from the manual
The Hifonics PLUTO II is a digital class D 2-channel amplifier designed for use in vehicles with a 12V electrical system and negative ground. Before installation, always disconnect the ground wire from the vehicle battery to prevent short circuits and electric shocks. Ensure the amplifier is mounted in a location with sufficient air circulation and protected from moisture and dust.
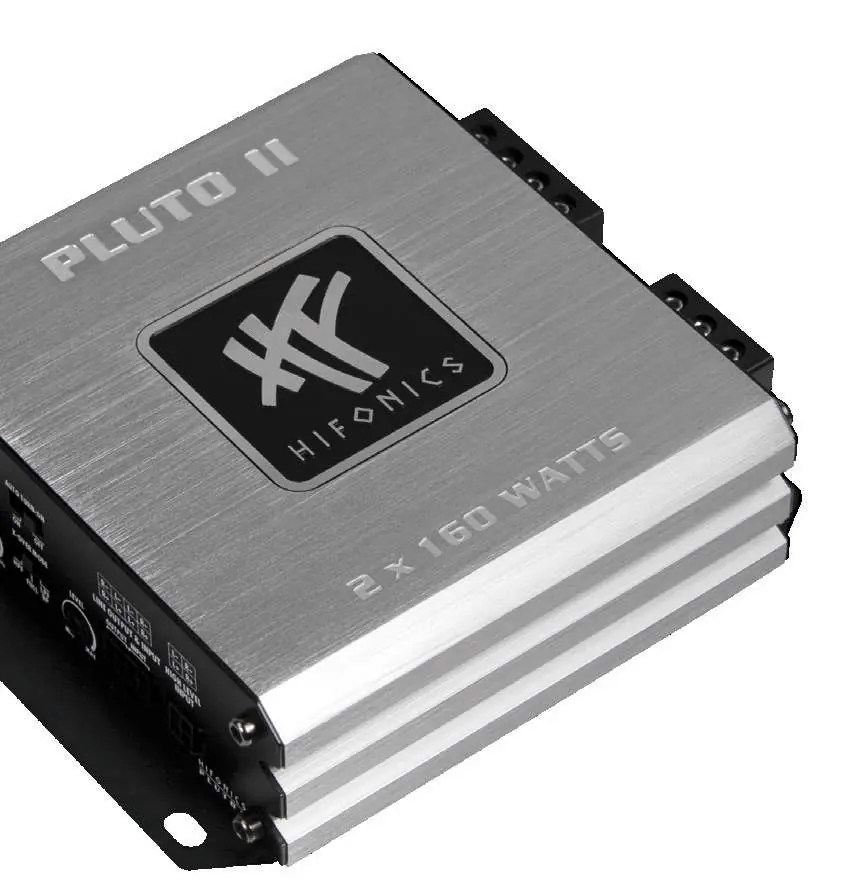
Technical Specifications
- Channels: 2
- Circuit: Digital Class D
- RMS Power @ 14.4V (4 Ohm): 2 x 100 W
- RMS Power @ 14.4V (2 Ohm): 2 x 160 W
- RMS Power @ 14.4V (4 Ohm bridged): 1 x 320 W
- Frequency Response: 4 - 38000 Hz
- Signal-to-Noise Ratio: 105 dB
- Fuse Rating: 1 x 25 A
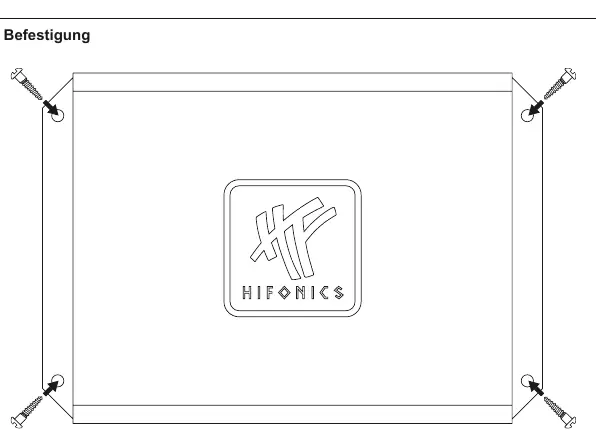
Mechanical Installation
When installing the amplifier, ensure that no vehicle components like cables, fuel tanks, or seat belts are damaged. Use self-tapping screws to fasten the device securely. Avoid mounting the amplifier in small, sealed spaces to ensure proper cooling.
Electrical Interconnection
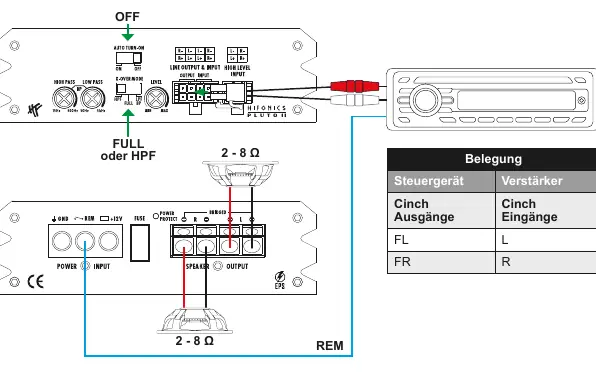
For professional installation, use appropriate wiring kits. Ensure the ground wire is as short as possible and connected to a clean, metallic point on the vehicle chassis. Connect the +12V terminal to the battery positive pole, and install a fuse within 30 cm of the battery to protect the cable. The REM terminal should be connected to the head unit's remote turn-on signal, or use the Auto Turn-On function if the head unit lacks a remote output.
Operation and Settings
The amplifier features adjustable filters to optimize sound:
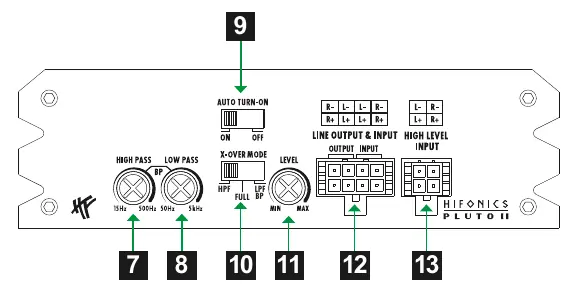
- High Pass (HP): Limits frequencies downwards (15 Hz - 500 Hz).
- Low Pass (LP): Limits frequencies upwards (50 Hz - 5000 Hz).
- X-OVER Mode: Select between Full, HP, or LP/BP modes.
- Level: Adjusts input sensitivity to match the head unit's output.
Troubleshooting
If the amplifier does not function or the Protect LED lights up red, check the following:
- Power LED off: Check the fuse at the battery and the +12V connection. Verify the remote turn-on signal or Auto Turn-On setting.
- Protect LED red: Check for short circuits on speaker cables, ensure load impedance is not too low (minimum 2 Ohm), and verify the amplifier is not overheated.
- No sound: Check RCA/speaker cable connections, input mode settings, and crossover settings.
Practical help
Common problems
Power LED is red (Protect mode)
Check for short circuits on speaker cables, ensure load impedance is not below 2 Ohms, verify proper ventilation, and check if the power cable cross-section is sufficient.
No sound from speakers
Verify RCA/speaker cable connections, check if the input mode switch is correct, and ensure crossover settings are not blocking the signal.
Distortion or hissing noise
Lower the input level or Bass Boost settings on the amplifier, or adjust EQ settings on the head unit.
Before use
- Disconnect the ground wire from the vehicle battery before starting installation.
- Ensure the mounting location provides sufficient air circulation.
- Use a fuse within 30 cm of the battery for the power cable.
- Ensure all cable connections are tight and secure.
- Verify the vehicle has a 12V electrical system with negative ground.
Specs in practice
- RMS Power @ 4 Ohm
- Output power per channel when driving 4 Ohm speakers.
- RMS Power @ 2 Ohm
- Output power per channel when driving 2 Ohm speakers.
- RMS Power @ 4 Ohm bridged
- Total output power when combining channels for a single load.
- Frequency Response
- The range of frequencies the amplifier can reproduce.
Images and diagrams
- Wiring diagrams illustrate connections for RCA inputs and High Level inputs.
- Application examples show how to connect speakers in different configurations (Full/HP or LPF/BP).
Model compatibility
- Designed for 12V vehicle electrical systems.
- Requires negative ground.
- Speaker impedance must be between 2 and 8 Ohms.

Manual page author
Michael Turner
Technical manual editor
Reviews PDF manuals for structure, safety notes, and practical product details so readers can find the right information quickly.