Tools / Power Tools
User Manual for Hikoki RH 18DA Cordless Heat Gun
Quick guide for the Hikoki RH 18DA Cordless Heat Gun. Includes safety warnings, operating instructions, temperature settings, maintenance, and troubleshooting.
Quick answers from the manual
Quick answer
- The RH 18DA is a cordless heat gun. To operate, insert a compatible battery, set the switch to the desired temperature setting (I or II), and ensure the nozzle is at least 5 cm from the material. p. 2, 10, 11
Key actions
- Switching between Fahrenheit and Celsius p. 11
- Removing the nozzle p. 11
First start
- Charge the battery using the specified charger. p. 9
Problems and fixes
Tool doesn't run
Charge battery or reset switch.
p. 13Error codes
| Code | Meaning | Action | Pages |
|---|---|---|---|
| Overload Protection | LED light and display blink (0.5s on/off) | Remove the cause of the overload. | p. 11 |
| Temperature Protection | LED light and display blink | Allow the tool and battery to cool. | p. 11 |
Technical specifications
| Parameter | Value | Meaning | Pages |
|---|---|---|---|
| Voltage | 18 V | Operating voltage | p. 9 |
Where to find it in the PDF
- Safety Warnings p. 4, 5, 6, 7
- Names of Parts p. 8
- Specifications p. 9
- Mounting and Operation p. 10, 11
- Troubleshooting p. 13
Table of contents
Manual images
Click an image to enlargeQuick guide from the manual
The Hikoki RH 18DA is a cordless heat gun designed for various applications such as peeling paint, softening adhesives, heat wrapping, and defrosting. Before use, ensure the battery is fully charged and the work area is well-ventilated. Always wear eye protection and a dust mask when operating the tool.
Description of the tool
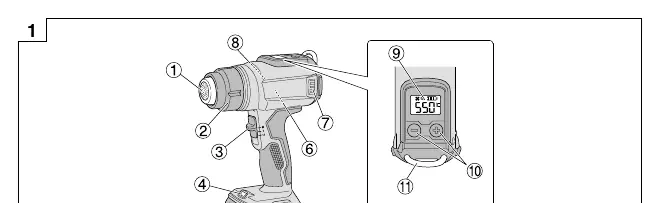
The tool features a nozzle, temperature control buttons, a display, and an LED light. It is powered by a compatible 18V battery (sold separately).
Operation
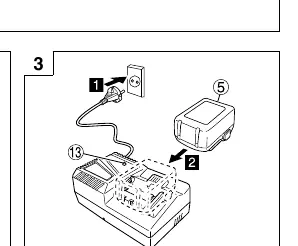
Battery and Charging: Insert a compatible Multi Volt or BSL18 series battery into the tool. Charge the battery using the specified charger (e.g., UC18YFSL). The pilot lamp on the charger indicates the charging status.
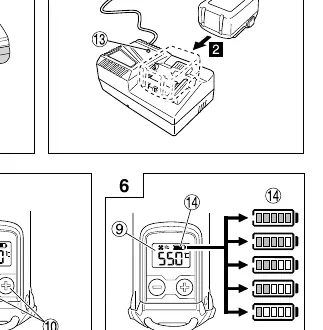
Switching and Temperature: Use the switch to select between setting I (30-400°C) and setting II (30-550°C). Press and hold the + and - buttons simultaneously to switch between Fahrenheit (°F) and Celsius (°C).
Nozzle: Insert the nozzle firmly into the front cover. To remove it without touching the hot nozzle, rotate the front cover counterclockwise.
Work Examples
- Peeling paint: Use the plane or round nozzle to soften paint, then remove with a scraper.
- Softening adhesive: Use the plane or round nozzle to soften the surface, then peel off.
- Heat wrapping: Use the plane nozzle for heat-shrink film and tubes.
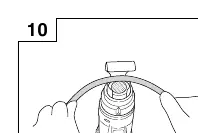
- Forming resin pipes: Use the curved surface nozzle to heat the circumference evenly.
- Defrosting water pipes: Use the curved surface nozzle to heat from the edge to the center.
Maintenance and Inspection
Always switch off the tool and remove the battery before maintenance. Regularly inspect mounting screws and ensure they are tight. Keep the motor winding clean and free from oil or water. Inspect terminals for dust and swarf. Store the tool in a cool, dry place out of reach of children.
Warning Signals
If the tool's safeguard functions (Overload or Temperature protection) are triggered, the LED light and temperature display will blink. Switch off the tool immediately and follow the corrective actions described in the manual (e.g., remove the cause of overload or allow the tool to cool).
Manufacturer information
HiKOKI
Practical help
Common problems
Tool doesn't run
Charge the battery or ensure the switch was not left between the 'I' and 'OFF' positions.
White smoke on first use
This is normal; oils in the heat insulating material are vaporizing. It will stop after a few minutes of continuous use.
Tool suddenly stopped
The battery is overheated. Let the battery cool down.
Battery cannot be installed
Ensure you are using a compatible Multi Volt or BSL18xx series battery.
Before use
- Check the tool for damage, cracks, or malformation.
- Ensure the work area is well-ventilated.
- Wear a dust-protection mask.
- Check that the nozzle is at least 5 cm away from the item being heated.
- Ensure the battery is fully charged and firmly installed.
Images and diagrams
- Fig 1: Overview of parts including nozzle, switch, and display.
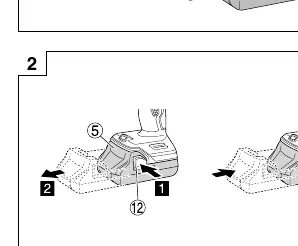
- Fig 2: Battery removal and insertion.
- Fig 3: Charging the battery.
- Fig 5: Temperature settings.
- Fig 9: Attaching/removing the nozzle.
Model compatibility
- Compatible with Multi Volt and BSL18 series batteries.
- Existing batteries (BSL3660/3620/3626, etc.) cannot be used.

Manual page author
David Miller
Documentation analyst
Organizes user manual content into clear summaries, with attention to model details, product context, and everyday usability.