Tools / Drills
Operating Instructions for Hilti SF 144-A and SFH 144-A Cordless Drill
Quick guide for the Hilti SF 144-A and SFH 144-A cordless drill/driver. Includes setup, operation, maintenance, safety, and troubleshooting steps.
Table of contents
Manual images
Click an image to enlargeQuick Guide from the Manual
The Hilti SF 144-A and SFH 144-A are professional-grade cordless drill/drivers. The SF 144-A is designed for drilling and screwdriving, while the SFH 144-A includes a hammer drilling function for masonry. Always read the safety instructions before first use and ensure the battery is charged correctly.
Operating Controls
Familiarize yourself with the tool components:
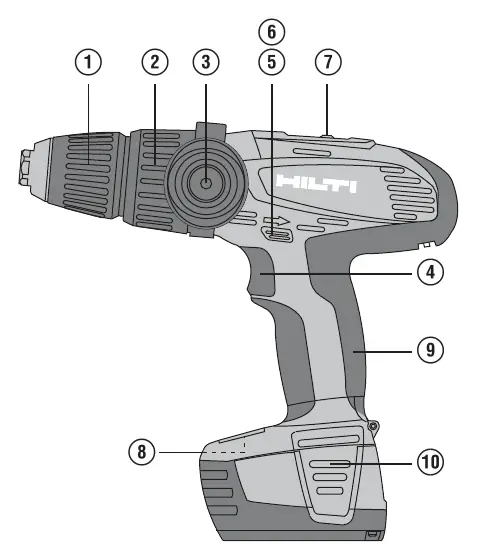
- Quick-release chuck: For inserting and removing drill bits.
- Torque and operating mode setting ring: Adjusts torque and selects drilling or hammer drilling modes.
- Side handle: Provides stability; should be used for heavy-duty tasks.
- Control switch: Features electronic speed control.
- Forward/reverse switch: Selects rotation direction and acts as a transport lock when in the middle position.
- Gear selector switch: Selects the mechanical gear range.
- Battery release buttons: Used to remove the battery pack.
Battery Management
Charging: Use only Hilti-approved chargers. A new battery must be charged fully before its first use to ensure proper cell formation. Li-ion batteries do not have a memory effect and can be charged at any time.
Fitting and Removing: To fit, push the battery into the tool from below until it clicks. To remove, press both battery release buttons and pull the battery downwards.
Charge Status: The battery features an LED display. When the battery is at rest, press the release buttons to see the charge status for three seconds.
Operation
Setting Rotation: Use the forward/reverse switch. The middle position locks the tool.
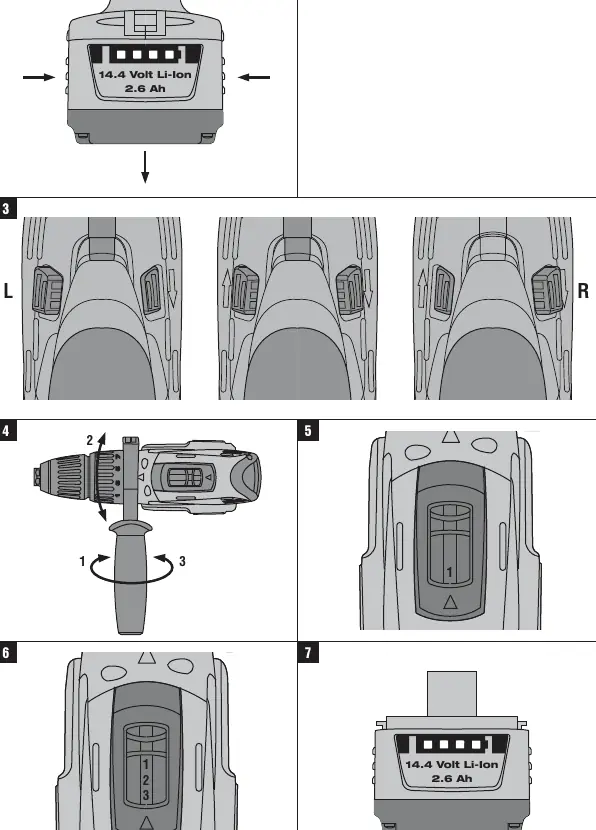
Speed Selection: Use the mechanical gear switch to select the appropriate speed range for your task. The SF 144-A has 2 gears, while the SFH 144-A has 3 gears.
Drilling and Hammer Drilling: Ensure the correct mode is selected on the torque ring. For hammer drilling (SFH 144-A), select the hammer symbol. Always use the side handle for better control.
Screwdriving: Set the torque ring to the desired torque value to prevent over-tightening.
Care and Maintenance
Always remove the battery before cleaning. Keep the tool, especially grip surfaces, free from oil and grease. Clean ventilation slots with a dry brush. Do not use silicone-based cleaning agents. Store batteries in a cool, dry place.
Troubleshooting
If the tool does not run, check if the battery is charged and properly engaged. If the switch is locked, ensure the forward/reverse switch is not in the middle position. If the tool or battery gets very warm, it may be overloaded; use a more powerful tool for heavy-duty applications.
Manufacturer information
Hilti Corporation
Practical help
Common problems
The power tool doesn't run.
Check if the battery is discharged or fitted incorrectly. Ensure it clicks into place.
No hammering action.
Ensure the torque and operating mode setting ring is set to the hammer drilling symbol.
The on/off switch cannot be pressed.
The forward/reverse switch is in the middle position (transport lock). Move it to the left or right.
The power tool or battery gets very warm.
The tool is likely overloaded. Use the right tool for the job and avoid heavy work with low-powered settings.
Before use
- Charge the battery fully before first use.
- Ensure the workplace is well-lit and ventilated.
- Check that the battery terminals are free from foreign objects.
- Wear appropriate personal protective equipment (eye, ear, breathing protection).
- Check that the insert tool is compatible and secured in the chuck.
Specs in practice
- 1st/2nd/3rd gear
- Mechanical speed ranges for different drilling or screwdriving tasks.
Images and diagrams
- 1: Quick-release chuck
- 2: Torque and operating mode setting ring
- 3: Side handle
- 4: Control switch
- 5: Forward/reverse switch
Model compatibility
- Use only genuine Hilti accessories and insert tools.
- Use only Hilti batteries and chargers approved for this tool.

Manual page author
Emily Carter
User documentation editor
Prepares concise manual descriptions and highlights the most useful setup, operation, and maintenance information for readers.