Tools / Power Tools
User Manual for Hilti DCH 150-SL Slitting Tool
Quick guide for the Hilti DCH 150-SL slitting tool. Includes setup, operation, maintenance, safety warnings, and troubleshooting steps.
Table of contents
Manual images
Click an image to enlargeQuick guide from the manual
The Hilti DCH 150-SL is a professional-grade electric slitting tool designed for use with diamond slitting discs. Before operation, ensure the tool is in its initial position. Always use a suitable vacuum cleaner to manage dust. The tool features a service indicator LED to alert you to overheating or maintenance needs.
Product description
The tool includes the following key components:
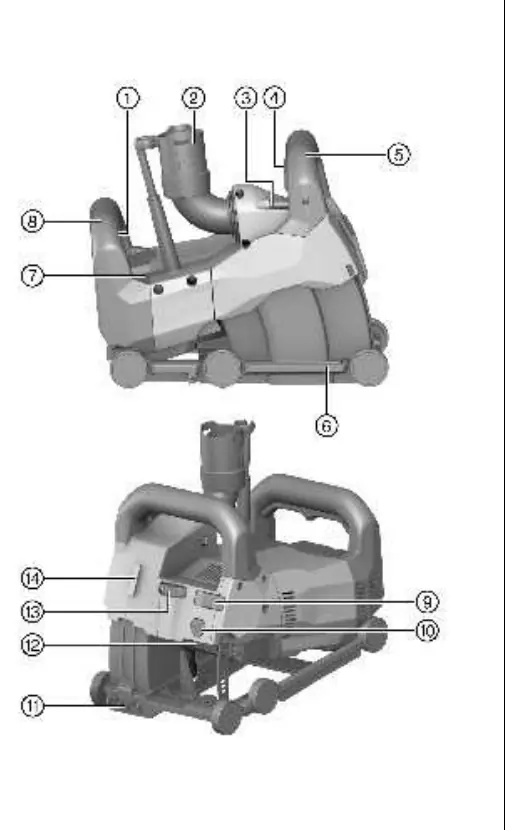
- On/off switch
- Vacuum cleaner hose connector
- Tubular bubble level
- Plunge movement lockbutton
- Slitting-depth adjusting knob
- Service indicator
- Interface for DCH-SL LG line laser
Installing diamond slitting discs


- Lay the tool on its left side with the spirit level facing up.
- Press and hold the carriage release button to unlock the carriage and swing it out.
- Fit the clamping flange onto the spindle.
- Place the first diamond slitting disc on the flange, ensuring the rotation arrow matches the tool's direction.
- Select and place the correct spacer rings for the desired slit width.
- Place the second diamond slitting disc.
- Warning: Always install all remaining spacer rings on the clamping flange after the second disc to prevent the wheels from working loose.
- Screw on the clamping nut and tighten with the pin wrench while holding the spindle lock button.
- Pivot the carriage back until it engages.
Operation
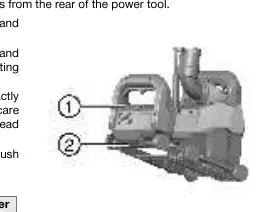
Setting initial position: Ensure the plunge movement lock button is not pressed. Lift the front of the tool until the carriage snaps into the initial position with an audible click.
Setting slitting depth: With the tool in the initial position, turn the slitting-depth adjusting knob to the desired depth in millimeters.
Slitting: Position the tool on the surface. Flick the locking lever, depress the ON/OFF switch, and hold the plunge movement lock button. Wait for the discs to reach full speed before plunging into the material. Guide the tool with both hands using reasonable pressure.
Care and maintenance
Always unplug the tool before maintenance. Clean air vents with a dry brush. The service indicator will light up when carbon brushes need replacement. Always replace all carbon brushes at the same time. After replacement, run the tool under no load for at least 1 minute to ensure proper seating.
Troubleshooting
If the service indicator flashes or shows red, the motor may be overheated or the carbon brushes may be worn. If the tool does not start, check the power supply, cord, or switch. If cutting performance is low, check if the diamond discs are worn or unsuitable for the material.
Manufacturer information
Hilti Corporation
Practical help
Common problems
Service indicator flashes red
Motor is overheated. Switch off and wait 10 minutes.
Power tool does not start
Check power supply, plug, or switch. If faulty, contact Hilti Service.
Cutting performance is low
Check if diamond discs are worn or unsuitable for the material.
Tool does not develop full power
Check extension cord gauge or reduce feed pressure.
Before use
- Check work area for concealed electric cables, gas, or water pipes.
- Ensure the guard is securely attached.
- Verify diamond discs are suitable for the material.
- Check power cord for damage.
- Ensure proper ventilation in the workplace.
- Wear appropriate personal protective equipment (eye protection, dust mask, ear protection).
Specs in practice
- Arbor diameter
- 22.2 mm (0.87 in)
- Max disc diameter
- 150 mm (5.9 in)
- Max disc thickness
- 3 mm (0.1 in)
Images and diagrams
- Product overview shows the location of the on/off switch, vacuum connector, and depth adjustment knob.
- Assembly diagram illustrates the correct order of spacer rings and diamond discs on the spindle.
- Carbon brush replacement diagram shows the location of the covers and wire routing.
Model compatibility
- Designed for use with diamond slitting discs.
- Compatible with Hilti mobile extractors for dust removal.
- Can be combined with a line laser for cutting guidance.

Manual page author
Emily Carter
User documentation editor
Prepares concise manual descriptions and highlights the most useful setup, operation, and maintenance information for readers.