Tools / Drills
Instruction Manual for Hilti 100x X-EAI 30 Positioning Device
Quick installation guide for the Hilti 100x X-EAI 30 positioning device. Includes step-by-step mounting instructions, safety requirements, and technical specifications.
Table of contents
Manual images
Click an image to enlargeQuick guide from the manual
This document provides visual instructions for the installation of the Hilti 100x X-EAI 30 positioning device. The device is intended for positioning purposes only and does not have a load rating. Ensure you follow the drilling and insertion steps carefully to ensure proper alignment.
Installation steps
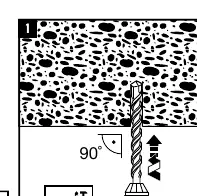
- Drilling: Drill a hole into the substrate at a 90-degree angle. Ensure the hole depth (h0) and diameter (d0) are appropriate for the device.
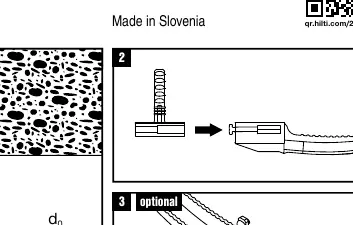
- Insertion: Insert the 100x X-EAI 30 device into the drilled hole.
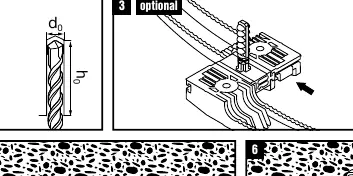
- Optional attachment: If required, attach the cable or conduit holder to the device.
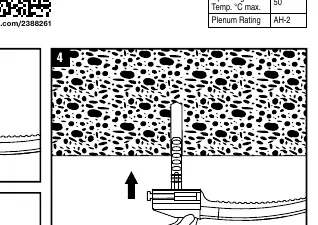
- Securing: Push the device firmly into the hole until it is properly seated.
- Visual check: Perform a visual inspection to ensure the device is correctly aligned and seated flush against the surface.
- Final installation: The device is now ready for use.
Safety and specifications
Safety requirements: Always wear appropriate personal protective equipment, including eye protection and gloves, during installation.
Technical specifications:
- Operating Temperature: Maximum 50°C.
- Plenum Rating: AH-2.
- Usage: Positioning only. Do not use for load-bearing applications.
Manufacturer information
Hilti Corporation
Practical help
Common problems
Device does not sit flush
Ensure the hole was drilled at a perfect 90-degree angle and that the hole depth is sufficient.
Device is loose
Verify that the drill bit diameter (d0) matches the requirements for the anchor size.
Before use
- Wear safety glasses and gloves.
- Ensure the drill is set to a 90-degree angle relative to the surface.
- Check that the hole depth (h0) is correct.
- Verify the device is for positioning only and not for load-bearing.
Specs in practice
- Operating Temp. °C max. 50
- The device should not be installed in environments exceeding 50 degrees Celsius.
- No load rating
- This device is designed solely for positioning cables or conduits and cannot support structural loads.
- Plenum Rating AH-2
- Indicates the fire safety rating of the material for use in plenum spaces.
Images and diagrams
- The diagram illustrates a 6-step process starting from drilling the hole to the final visual check.
- Step 3 shows an optional configuration for attaching additional components.
- Step 5 highlights the importance of a visual check to ensure the device is correctly seated.
Model compatibility
- Designed for use in standard substrates where drilling is possible.
- Not suitable for load-bearing applications.

Manual page author
Emily Carter
User documentation editor
Prepares concise manual descriptions and highlights the most useful setup, operation, and maintenance information for readers.