Tools / Power Tools
Operating Instructions for Hilti TE 1000-AVR Breaker
Quick guide for the Hilti TE 1000-AVR electric breaker. Includes setup, operation, maintenance, safety warnings, and troubleshooting steps.
Table of contents
Manual images
Click an image to enlargeQuick guide from the manual
The Hilti TE 1000-AVR is an electrically powered breaker designed for heavy chiseling work, such as breaking or demolishing concrete, masonry, stone, and asphalt. This guide provides essential information for safe and efficient operation. Always read the full documentation provided with the product before use.
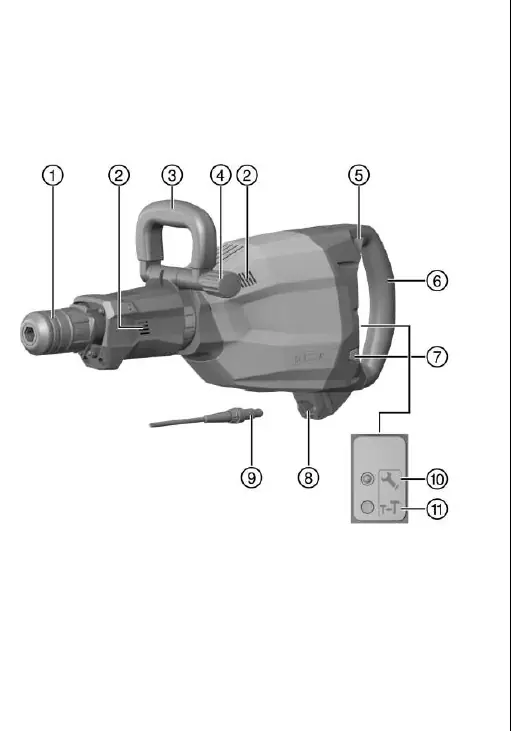
Product overview
The breaker features a chuck, side handle, on/off switch, power level selector switch, and service/power level indicators. The tool is equipped with an Active Vibration Reduction (AVR) system to significantly reduce vibration during operation.
Safety instructions
- General: Keep the work area clean and well-lit. Do not operate in explosive atmospheres. Keep children and bystanders away.
- Electrical: Ensure plugs match the outlet. Do not modify plugs. Avoid body contact with earthed surfaces. Use RCD-protected supply if working in damp locations.
- Personal: Always wear eye protection, ear protectors, hard hat, and safety shoes. Use the auxiliary handle provided.
- Operation: Hold the tool by insulated gripping surfaces when performing operations where the cutting accessory may contact hidden wiring.
Operation
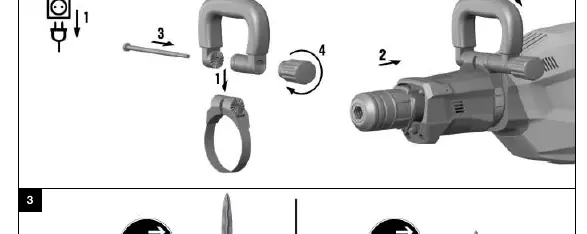
Fitting and adjusting the side handle
Ensure the side handle is fitted correctly and tightened securely before use. Follow the specific instructions provided with the side handle.
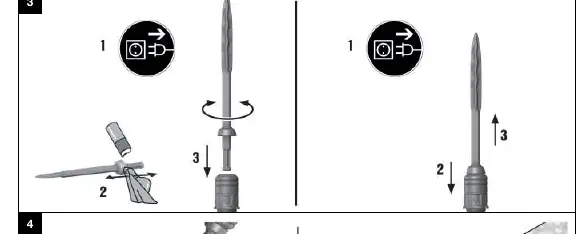
Fitting and removing the accessory tool
Apply a small amount of Hilti-recommended grease to the connection end of the accessory tool. Push the tool into the chuck until it engages with an audible click. To remove, pull the chuck back and remove the tool. Wear protective gloves as the tool gets hot during use.
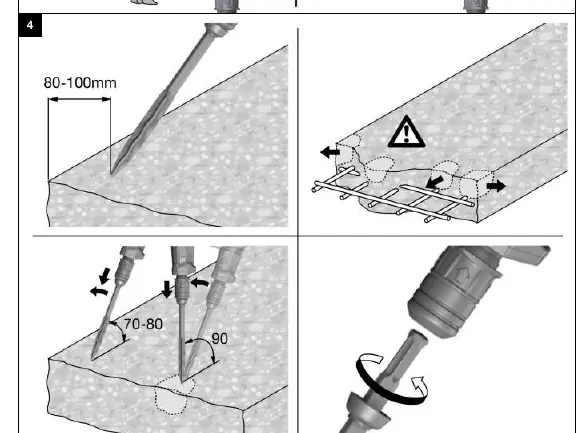
Chiseling technique
The chisel can be adjusted to 6 different positions (in 60-degree increments). Position the chisel 80-100 mm from the edge of the workpiece. Start at an angle of 70-80 degrees, pointing toward the edge, and increase the angle to 90 degrees as the chisel penetrates.
Setting the chiseling power
Press the power level selector switch to reduce chiseling power to approximately 70%. The power level LED will light up to indicate reduced power. Full power is restored by pressing the switch again or by switching the tool off and on.
Care and maintenance
Always unplug the tool before maintenance. Clean air vents with a dry brush. Use a slightly damp cloth to clean the casing; do not use silicone-based cleaning agents. Regularly clean the dust shield on the chuck and re-grease the sealing lip with Hilti grease. If the sealing lip is damaged, replace the dust shield.
Troubleshooting
If the tool does not start, ensure the power supply is active and wait up to 4 seconds for electronics initialization. If the service indicator lights red, servicing is due or a fault has occurred. If it blinks red, the tool may be overheating or the voltage is too high. Allow the tool to cool down and clean the air vents.
Manufacturer information
Hilti Corporation
Practical help
Common problems
The power tool doesn't start
Wait 4 seconds for electronics initialization after plugging in. Check if the generator is in sleep mode or if the detachable supply cord is fitted correctly.
Service indicator lights red
Servicing is due or a fault has occurred. Have the product repaired by Hilti Service.
Service indicator blinks red
Overheating protection is activated or voltage is too high. Let the tool cool down and clean the air vents.
No hammering action
The tool is too cold. Run it against the working surface until the mechanism engages.
Tool does not achieve full power
Power reduction is active. Press the power level selector switch to toggle full power.
Before use
- Check that the side handle is fitted correctly and tightened.
- Ensure the switch is in the off-position before connecting to power.
- Check the supply cord for damage.
- Wear appropriate PPE (eye protection, ear protection, hard hat, safety shoes).
- Check the working area for concealed cables or pipes.
Specs in practice
- Single impact energy
- 26 J
- Protection class
- Class II (double-insulated)
Images and diagrams
- Overview illustration shows the chuck, side handle, power level selector, and service indicators.
- Assembly diagrams show how to attach the side handle and insert/remove the chisel.
- Chiseling diagrams demonstrate the correct angle and positioning relative to the workpiece edge.
Model compatibility
- Use only Hilti-approved grease.
- Use only genuine Hilti spare parts.
- When using a generator, its power output must be at least twice the rated input power of the tool.

Manual page author
David Miller
Documentation analyst
Organizes user manual content into clear summaries, with attention to model details, product context, and everyday usability.