Lighting / Fixtures
Hinkley 2592 Outdoor Pendant Light Installation Guide
Quick installation and wiring guide for the Hinkley 2592 outdoor pendant light. Includes step-by-step mounting instructions, glass panel assembly, and electrical wiring procedures.
Table of contents
Manual images
Click an image to enlargeImportant Safety Information
Before beginning installation, ensure the power supply is turned off. If new wiring is required, consult a qualified electrician or local authorities for code requirements. Always read the provided wiring and grounding instructions (I.S. 18) thoroughly.
Mounting the Fixture
- Find a clear area in which you can work.
- Attach the mounting strap (A) to the junction box (J) using two screws (C). Ensure the holes in the strap align with the holes in the backplate (E).
- Make all necessary wiring connections as described in the wiring section.
- Mount the fixture to the ceiling by aligning it with the mounting screws (B) on the backplate (E).
- Secure the fixture in place by tightening the two ball knobs (F) onto the ends of the mounting screws (B).
Glass Installation
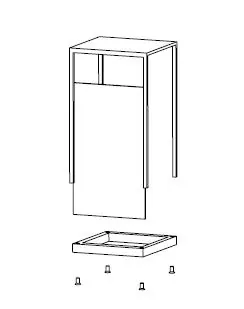
- Remove the four screws (S) located on the bottom of the fixture cage (P).
- Remove the bottom of the cage (P).
- Slide the four glass panels (G) into the fixture cage (Z).
- Replace the bottom of the cage (P) and secure it with the four screws (S).
- The fixture is now ready to be lamped and powered on.
Wiring and Grounding
Indoor Fixtures: Connect the positive supply wire (A) to the positive fixture lead (B) and the negative supply wire (C) to the negative fixture lead (D) using appropriately sized twist-on connectors.
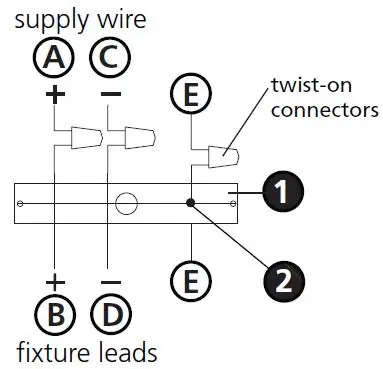
Outdoor Fixtures: Follow the same wiring procedure as indoor fixtures. Additionally, cover the open end of the connectors with silicone sealant to form a watertight seal. If installing on a wall, use caulk to seal gaps between the fixture mounting plate and the wall to prevent water from entering the outlet box.
Grounding: Fasten the fixture ground wire (E) to the mounting strap (M) using the ground screw (S). For chain-hung fixtures, loop the ground wire under the head of the ground screw and connect the loose end directly to the building system ground wire.
Manufacturer information
Hinkley Lighting
Practical help
Common problems
Water entering the outlet box (outdoor installation)
Use caulk to seal gaps between the fixture mounting plate and the wall. For outdoor connectors, use silicone sealant to create a watertight seal.
Difficulty mounting the fixture
Ensure the mounting strap is securely attached to the junction box and that the mounting screws are properly aligned with the backplate holes.
Before use
- Turn off the main power supply before starting installation.
- Ensure you have a clear, flat workspace.
- Verify that the junction box is properly installed and compatible.
- Gather necessary tools, including silicone sealant for outdoor installations.
- Read the I.S. 18 wiring and grounding instructions completely.
Images and diagrams
- Drawing 1: Mounting strap installation and fixture attachment.
- Drawing 2: Glass installation sequence.
- Wiring Diagrams: Shows connections for flush mount, chain hung, and post-mount configurations.
Model compatibility
- Outdoor installation requires silicone sealant on wire connectors.
- Wall-mounted outdoor fixtures require caulking between the backplate and the wall.

Manual page author
David Miller
Documentation analyst
Organizes user manual content into clear summaries, with attention to model details, product context, and everyday usability.