Lighting / Outdoor Landscape
Installation Guide for Hinkley 16019OZ-LL Landscape Pathway Light
Quick installation and maintenance guide for the Hinkley 16019OZ-LL landscape pathway light. Includes wiring instructions, ground stake mounting steps, safety warnings, and bulb replacement procedures.
Table of contents
Quick guide from the manual
This document provides installation and maintenance instructions for the Hinkley Hardy Island landscape pathway light. This luminaire is designed specifically for use with Hinkley-approved 12-volt landscape systems. Connecting to other systems may result in premature failure or unintended operation.
Luminaire mounting
Follow these steps for typical ground stake mounting:
- Disconnect the transformer from the electrical supply before starting installation or service.
- Run the wire from the luminaire through the mounting hole located in the top of the ground stake.
- Attach the luminaire to the ground stake by threading it into the mounting hole until it fits snugly against the bottom of the stem.
- Place the stake in the desired position and insert it into the ground until the flange of the stake is flush with the ground.
- Strip the two wire leads from the luminaire and connect them to the main supply wire using the provided silicone-filled wirenuts. Note that these nuts are for one-time use only.
Safety instructions
- The lamp becomes hot quickly. Only touch the switch or plug when turning the unit on.
- Do not touch the hot lens, guard, or enclosure.
- Keep the lamp away from combustible materials.
- Do not operate the luminaire if the shield is missing or damaged.
- Do not install the luminaire within 10 feet (3 meters) of a pool, spa, or fountain.
Relamping instructions
- Remove the top shade by turning it in a counter-clockwise direction.
- Remove the harp by unscrewing the two screws located under the harp.
- Remove the dome lens.
- Replace the lamp (bulb).
- Reassemble the lens, harp, and shade.
Manufacturer information
Hinkley Lighting
Practical help
Common problems
Premature failure or unintended operation
Ensure the luminaire is connected to a Hinkley-approved 12-volt landscape system.
Risk of burn injury
Do not touch the lens, guard, or enclosure while the lamp is operating as it gets hot quickly.
Before use
- Disconnect the transformer from the electrical supply before installation or service.
- Ensure the installation site is at least 10 feet (3m) away from pools, spas, or fountains.
- Verify the main supply wire is protected by routing it near a building structure or burying it less than 6 inches (15.2cm) deep.
- Ensure the wire connection is made within 6 inches (15.2cm) of a building structure, luminaire, or fitting.
Specs in practice
- Silicone filled wirenuts
- Provided connectors are for one-time use only.
- Wire Nut Capacity
- Supports 2 pcs 18 AWG + 2 pcs 12 AWG wires.
Images and diagrams
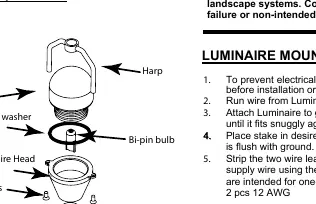
- Ground Stake Mounting: Illustrates the luminaire head, ground stake, and wiring connection to the transformer.
- Parts Breakdown: Shows the lens, harp, rubber washer, and bi-pin bulb assembly.
Model compatibility
- Designed for use with Hinkley approved 12 volt landscape systems only.

Manual page author
Emily Carter
User documentation editor
Prepares concise manual descriptions and highlights the most useful setup, operation, and maintenance information for readers.