Lighting / Fixtures
Hinkley 1500SMT Transformer Installation and Wiring Guide
A comprehensive installation and wiring guide for the Hinkley 1500SMT transformer. Includes step-by-step mounting instructions, terminal connection details, and app setup.
Table of contents
Quick guide from the manual
This document provides essential installation and wiring instructions for the Hinkley 1500SMT transformer. It covers the physical mounting of the dimmer box, connection of light fixtures to the daughter board, and initial setup for app-based control.
Installation and Wiring
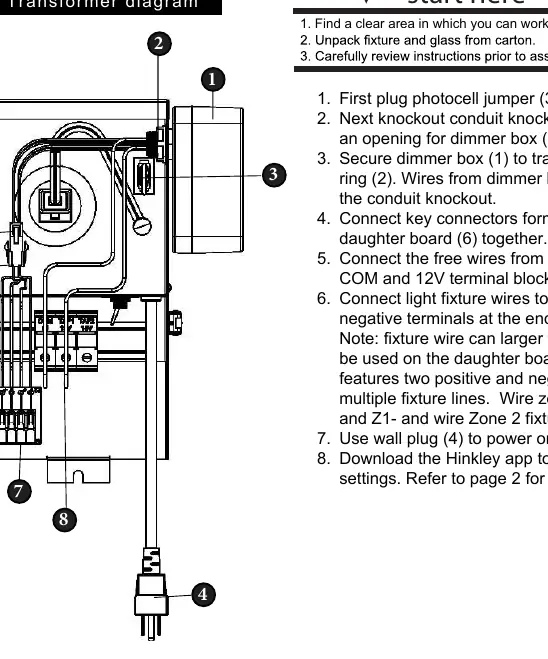
- Preparation: Find a clear area to work and unpack the transformer.
- Photocell Jumper: Plug in the photocell jumper (3) if your installation requires it.
- Conduit Preparation: Create an opening for the dimmer box (1) by knocking out the conduit knockout.
- Mounting: Secure the dimmer box (1) to the transformer using the lock ring (2). Ensure the wires from the dimmer box pass through the conduit knockout.
- Internal Connections: Connect the key connectors from the dimmer box (5) and the daughter board (6) together.
- Terminal Block: Connect the free wires from the dimmer box into the COM and 12V terminal block connectors (8).
- Fixture Connection: Connect light fixture wires to the positive and negative terminals on the end of the daughter board.
- Power: Use the wall plug (4) to power on the transformer.
Wiring Zones and Limitations
The daughter board features specific terminals for managing multiple fixture lines:
- Zone 1: Connect fixtures to Z1+ and Z1-.
- Zone 2: Connect fixtures to Z2+ and Z2-.
- Wire Gauge Limitation: Fixture wire larger than 10 gauge cannot be used on the daughter board.
App Control
The Hinkley 1500SMT transformer supports app-based control for dimmer settings. Download the Hinkley app to configure your device. Refer to page 2 of the original manual for specific app setup instructions.
Manufacturer information
Hinkley Lighting
Practical help
Common problems
Fixture wire will not fit into the daughter board terminals.
Ensure the wire gauge is not larger than 10 gauge, as larger wires are not compatible with the daughter board.
Before use
- Clear a workspace for installation.
- Unpack the transformer and verify all components.
- Determine if the photocell jumper is required for your setup.
- Ensure you have the correct gauge wire (10 gauge or smaller) for light fixtures.
Images and diagrams
- 1: Dimmer box
- 3: Photocell jumper
- 5: Key connectors
- 6: Daughter board
- 7: Transformer
Model compatibility
- The daughter board supports two zones (Zone 1 and Zone 2).
- Fixture wire must be 10 gauge or smaller.

Manual page author
Emily Carter
User documentation editor
Prepares concise manual descriptions and highlights the most useful setup, operation, and maintenance information for readers.