Tools / Saws
User Manual for Hitachi C 10FL Stationary Table Saw
Quick guide for the Hitachi C 10FL Stationary Table Saw. Includes assembly instructions, safety guidelines, operation procedures, maintenance tips, and troubleshooting.
Table of contents
Manual images
Click an image to enlargeQuick Guide from the Manual
This manual provides essential instructions for the safe assembly, operation, and maintenance of the Hitachi C 10FL Stationary Table Saw. Before operating, ensure the saw is properly assembled, the blade is aligned, and all safety guards are in place. Always wear eye protection and use a push stick for narrow cuts.
Safety Instructions
General Safety: Read and understand the entire manual before use. Keep the work area clean and well-lit. Do not operate the tool under the influence of drugs or alcohol. Always wear eye protection compliant with ANSI Z87.1.
Table Saw Safety: Never operate the machine without the safety guard, splitter, and anti-kickback pawls. Never perform freehand cuts; always use the rip fence or miter gauge. Feed work into the blade against the direction of rotation only. Never reach behind or over the cutting tool.
Assembly and Adjustments
Stand Assembly: Assemble the stand using the provided brackets, legs, and hardware. Ensure the stand is on a level surface and does not rock before tightening all bolts.
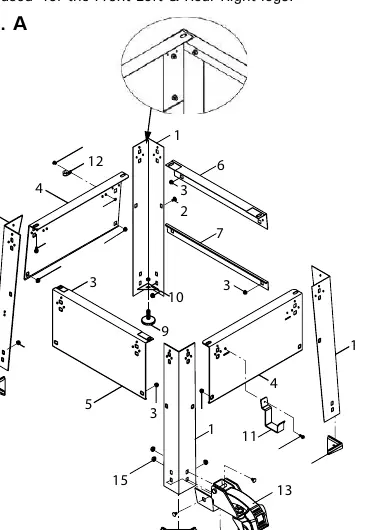


Table and Rails: Attach the table extensions and front/rear rails. Ensure the front rail is level with the table before tightening.
Blade Guard and Splitter: Install the blade guard assembly. The splitter must be correctly aligned with the blade to prevent binding. Use the provided adhesive washers to adjust alignment if necessary.
Blade Installation: To remove or install a blade, raise the blade to maximum height, lock the motor, and use the blade wrench on the arbor nut. Ensure the blade teeth point forward.
Operation
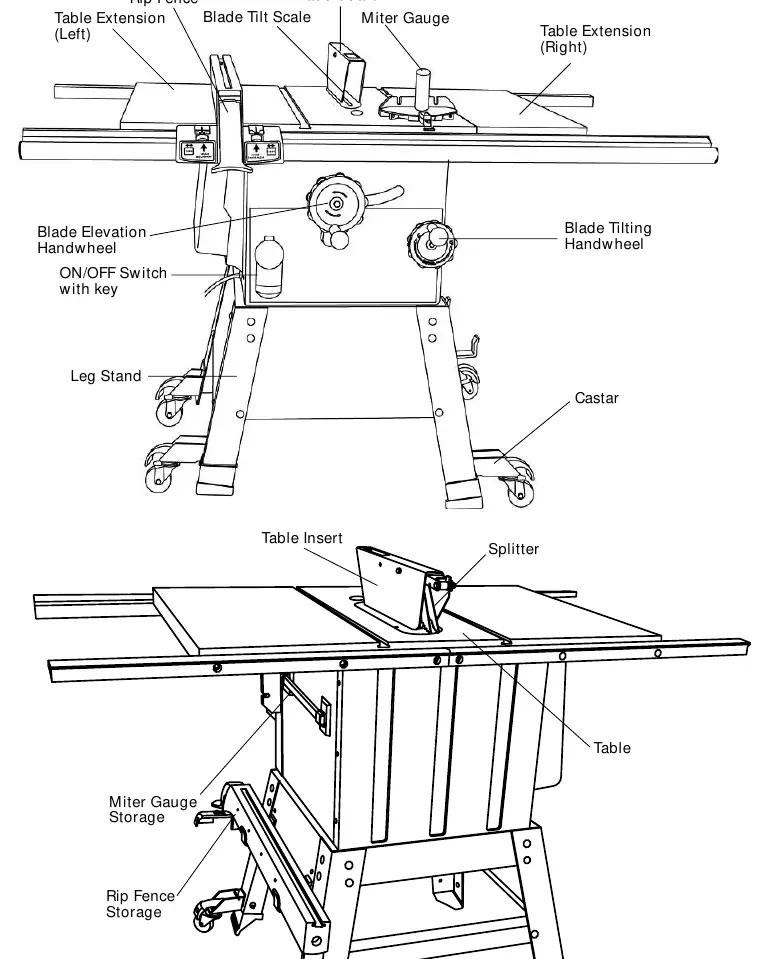
Switch: The ON/OFF switch features a removable safety key to prevent unauthorized use.
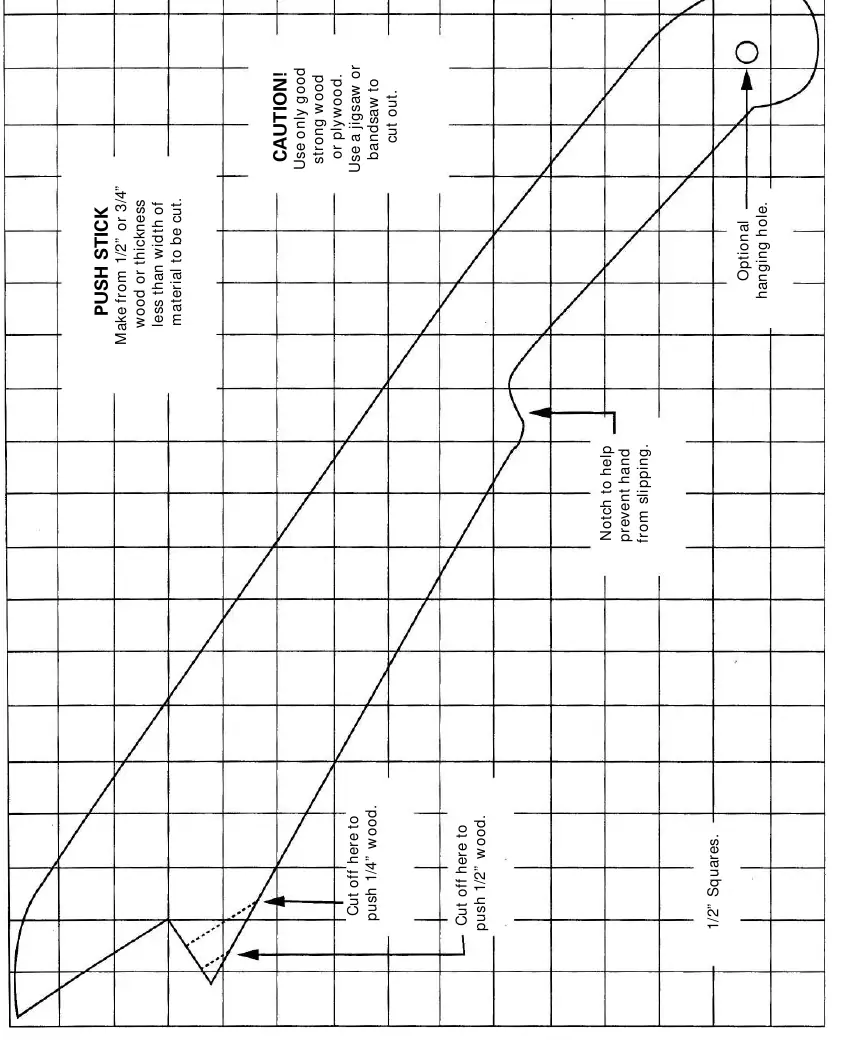
Ripping: Use the rip fence. For cuts narrower than 2 inches, use a push stick. Never use a miter gauge when ripping.
Crosscutting: Use the miter gauge. Remove the rip fence and store it in the designated storage compartment.
Dado Cuts: Use the included dado insert. Do not exceed 8-inch diameter dadoes or 13/16-inch width. Remove the blade guard and splitter when using a dado blade.
Maintenance
General: Disconnect from power before maintenance. Clean sawdust from the cabinet and motor. Polish the table with automotive wax to reduce friction.
Lubrication: Motor bearings are permanently lubricated. Use graphite or silicone dry lubricants on pivots and threaded rods; avoid oil or grease as they attract sawdust.
Troubleshooting
If the saw fails to start, check the power connection and circuit breaker. If the blade does not make accurate cuts, check the positive stops and alignment. If the machine vibrates, ensure it is securely mounted to a workbench on a level floor.
Product Specifications
Motor: 3.0 HP (Max developed), Induction, 120/240V, 60Hz, 3450 RPM.
Saw: 10-inch blade, 27-1/8" x 20-1/8" table size, 3-3/8" max cut depth at 90°, 2-1/4" max cut depth at 45°.
Manufacturer information
Hitachi, Ltd.
Practical help
Common problems
Saw will not start
Check if the saw is plugged in, check for a blown fuse or tripped circuit breaker, or have the cord replaced by an authorized service center.
Material pinched when ripping
Check if the rip fence is aligned with the blade or select a different piece of wood.
Material kicked back from blade
Align the rip fence, ensure the splitter is in place, use the rip fence, or replace a dull blade.
Machine vibrates excessively
Tighten all mounting hardware or reposition the saw on a flat, level surface.
Before use
- Ensure the blade is tightened to the arbor.
- Check that the bevel angle lock knob is tight.
- Verify the rip fence is locked and parallel to the miter gauge groove.
- Confirm the blade guard is in place and functioning properly.
- Wear safety glasses.
Specs in practice
- Max Cut Depth @ 90°
- 3-3/8 inches
- Max Cut Depth @ 45°
- 2-1/4 inches
- Max Dado Cut Width
- 13/16 inches
Images and diagrams
- Fig. A/B: Stand assembly steps.
- Fig. G/H: Blade guard installation and alignment.
- Fig. I: Blade removal and installation.
- Fig. M: Checking blade parallelism to miter gauge groove.
Model compatibility
- Use only 3-wire extension cords with grounding.
- Do not use dadoes larger than 8 inches in diameter.
- Maximum dado width is 13/16 inch.

Manual page author
David Miller
Documentation analyst
Organizes user manual content into clear summaries, with attention to model details, product context, and everyday usability.