Lighting / Outdoor Lighting
User Manual for Hoftronic Granada LED Porch Lights
Quick guide for installing and operating Hoftronic Granada LED Porch Lights. Includes wiring instructions, remote control pairing, and troubleshooting steps.
Quick answers from the manual
Quick answer
- The Hoftronic Granada LED Porch Lights kit includes spotlights, a dimmable LED driver, connectors, and a remote control. Installation requires a 44mm hole and connection to 230V mains power. p. 2
Key actions
- Install the spotlights p. 2
- Pair the standard remote p. 3
First start
- Test the kit before permanent installation. p. 2
Problems and fixes
Light does not turn on
Try plugging the spotlight into a different port and then check to see if it works.
p. 2Maintenance and reset
- Clean only with soft and dry cloths. Do not use chemical detergents. p. 8
Technical specifications
| Parameter | Value | Meaning | Pages |
|---|---|---|---|
| Hole size | 44 mm | Required diameter for recessed installation. | p. 2 |
| Max capacity | 36 spots | Maximum spots controllable with 4-channel remote. | p. 2 |
Where to find it in the PDF
- Installation Manual p. 2
- Remote Control Functions p. 3
Table of contents
Manual images
Click an image to enlargeQuick guide from the manual
The Hoftronic Granada LED Porch Lights kit is designed for indoor and covered outdoor use. The system is modular, allowing for the connection of multiple spotlights to a single transformer using a 6-port connector. The kit includes a dimmable LED driver and a remote control. Before permanent installation, it is essential to test all components.
Installation
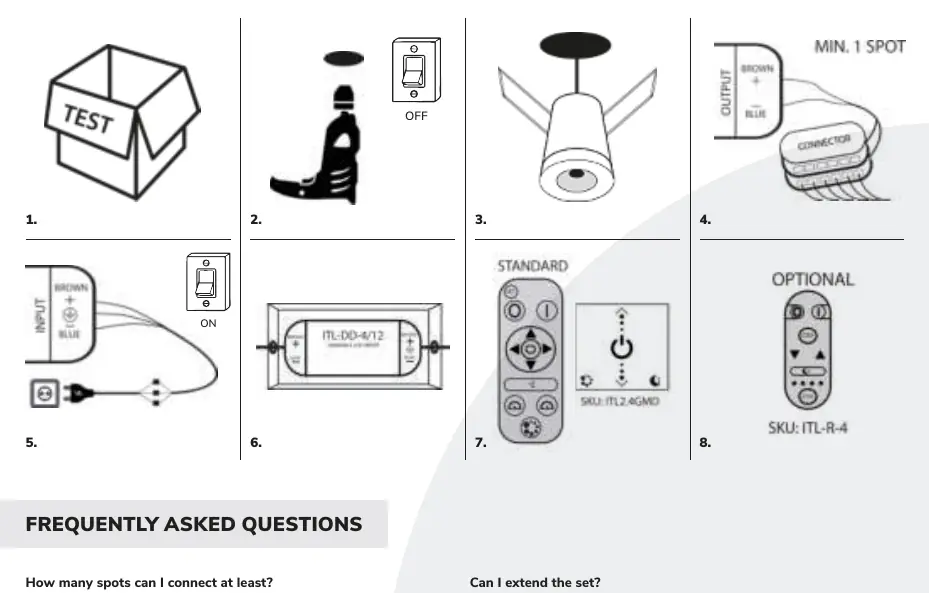
- Preparation: Check that all parts are present in the box and test the kit before installation.
- Drilling: Drill holes with a diameter of 44 mm at the desired locations. Position the cables accordingly.
- Mounting: Insert the LED spots into the holes. Ensure the two springs touch the material, then push both springs against the downlight to secure it in place.
- Connection: Connect the spotlights to the connector (each connector has 6 ports).
- Wiring: Switch off the power group. Connect the transformer to 230V (INPUT). N = blue cable, L = brown cable. Connect the INPUT to an on/off switch for fixed mains current.
- Outdoor Use: If the transformer is installed outdoors, it must be placed in a water/moisture-resistant housing (Art. No. 396302). The spots are only suitable for covered areas.
- Remote Control: Insert batteries into the supplied remote control. It is pre-paired with the transformer.
Remote Control & Dimmer Pairing
The standard remote control is pre-paired at the factory. If re-pairing is required or if using a wall dimmer or 4-channel remote, follow these steps:
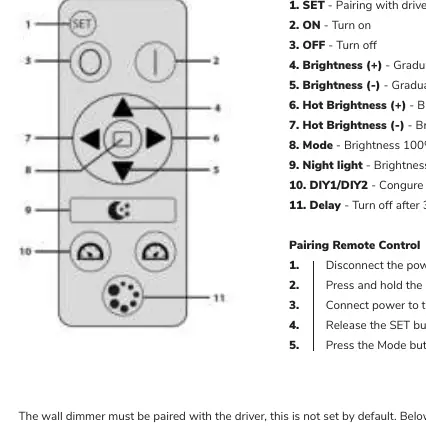
Standard Remote Control
- Disconnect power to the driver.
- Press and hold the SET button.
- Connect power to the driver.
- Release the SET button when the lights flicker.
- Press the Mode button 4 times.
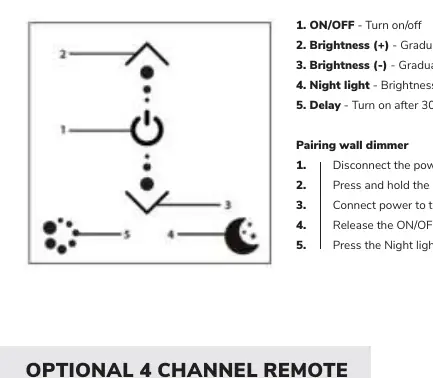
Wall Dimmer
- Disconnect power to the driver.
- Press and hold the ON/OFF button.
- Connect power to the driver.
- Release the ON/OFF button.
- Press the Night light button 3 times.
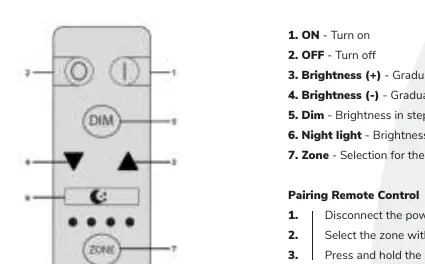
Optional 4-Channel Remote
- Disconnect power to the driver.
- Select the zone using the Zone button.
- Press and hold the DIM button.
- Connect power to the driver.
- Release the DIM button.
- Press the ON button 4 times.
Safety and Maintenance
- Maintenance: Perform maintenance only when the power is off and the product has cooled down. Clean with soft, dry cloths; do not use chemical detergents.
- Usage: Do not cover the product. Ensure free air access. Do not use if the protective cover is damaged.
- Environment: The product is IP44 rated but must be used in covered areas if installed outdoors.
Manufacturer information
Hoftronic
Practical help
Common problems
Light does not turn on
Try plugging the spotlight into a different port on the connector. If it still does not work, contact your distributor.
Need to control more than 12 spots
Order multiple sets and a 4-channel remote control to manage up to 36 spots.
Before use
- Check that all parts are in the box.
- Test the kit before permanent installation.
- Ensure power is disconnected before starting any wiring.
- Drill 44mm holes for the spotlights.
- Ensure the transformer is in a water-resistant housing if installed outdoors.
Specs in practice
- Cable length
- 5 meters of cable provided per spot.
Images and diagrams
- The wiring diagram shows the transformer input connection with N (blue) and L (brown) wires.
- The connector diagram illustrates the 6-port layout for connecting multiple spotlights.
Model compatibility
- The set is expandable.
- Standard remote is 1-channel.
- Optional 4-channel remote allows control of up to 36 spots.

Manual page author
David Miller
Documentation analyst
Organizes user manual content into clear summaries, with attention to model details, product context, and everyday usability.