Lighting / Outdoor Lighting
User Manual for Hoftronic Sienna LED Porch Lights
Quick guide for installing and operating Hoftronic Sienna LED Porch Lights. Includes wiring instructions, remote control pairing, and troubleshooting tips.
Quick answers from the manual
Quick answer
- The Hoftronic Sienna LED Porch Lights are dimmable recessed downlights. The kit includes the lights, cables, a dimmable LED driver, and a remote control. They are designed for covered areas and are not suitable for floor or deck installation. p. 2
Key actions
- Pairing the remote p. 3
Problems and fixes
Light does not turn on
Try plugging the spotlight into a different port on the connector.
p. 2Technical specifications
| Parameter | Value | Meaning | Pages |
|---|---|---|---|
| Hole size | 44 mm | Drill diameter for installation | p. 2 |
Where to find it in the PDF
- Installation Manual p. 2
- Remote Control Functions p. 3
Table of contents
Manual images
Click an image to enlargeQuick guide from the manual
The Hoftronic Sienna LED Porch Lights are dimmable recessed downlights designed for use in covered areas. The kit includes the lights, 5-meter cables per spot, a dimmable LED driver, connectors, and a remote control. Important: These spotlights are not suitable for floor or deck installation.
Installation
- Preparation: Check that all parts are in the box and test the kit before permanent installation.
- Drilling: Drill holes with a diameter of 44 mm at the desired location.
- Placement: Insert the LED recessed spots into the drill hole. Push both springs against the downlight to secure it in place.
- Connection: Connect the LED recessed spots to the connector (each connector has 6 ports).
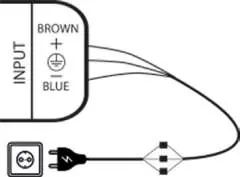
- Power: Switch off the power group. Connect the transformer to 230V (INPUT). Connect the blue cable to N and the brown cable to L. Connect the transformer INPUT to an on/off switch (fixed mains current).
- Outdoor Use: If the transformer is installed outdoors, it must be placed in a water/moisture-resistant housing (Art. No. 396302 or 4409418).
Remote Control Operation
The remote control is paired at the factory. Insert the supplied batteries to begin use.
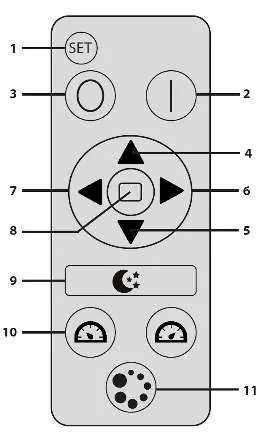
Pairing the Remote Control
- Disconnect the power from the driver.
- Press and hold the SET button on the remote.
- Connect power to the driver.
- Release the SET button as soon as the lights flicker.
- Press the Mode button 4 times repeatedly.
Troubleshooting
- Light does not turn on: Try plugging the spotlight into a different port on the connector. If it still does not work, contact your distributor.
- Expanding the set: The set is expandable. If you need more than 12 spots, order multiple sets and a multi-zone remote control to control up to 36 spots.
Safety and Maintenance
- Clean only with soft, dry cloths. Do not use chemical detergents.
- Ensure free air access; do not cover the product.
- The product may heat up during operation.
- Do not use if the protective cover is damaged.
- Not suitable for independent repairs.
Manufacturer information
Hoftronic
Practical help
Common problems
Light does not turn on
Try plugging the spotlight into a different port on the connector. If it still does not work, contact your distributor.
Before use
- Check all parts are in the box
- Test the kit before permanent installation
- Ensure installation area is covered (not floor or deck)
- Verify power supply is 230V
Images and diagrams
- Wiring diagram shows connection of transformer to mains and spotlights to connector
- Remote control diagram shows button functions 1-11
Model compatibility
- Compatible with 2-channel remote (SKU: 5422294) and 4-channel remote (SKU: ITL-R-4)
- Compatible with wall panels (SKU: 5422300, ITL2.4GMD)

Manual page author
Michael Turner
Technical manual editor
Reviews PDF manuals for structure, safety notes, and practical product details so readers can find the right information quickly.