Smart Home / Sensors Buttons
Operating Manual for Homematic IP Wall-mount Remote Control 2-button HMIP-WRC2-A
Quick guide for the Homematic IP Wall-mount Remote Control (HMIP-WRC2-A). Learn how to install, mount, configure, and troubleshoot your 2-button remote control.
Quick answers from the manual
Quick answer
- The Homematic IP Wall-mount Remote Control (HMIP-WRC2-A) is a 2-button wireless remote used to control Homematic IP devices. It is battery-operated, mounts via adhesive or screws, and is configured through the Homematic IP app. p. 10, 31
Key actions
- Teach-in device p. 12, 33
- Replace batteries p. 18, 39
First start
- Set up Access Point and teach-in device p. 11, 12, 32, 33
Problems and fixes
Transmission failed
Check receiver reachability or radio interference.
p. 20, 41Error codes
| Code | Meaning | Action | Pages |
|---|---|---|---|
| 3x long red flashes | Duty cycle limit exceeded | Wait up to 1 hour. | p. 21, 41 |
Maintenance and reset
- Factory reset p. 23, 43
Technical specifications
| Parameter | Value | Meaning | Pages |
|---|---|---|---|
| Battery life | 4 years (typ.) | Typical battery life under normal usage. | p. 25, 46 |
| Radio frequency | 868.0 - 868.6 MHz / 869.4 - 869.65 MHz | Operating frequency band. | p. 25, 46 |
Where to find it in the PDF
- Installation p. 13, 34
- Troubleshooting p. 19, 40
Table of contents
Manual images
Click an image to enlargeQuick guide from the manual
The Homematic IP Wall-mount Remote Control (HMIP-WRC2-A) is a battery-operated, 2-button wireless remote control designed for central control of Homematic IP devices. It can be mounted on various surfaces using adhesive strips or screws and is compatible with many standard switch frames.
Device overview
The device consists of the following main components:
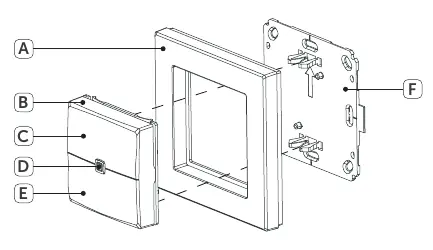
- A: Clip-on frame
- B: Remote control (electronic unit)
- C: Channel 1 (On/Eco mode)
- D: System button (Teach-in button and LED)
- E: Channel 2 (Off/Automatic mode)
- F: Mounting plate
Installation and mounting
You can mount the device using the supplied adhesive strips or screws. Ensure the mounting surface is smooth, solid, clean, and dry.
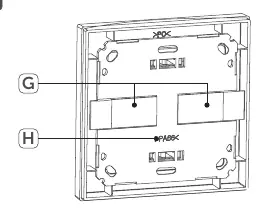
Adhesive strip mounting
- Fix the adhesive strips (G) to the back of the mounting plate (F) in the marked areas.
- Remove the protective film.
- Press the assembled remote control firmly against the wall.
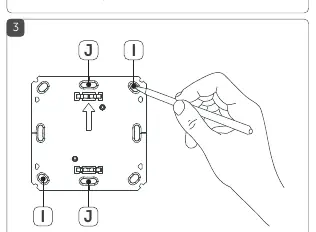
Screw mounting
- Position the mounting plate (F) on the wall and mark the bore holes (I).
- Drill the holes (5 mm for stone walls, 1.5 mm for wooden walls).
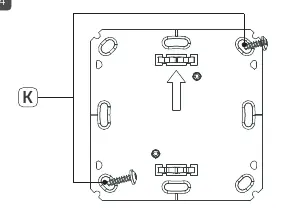
- Fasten the mounting plate using the supplied plugs and screws (K).
- Attach the clip-on frame (A) and insert the remote control (B).
First start and teach-in
- Open the Homematic IP app on your smartphone.
- Select the menu item "Teach-in device".
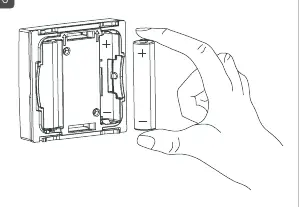
- Remove the remote control (B) from the frame and insert two 1.5 V LR03/micro/AAA batteries, ensuring correct polarity.
- The teach-in mode is active for 3 minutes. If needed, press the system button (D) to restart the mode.
- Follow the app instructions to confirm the device by entering the last four digits of the SGTIN or scanning the QR code.
Eco mode
Eco mode allows you to reduce the temperature in your home to save energy. You can configure the rooms, target temperature, and duration for Eco mode directly within the Homematic IP app.
Battery replacement
If the app displays an empty battery, replace the two LR03/micro/AAA batteries. Pull the remote control (B) out of the frame, remove the old batteries, and insert new ones with the correct polarity. The device will perform a self-test after insertion.
Troubleshooting
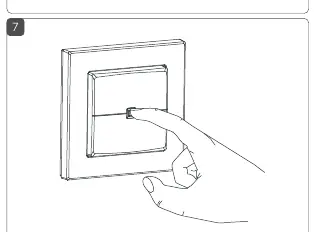
The device uses LED signals to indicate status:
- Short orange flashing: Transmission in progress.
- 1x long green: Transmission confirmed.
- 1x long red: Transmission failed (check receiver or radio interference).
- 3x long red: Duty cycle limit exceeded (wait up to 1 hour).
Practical help
Common problems
LED lights up red
The command was not confirmed. Check if the receiver is reachable or if there is radio interference.
Duty Cycle exceeded (3x long red flashes)
The device has reached its transmission limit. Wait up to 1 hour for the device to resume normal operation.
Device not responding
Check battery levels and polarity. If the issue persists, perform a factory reset.
Before use
- Install the Homematic IP App on your smartphone
- Ensure the mounting surface is clean, dry, and smooth
- Check battery polarity before insertion
- Have the device SGTIN or QR code ready for teach-in
Specs in practice
- SRD category 2
- Receiver category for radio equipment.
Images and diagrams
- Figure 1: Exploded view of the remote control, frame, and mounting plate.
- Figure 2: Correct placement of adhesive strips on the mounting plate.
- Figure 3: Marking bore holes for screw mounting.
- Figure 4: Fastening the mounting plate to the wall.
- Figure 5: Removing the remote control unit from the frame.
Model compatibility
- Compatible with frames from Berker, ELSO, GIRA, merten, and JUNG.
- Can be integrated into existing multi-gang switch frames.

Manual page author
Emily Carter
User documentation editor
Prepares concise manual descriptions and highlights the most useful setup, operation, and maintenance information for readers.