Smart Home / Sensors Buttons
Homematic IP Wall-mount Remote Control HmIP-WRC2-2 User Manual
Quick guide for the Homematic IP Wall-mount Remote Control (HmIP-WRC2-2). Learn how to install, pair, and set up your 2-button remote control with your smart home system.
Quick answers from the manual
Quick answer
- The Homematic IP Wall-mount Remote Control (HmIP-WRC2-2) is a 2-button wireless remote for the Homematic IP system. It is used to trigger functions like heating eco-modes or switching lights and can be mounted via adhesive, screws, or integrated into existing switch frames. p. 1, 2
Key actions
- Mounting the device p. 1
- Pairing with system p. 1
First start
- Insert batteries and pair via the Homematic IP app. p. 1
Technical specifications
| Parameter | Value | Meaning | Pages |
|---|---|---|---|
| Power supply | 2x 1.5V LR03/Micro/AAA | Battery requirements | p. 2 |
| Radio frequency | 868.0-868.6 MHz / 869.4-869.65 MHz | Operating frequency | p. 2 |
Where to find it in the PDF
- Installation and Overview p. 1
- Technical Data and Safety p. 2
Table of contents
Manual images
Click an image to enlargeQuick guide from the manual
The Homematic IP Wall-mount Remote Control (HmIP-WRC2-2) is a 2-button wireless remote control designed for the Homematic IP smart home system. It allows for central control of devices and functions, such as switching lights or activating heating eco-modes. The device is battery-operated and can be mounted using adhesive strips, screws, or integrated into existing switch frames.
Device overview
The device consists of the following components:
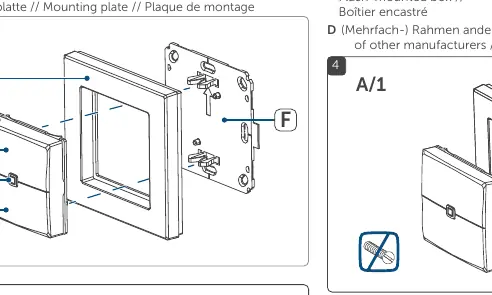
- A: Clip-on frame
- B: Push-button (electronic unit)
- C: Channel 1
- D: System button (pairing button and LED)
- E: Channel 2
- F: Mounting plate
Installation
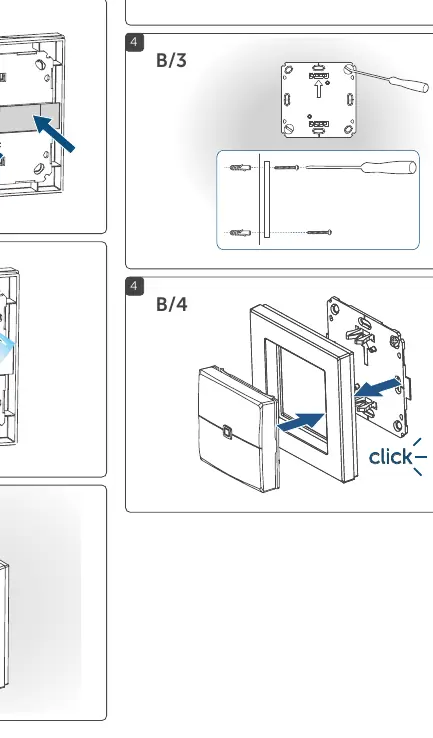
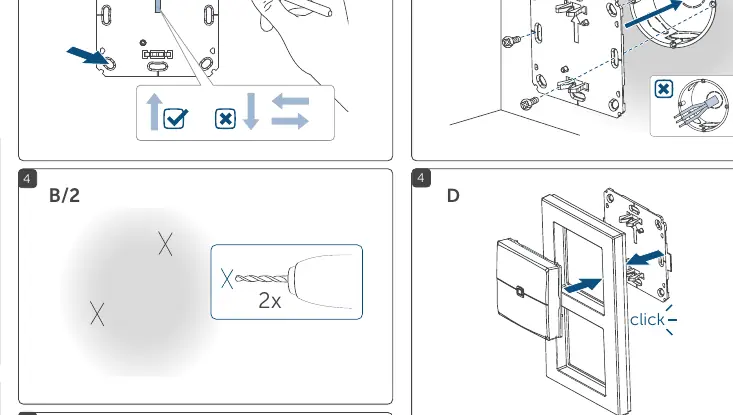
The device offers flexible mounting options:
- Adhesive mounting: Use the supplied clip-on frame and adhesive strips to attach the mounting plate to the desired surface.
- Screw mounting: Use the supplied clip-on frame and screws to secure the mounting plate.
- Flush-mounted box: The device can be mounted onto a flush-mounted box. Ensure there are no open conductor ends in the box.
- Multi-gang frames: The remote control can be integrated into existing switch frames from other manufacturers.
Important: When selecting the installation location, check for electrical wires and power supply cables. Installation on mains-connected boxes should only be performed by persons with relevant electro-technical knowledge.
Pairing and setup
To use the remote control, it must be connected to a Homematic IP Access Point or a Homematic IP Home Control Unit.
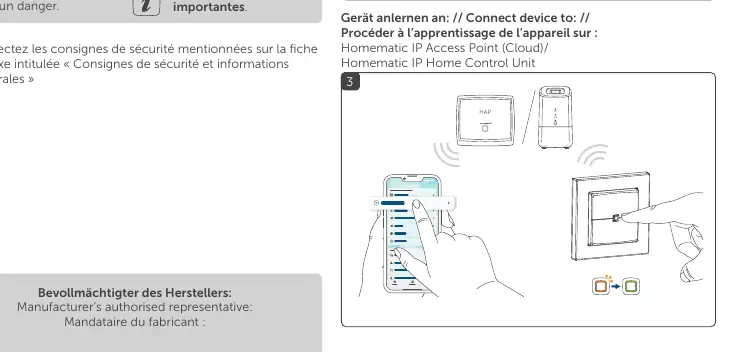
- Open the Homematic IP app on your smartphone.
- Select the option to add a new device.
- Press the system button (D) on the remote control to initiate pairing.
- Follow the instructions in the app to complete the setup.
Safety instructions
- Battery safety: Risk of explosion if batteries are replaced incorrectly. Use only the same or equivalent type. Do not recharge, burn, or short-circuit batteries.
- Electrical safety: If installing on a flush-mounted box, ensure the installation complies with safety regulations. Disconnect from mains and ensure the system is de-energized before working.
- Handling: If batteries are leaking or damaged, use protective gloves to avoid skin irritation.
Technical specifications
- Power supply: 2x 1.5V LR03/Micro/AAA
- Battery life: Approx. 4 years (typical)
- Radio frequency: 868.0-868.6 MHz / 869.4-869.65 MHz
- Range: Up to 200m (open area)
- Protection class: IP20
- Dimensions (with frame): 86 x 86 x 19 mm
Practical help
Common problems
Battery replacement issues
Use only the same or equivalent battery type. Do not recharge non-rechargeable batteries.
Installation on flush-mounted box
Ensure there are no open conductor ends in the box. If working on house installation, ensure the system is de-energized.
Before use
- Check for electrical wires and power supply cables before drilling.
- Ensure the flush-mounted box contains no open wires.
- Verify you have the correct battery type (2x 1.5V LR03/Micro/AAA).
- Ensure you have a Homematic IP Access Point or Control Unit for pairing.
Images and diagrams
- A/1 to A/4: Steps for adhesive mounting using the clip-on frame.
- B/1 to B/4: Steps for screw mounting, including use with flush-mounted boxes.
- 3: Pairing process using the Homematic IP app.
- 5: System setup via the Homematic IP app.
Model compatibility
- Compatible with Homematic IP Access Point and Homematic IP Home Control Unit.
- Can be integrated into existing switch frames from other manufacturers.

Manual page author
Emily Carter
User documentation editor
Prepares concise manual descriptions and highlights the most useful setup, operation, and maintenance information for readers.