Garden / Garden Tools
User Manual for Husqvarna WT 10MP Pressurized Water Tank
Quick guide for the Husqvarna WT 10MP pressurized water tank. Includes setup, operation, maintenance, troubleshooting, and safety instructions for dust suppression.
Table of contents
Manual images
Click an image to enlargeQuick guide from the manual
The Husqvarna WT 10MP is a pressurized water tank designed for dust suppression when using drills, concrete saws, and grinders. It uses a manual pump to create pressure. Warning: Do not use for drinking water or as an eyewash. Only use the built-in hand pump to pressurize the tank.
Assembly
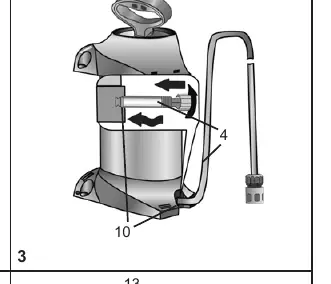
Push the hose [4] into the fixture [10] and secure it with the cap nut (Fig. 3).
Preparation
Before filling, ensure the device is in an upright position. If filling from a water line, ensure the hose does not project into the tank.

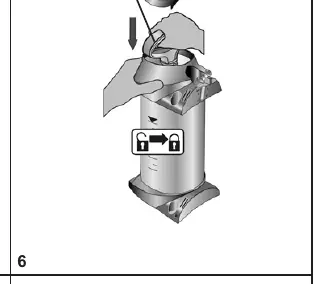
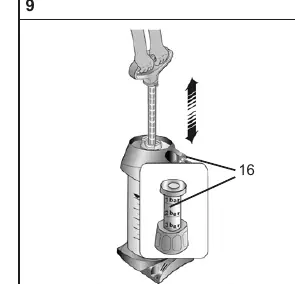
- Pull up the red piston pressure gauge [16] until the tank is depressurized (Fig. 5).
- Press the piston rod with handle [13] down and turn it counterclockwise to lock it (Fig. 6).
- Unscrew the pump [2] from the tank (Fig. 7).
- Add liquid to the tank [1] and check the level using the scale [35] (Fig. 8).
- Screw the pump [2] back into the tank (Fig. 9).
- Press the piston rod with handle [13] down and turn it clockwise to unlock it (Fig. 10).
- Pump to create the desired pressure (Fig. 11). Do not exceed 3 bar.
Operation
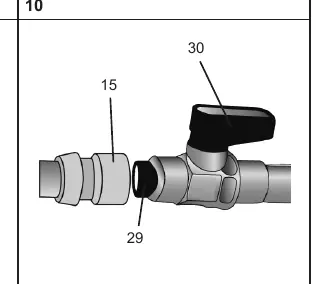
Connect the plug-in coupling [15] of the water tank to the plug-in nipple on your device [29] (Fig. 12). Activate the ball valve [30] to start the liquid supply. The flow can be regulated via the ball valve [30]. If pressure drops below 1 bar, pump again.
After Usage
Never leave liquid in the device. Disconnect the coupling [15] by pulling its outer ring (Fig. 12). Depressurize the tank by pulling up the red piston pressure gauge [16] (Fig. 5). Empty the tank and store the tank [1] and pump [2] separately in a dry, frost-free place protected from sunlight (Fig. 16).
Care and Maintenance
After 50 uses or at least once a year, dismantle the pump [2] to grease the O-ring [19] and diaphragm [20] (Fig. 18). Clean the discharge filter [34] under running water (Fig. 24).
Safety
Only trained personnel should operate the device. Do not use under the influence of alcohol, drugs, or medication. Keep away from children. Avoid ignition sources. Protect from frost and ammonia. Always observe the pressure gauge to ensure the maximum spraying pressure of 3 bar is not exceeded.
Manufacturer information
Husqvarna
Practical help
Common problems
No pressure builds up in the device
Ensure the pump is screwed on tightly. Check if the O-ring [19] or diaphragm [20] is faulty and replace if necessary.
Liquid flows out of the pump
The valve disc [23] may be dirty or defective. Clean or replace it.
No tank pressure indication or safety valve blows off too early
The piston pressure gauge [16] is likely defective. Replace it.
Before use
- Check tank [1], pump [2], hose [4], and piston pressure gauge [16] for damage.
- Pay special attention to connections between tank-hose and hose-coupling.
- Check the condition of the pump thread.
- Pump the empty device to 2 bar to check for leaks (pressure should not drop more than 0.5 bar in 30 minutes).
- Ensure the device is in an upright position.
Specs in practice
- Max. filling amount
- 10 liters
- Max. spraying pressure
- 3 bar
- Max. operating temperature
- 40 °C
- Weight when empty
- 2.8 kg
Images and diagrams
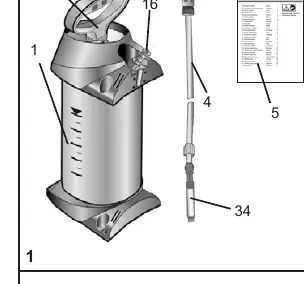
- Fig 1: Overview of components.
- Fig 3: Hose assembly.
- Fig 5: Depressurizing the tank.
- Fig 6: Locking/unlocking the pump handle.
- Fig 11: Pumping and pressure gauge operation.
Model compatibility
- Designed for supplying water to drills, concrete saws, and grinders for dust suppression.
- Do not use for storage of liquids, drinking water, or as an eyewash.

Manual page author
Michael Turner
Technical manual editor
Reviews PDF manuals for structure, safety notes, and practical product details so readers can find the right information quickly.