Smart Home / Smart Switches
Idinio 140301 2-Wire Universal Rotary Dimmer User Guide
Quick guide for the Idinio 140301 2-Wire Universal Rotary Dimmer. Includes installation wiring, Zigbee pairing, factory reset, and technical specifications.
Quick answers from the manual
Quick answer
- The Idinio 140301 is a Zigbee 3.0 2-wire universal rotary dimmer. It is installed by connecting the Live and Load wires and paired by pressing the reset button while the Zigbee hub is in pairing mode. p. 1
Key actions
- Pairing with Zigbee hub p. 1, 2
- Factory Reset p. 2
First start
- Switch off power, connect wires according to diagram, switch on power, and initiate pairing mode via the reset button. p. 1
Problems and fixes
Device not pairing
Reset the device by holding the reset button for 10 seconds and restart the pairing process.
p. 2Maintenance and reset
- Hold the reset button for 10 seconds to perform a factory reset. p. 2
Technical specifications
| Parameter | Value | Meaning | Pages |
|---|---|---|---|
| Voltage | 220-240V~ | Operating voltage | p. 1 |
| Load | 5-250W | Supported load range | p. 1 |
Where to find it in the PDF
- Installation and Pairing p. 1
- Reset and Troubleshooting p. 2
Table of contents
Quick guide from the manual
This document provides instructions for the Idinio 140301 2-Wire Universal Rotary Dimmer. It covers the electrical installation, Zigbee network pairing, and factory reset procedures. Ensure the power is switched off before starting any installation work.
Installation
The dimmer is designed for a 2-wire connection. Follow these steps for installation:
- Switch off the power supply at the main breaker.
- Connect the wires according to the wiring diagram provided in the manual. The dimmer requires a Live (L) connection and a connection to the Load.
- Ensure the dimmer is securely mounted in the wall box.
- Switch the power back on after installation is complete.
Zigbee Network Pairing
To connect the dimmer to a Zigbee network:
- Put your Zigbee hub into pairing mode.
- Press the reset button on the dimmer. The indicator light will start flashing, indicating it is in pairing mode.
- The indicator light will stop flashing once the device is successfully paired.
Factory Reset
If you need to reset the dimmer to factory settings:
- Press and hold the reset button for 10 seconds.
- The indicator light will flash, confirming the reset process.
Technical Specifications
- Voltage: 220-240V~ 50/60Hz
- Load Capacity: 5-250W (Incandescent/Halogen), 5-225W (LED @ PF0.9), 10-100W (LED leading/trailing edge)
- Protocol: Zigbee 3.0
Safety
This device is for indoor use only. Installation must be performed by a qualified electrician in accordance with local electrical regulations. Do not exceed the maximum load capacity specified.
Manufacturer information
Idinio
Practical help
Common problems
Dimmer not responding or pairing failed
Perform a factory reset by holding the reset button for 10 seconds and try pairing again.
Light flickering
Check if the load is within the specified wattage range (5-250W) and ensure the correct leading/trailing edge mode is selected.
Before use
- Switch off the main power supply.
- Verify the load is compatible (5-250W).
- Ensure a Zigbee hub is available for pairing.
- Check that the wiring matches the 2-wire diagram.
Images and diagrams
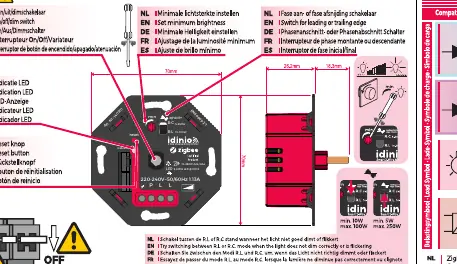
- The wiring diagram illustrates the connection of the Live (L) wire and the Load wire to the dimmer switch.
- The pairing diagram shows the interaction between the dimmer reset button and the Zigbee hub.
Model compatibility
- Compatible with Zigbee 3.0 hubs.
- Designed for 2-wire electrical systems.

Manual page author
David Miller
Documentation analyst
Organizes user manual content into clear summaries, with attention to model details, product context, and everyday usability.